运行起 dify 后,在控制台里可以看到登录调用的接口文件定义在这里:api\controllers\console\auth\login.py 现在想扩展新的接口,可以在当前目录下新建一个 register.py 文件,加入以下代码。
import os
import hashlib
import functools
import time
import logging
import secrets
import base64
from flask import make_response, request
from flask_restx import Resource
from pydantic import BaseModel, Field, field_validator, ValidationError
from sqlalchemy import select, update
from typing import Literal, Optional
from controllers.common.fields import SimpleResultOptionalDataResponse
from controllers.common.schema import (
register_response_schema_models,
register_schema_models,
)
from controllers.console import console_ns
from libs.helper import EmailStr
from libs.helper import timezone as validate_timezone_string
from libs.password import hash_password
from constants.languages import get_valid_language
from models import Account, Tenant, TenantAccountJoin
from extensions.ext_database import db
from services.errors.account import AccountRegisterError
from controllers.console.wraps import (
decrypt_password_field,
setup_required,
)
from sqlalchemy import func
from models import ApiToken
logger = logging.getLogger(__name__)
# 签名校验装饰器
def private_api_auth_required(f):
@functools.wraps(f)
def decorated(*args, **kwargs):
private_secret = os.environ.get("CONSOLE_PRIVATE_API_SECRET")
if not private_secret or len(private_secret) != 12:
return {"result": "fail", "message": "Private API service unavailable"}, 503
req_time = request.headers.get("X-API-TIME", "")
req_sign = request.headers.get("X-API-SIGN", "")
if not req_time or not req_sign:
return {"result": "fail", "message": "Missing required headers"}, 400
try:
timestamp = int(req_time)
if timestamp > 9999999999:
timestamp = timestamp // 1000
except (ValueError, TypeError):
return {"result": "fail", "message": "Invalid timestamp"}, 400
if abs(int(time.time()) - timestamp) > 300:
return {"result": "fail", "message": "Request expired"}, 401
calc_sign = (
hashlib.md5(f"{private_secret}{req_time}".encode()).hexdigest().lower()
)
if calc_sign != req_sign.lower():
return {"result": "fail", "message": "Invalid signature"}, 401
return f(*args, **kwargs)
return decorated
# 请求模型:字段改为 name,timezone 默认 Asia/Shanghai
class RegisterPayload(BaseModel):
email: EmailStr = Field(..., description="邮箱")
name: str = Field(..., min_length=1, max_length=50, description="用户名")
password: str = Field(..., description="明文密码")
language: str | None = Field(default=None, description="界面语言")
timezone: str = Field(
default="Asia/Shanghai", description="时区,默认 Asia/Shanghai"
)
@field_validator("timezone")
@classmethod
def validate_timezone(cls, value):
return validate_timezone_string(value) if value else "Asia/Shanghai"
# 获取用户详情
class UserInfoPayload(BaseModel):
account_id: str = Field(..., description="用户ID")
class GenerateApiTokenPayload(BaseModel):
account_id: str = Field(..., description="用户ID")
tenant_id: str = Field(..., description="租户ID")
# 限定只能是 dataset / app
type: Literal["dataset", "app"] = Field(
..., description="令牌类型,仅支持 dataset、app"
)
# 非必填,默认 None
app_id: Optional[str] = Field(None, description="应用ID,type 为 app 时必填")
@field_validator("app_id")
def check_app_id_required(cls, v, values):
# values.data 获取模型已解析的其他字段
token_type = values.data.get("type")
if token_type == "app" and not v:
raise ValueError("当令牌类型为 app 时,app_id 不能为空")
if token_type == "dataset" and v is not None:
raise ValueError("当令牌类型为 dataset 时,无需传入 app_id")
return v
register_schema_models(
console_ns,
RegisterPayload,
UserInfoPayload,
GenerateApiTokenPayload,
)
register_response_schema_models(console_ns, SimpleResultOptionalDataResponse)
def get_first_tenant():
stmt = select(Tenant).order_by(Tenant.created_at)
return db.session.scalar(stmt)
# 对齐 Dify 原生密码哈希逻辑
def create_password_hash(raw_pwd: str) -> tuple[str, str]:
salt = secrets.token_bytes(16)
hashed = hash_password(raw_pwd, salt)
return base64.b64encode(hashed).decode("utf-8"), base64.b64encode(salt).decode(
"utf-8"
)
@console_ns.route("/register")
class RegisterApi(Resource):
@setup_required
@private_api_auth_required
@console_ns.expect(console_ns.models[RegisterPayload.__name__])
@console_ns.response(
200, "Success", console_ns.models[SimpleResultOptionalDataResponse.__name__]
)
@decrypt_password_field
def post(self):
# 单独捕获参数校验异常
try:
args = RegisterPayload.model_validate(console_ns.payload)
except ValidationError as ve:
err_info = ve.errors()[0]
field = ".".join(map(str, err_info["loc"]))
msg = f"Parameter error: {field} - {err_info['msg']}"
return {"result": "fail", "message": msg}, 403
try:
email = args.email.strip().lower()
name = args.name.strip()
raw_pwd = args.password.strip()
lang = get_valid_language(args.language)
tz = args.timezone.strip()
# 邮箱去重
exist_stmt = select(Account).where(Account.email == email)
if db.session.scalar(exist_stmt):
raise AccountRegisterError("Email already exists")
# 生成密码
pwd_hash, pwd_salt = create_password_hash(raw_pwd)
# 新建账号(字段完全对齐数据库)
new_account = Account(
email=email,
name=name,
password=pwd_hash,
password_salt=pwd_salt,
interface_language=lang,
timezone=tz,
)
db.session.add(new_account)
db.session.flush()
# 租户处理
tenant = get_first_tenant()
if not tenant:
tenant = Tenant(name=f"{name}'s Workspace")
db.session.add(tenant)
db.session.flush()
is_first_tenant = get_first_tenant() is None
join_rel = TenantAccountJoin(
account_id=new_account.id,
tenant_id=tenant.id,
role="owner" if is_first_tenant else "admin",
current=True,
)
db.session.add(join_rel)
# 更新当前租户标记
update_all = (
update(TenantAccountJoin)
.where(TenantAccountJoin.account_id == new_account.id)
.values(current=False)
)
db.session.execute(update_all)
update_curr = (
update(TenantAccountJoin)
.where(
TenantAccountJoin.account_id == new_account.id,
TenantAccountJoin.tenant_id == tenant.id,
)
.values(current=True)
)
db.session.execute(update_curr)
# 统一提交,事务原子化
db.session.commit()
return make_response(
{
"result": "success",
"data": {
"account_id": str(new_account.id),
"email": new_account.email,
"name": new_account.name,
"tenant_id": str(tenant.id),
"tenant_name": tenant.name,
},
}
)
except Exception as e:
db.session.rollback()
logger.exception("Register failed, rollback transaction")
if isinstance(e, AccountRegisterError):
return {"result": "fail", "message": str(e)}, 400
return {"result": "fail", "message": "Register failed"}, 500
# ===================== 获取用户基本信息 =====================
@console_ns.route("/user/info")
class UserInfoApi(Resource):
@setup_required
@private_api_auth_required
def get(self):
try:
# 从 URL 查询参数取值,而非 payload
account_id = request.args.get("account_id", "").strip()
if not account_id:
return {"result": "fail", "message": "account_id is required"}, 403
args = UserInfoPayload(account_id=account_id)
except ValidationError as ve:
err_info = ve.errors()[0]
field = ".".join(map(str, err_info["loc"]))
msg = f"Parameter error: {field} - {err_info['msg']}"
return {"result": "fail", "message": msg}, 403
try:
account_id = args.account_id.strip()
# 1. 查询单条用户基础信息
user_stmt = select(
Account.id,
Account.email,
Account.name,
Account.status,
Account.timezone,
Account.interface_language,
Account.created_at,
).where(Account.id == account_id)
user_row = db.session.execute(user_stmt).first()
if not user_row:
return {"result": "success", "data": None, "message": "用户不存在"}
# 2. 查询该用户关联的租户信息
tenant_stmt = (
select(
TenantAccountJoin.account_id,
TenantAccountJoin.tenant_id,
TenantAccountJoin.role,
TenantAccountJoin.current,
Tenant.name.label("tenant_name"),
Tenant.created_at.label("tenant_created_at"),
)
.join(Tenant, TenantAccountJoin.tenant_id == Tenant.id)
.where(TenantAccountJoin.account_id == account_id)
)
tenant_row = db.session.execute(tenant_stmt).first()
# 查询用户的 api_tokens
api_token_stmt = select(
ApiToken.id,
ApiToken.tenant_id,
ApiToken.account_id,
ApiToken.type,
ApiToken.token,
ApiToken.app_id,
ApiToken.last_used_at,
).where(ApiToken.account_id == account_id)
api_token_rows = db.session.execute(api_token_stmt).all()
api_token_list = []
for row in api_token_rows:
api_token_list.append(
{
"id": str(row.id),
"tenant_id": str(row.tenant_id),
"account_id": str(row.account_id),
"type": row.type,
"token": row.token,
"app_id": row.app_id,
"last_used_at": (
row.last_used_at.isoformat() if row.last_used_at else None
),
}
)
# 3. 组装最终返回数据
user_data = {
"user_id": str(user_row.id),
"email": user_row.email,
"name": user_row.name,
"timezone": user_row.timezone,
"interface_language": user_row.interface_language,
"created_at": (
user_row.created_at.isoformat() if user_row.created_at else None
),
"tenant": tenant_row,
"api_token_list": api_token_list,
}
return {"result": "success", "data": user_data}
except Exception as e:
logger.exception("Get user list failed")
return {"result": "fail", "message": "Query failed"}, 500
# ===================== 创建 api key =====================
@console_ns.route("/generate/api_key")
class GenerateApiTokenApi(Resource):
@setup_required
@private_api_auth_required
@console_ns.expect(console_ns.models[GenerateApiTokenPayload.__name__])
def post(self):
try:
args = GenerateApiTokenPayload.model_validate(console_ns.payload)
except ValidationError as ve:
err_info = ve.errors()[0]
field = ".".join(map(str, err_info["loc"]))
msg = f"Parameter error: {field} - {err_info['msg']}"
return {"result": "fail", "message": msg}, 403
try:
account_id = args.account_id.strip()
tenant_id = args.tenant_id.strip()
type = args.type
app_id = args.app_id
# 一个租户最多可以创建 10 个 api tokens(todo 要破掉)
current_key_count = db.session.scalar(
select(func.count(ApiToken.id)).where(ApiToken.tenant_id == tenant_id)
)
if current_key_count >= 10:
logger.warning(
f"User {account_id} has reached maximum API key limit (10)"
)
return {"result": "fail", "message": "API key limit reached"}, 403
# 2. 生成API Key(和Dify原生生成规则完全一致)
token_prefix = "sk-" # Dify原生用户API Key前缀
key = ApiToken.generate_api_key(token_prefix, 24)
# 3. 创建并保存API Token
api_token = ApiToken()
api_token.tenant_id = tenant_id
api_token.account_id = account_id
api_token.type = type
api_token.token = key
if app_id:
api_token.app_id = app_id
db.session.add(api_token)
db.session.commit()
return {"result": "success", "data": {"token": key}}
except Exception as e:
logger.exception("Get user list failed")
return {"result": "fail", "message": "Query failed"}, 500
# ===================== 用户列表接口(含租户 + API Token) =====================
@console_ns.route("/user/list")
class UserListApi(Resource):
@setup_required
@private_api_auth_required
def get(self):
try:
# 解析分页参数
page = request.args.get("page", 1, type=int)
page_size = request.args.get("page_size", 20, type=int)
# 限制最大条数,防护大数据查询
page_size = min(page_size, 100)
offset = (page - 1) * page_size
# 1. 查询用户总数
total_stmt = select(func.count(Account.id))
total = db.session.scalar(total_stmt) or 0
# 2. 分页查询用户基础信息
user_stmt = (
select(
Account.id,
Account.email,
Account.name,
Account.timezone,
Account.interface_language,
Account.created_at,
)
.order_by(Account.created_at.desc())
.offset(offset)
.limit(page_size)
)
user_rows = db.session.execute(user_stmt).all()
user_id_list = [row.id for row in user_rows]
# 无用户直接返回空列表
if not user_id_list:
return {
"result": "success",
"data": {
"total": total,
"page": page,
"page_size": page_size,
"list": [],
},
}
# 3. 批量查询 用户-租户 关联信息(修复变量名笔误)
tenant_stmt = (
select(
TenantAccountJoin.account_id,
TenantAccountJoin.tenant_id,
TenantAccountJoin.role,
TenantAccountJoin.current,
Tenant.name.label("tenant_name"),
Tenant.created_at.label("tenant_created_at"),
)
.join(Tenant, TenantAccountJoin.tenant_id == Tenant.id)
.where(TenantAccountJoin.account_id.in_(user_id_list))
)
# 此处原代码写错:tenant_rows → tenant_stmt
tenant_rows = db.session.execute(tenant_stmt).all()
# 按用户ID分组租户数据
tenant_map = {}
for row in tenant_rows:
aid = row.account_id
if aid not in tenant_map:
tenant_map[aid] = []
tenant_map[aid].append(
{
"tenant_id": str(row.tenant_id),
"tenant_name": row.tenant_name,
"role": row.role,
"is_current": row.current,
"tenant_created_at": (
row.tenant_created_at.isoformat()
if row.tenant_created_at
else None
),
}
)
# 5. 组装最终返回数据
user_list = []
for user in user_rows:
user_id = user.id
user_list.append(
{
"user_id": str(user_id),
"email": user.email,
"name": user.name,
"timezone": user.timezone,
"interface_language": user.interface_language,
"created_at": (
user.created_at.isoformat() if user.created_at else None
),
"tenant_list": tenant_map.get(user_id, []),
# "api_token_list": token_map.get(user_id, []),
}
)
return {
"result": "success",
"data": {
"total": total,
"page": page,
"page_size": page_size,
"list": user_list,
},
}
except Exception as e:
logger.exception("Get user list failed")
return {"result": "fail", "message": "Query failed"}, 500
并且将该文件注册进去。修改 api/controllers/console/init.py, 添加 "register" 就好。
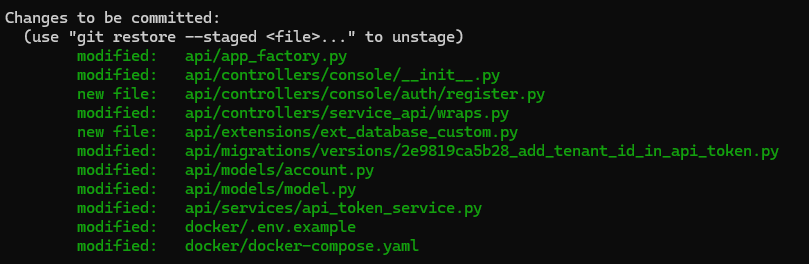
然后看看最近这几个功能修改涉及到的文件。
最后,如果有需要可以去打一个镜像。
docker compose build api