1月
22
The left-hand side of an assignment expression may not be an optional property access.t ts 中,这个报错通常是在给可能为空或undefined的对象赋值引起的。
使用可选链操作符 ?. 来给一个可能为 undefined 的对象赋值也会引起上边这个错误。如:
obj?.name = '123'
?.链式操作符仅用于读取属性或调用方法,而不能用于赋值。
解决方法
- 使用 if 判断
if (obj) {
    obj.name = '123'
}
-
使用逻辑与操作符 &&
obj && (obj.name = '123')
-
使用非空断言操作符
如果你确定对象不会是 undefined 或 null,可以使用非空断言操作符(!)
obj!.name = value
但这种方法比较危险,因为如果 obj 确实是 undefined 或 null,运行时会抛出错误
1月
10
前端 html 页面中,选择上传视频文件,获取视频文件的长度以及截取封面是个很常见的功能。前端 js 也能实现这个功能。
流程: file -> loadedmetadata(获取视频元信息)->currentTime(定格到视频的位置)->绘制到 canvas->转换成图片
-
通过 input(file) 选择文件。
https://developer.mozilla.org/zh-CN/docs/Web/HTML/Element/input/file
<div>
<label class="upload-btn" for="video">
    <span class="text">上传</span>
</label>
<input class="hidden" id="video" name="video" type="file" accept="video/mp4" @change="changeVideo" />
</div>
-
获取视频元信息。
https://developer.mozilla.org/zh-CN/docs/Web/HTML/Element/video
使用 createObjectURL 创建的URL是一个blob:开头的临时路径,这个路径可以在浏览器中直接访问,访问到的内容就是上传的视频文件。当页面关闭后,此路径也随之失效。
function changeVideo() {
    const fileInput: HTMLInputElement = document.getElementById('video') as HTMLInputElement
    const files: FileList = fileInput?.files as FileList
    const file = files[0]

    const video = document.createElement('video')
    video.src = URL.createObjectURL(file)
    video.addEventListener('loadedmetadata', function () {
        console.log(video.duration)
    })
}
-
定格到视频位置
// 设置视频自动播放
video.autoplay = true
// 设置视频播放的时间(方便截图)
video.currentTime = 1
-
绘制 canvas
const canvas = document.createElement("canvas");
canvas.width = video.videoWidth;
canvas.height = video.videoHeight;
const ctx = canvas.getContext("2d");
if (ctx) {
ctx.drawImage(video, 0, 0, canvas.width, canvas.height);
// document.body.appendChild(canvas);
}
-
将 canvas 转换成图片
canvas.toBlob((blob) => {
if (blob) {
const url = URL.createObjectURL(blob);
}
});
完整的 ts。
interface VideoInfo {
    name: string
    width: number
    height: number
    thumbnail?: string
    duration?: number
}

function getVideoInfo(file: File, maxWidth = 320) {
    return new Promise<VideoInfo>((resolve) => {
        const index = file.name.lastIndexOf('.')
        const name = index > 0 ? file.name.substring(0, index) : ''
        const videoMedia: VideoInfo = {
            name,
            width: 0,
            height: 0
        }

        const video = document.createElement('video')
        video.src = URL.createObjectURL(file)
        video.addEventListener('loadedmetadata', function () {
            videoMedia.width = video.videoWidth
            videoMedia.height = video.videoHeight
            videoMedia.duration = video.duration
        })

        // 监听视频跳转完成事件
        video.addEventListener('seeked', function () {
            // 创建画布并绘制视频帧
            const canvas = document.createElement('canvas')
            const ctx = canvas.getContext('2d')

            if (video.videoWidth > maxWidth) {
                canvas.width = maxWidth
                canvas.height = Math.round((maxWidth / video.videoWidth) * this.videoHeight)
            } else {
                canvas.width = video.videoWidth
                canvas.height = video.videoHeight
            }

            if (ctx) {
                ctx.drawImage(video, 0, 0, canvas.width, canvas.height)
                canvas.toBlob((blob) => {
                    if (blob) {
                        videoMedia.thumbnail = URL.createObjectURL(blob)
                        resolve(videoMedia)
                    } else {
                        resolve(videoMedia)
                    }
                })
            } else {
                resolve(videoMedia)
            }
            // 释放创建的临时URL
            // URL.revokeObjectURL(video.src)
        })

        // 设置视频自动播放
        video.autoplay = true
        // 设置视频播放的时间(方便截图)
        video.currentTime = 1
    })
}
12月
23
要实现前端 js 通过 url 给 unity webgl 传参,可以通过两步来实现。第一步是 unity 调用 js 脚本。第二步是将参数给到 url。
unity webgl 和 js 交互 https://docs.unity3d.com/cn/2018.4/Manual/webgl-interactingwithbrowserscripting.html
这个是从 Unity 5.6 开始,5.6 和以后的版本可以这样使用。
步骤
- unity 端在 Assets 文件夹中的 Plugins 文件夹下新建 default.jslib 文件,填入一下代码。
mergeInto(LibraryManager.library, {
  GetURLParam: function(key) {
    var params = new URLSearchParams(window.location.search)
    var returnStr = params.get(key)
    if (returnStr) {
      var bufferSize = lengthBytesUTF8(returnStr) + 1
      var buffer = _malloc(bufferSize)
      stringToUTF8(returnStr, buffer, bufferSize)
      return buffer
    }
    return null
  }
});
如果要返回字符串给 unity 用,必须要经过
      var bufferSize = lengthBytesUTF8(returnStr) + 1
      var buffer = _malloc(bufferSize)
      stringToUTF8(returnStr, buffer, bufferSize)
处理。
- unity 调用。
using UnityEngine;
using System.Runtime.InteropServices;
public class NewBehaviourScript : MonoBehaviour {
[DllImport("__Internal")]
private static extern string GetURLParam(string key);
void Start() {
    string step = GetURLParam("step");
    Debug.Log(step);
}
}
12月
15
这里使用 pnpm + vite 构建 官网:https://nuxt.com/docs/getting-started/installation
安装
pnpm dlx nuxi@latest init vini123

cd vini123

pnpm install

pnpm  dev -o
配置 typescript
https://nuxt.com/docs/guide/concepts/typescript
pnpm add -D vue-tsc typescript

npx nuxi typecheck
修改 nuxt.config.ts 配置。
export default defineNuxtConfig({
  typescript: {
    typeCheck: true,
    strict: true
  }
})
ui 框架
https://primevue.org/
https://daisyui.com/
11月
26
tauri 2 默认打出的安装包是英文的。配置下,就可以打出中文安装包。
操作
修改 src-tauri/tauri.conf.json 文件,在 bundle 节点下追加 windows 节点(默认是没有的),然后将 wix 的 language 设置为 zh-CN 即可。
  "bundle": {
    "active": true,
    "targets": "all",
    "icon": [
      "icons/icon.png",
      "icons/128x128.png",
      "icons/32x32.png",
      "icons/128x128.png",
      "icons/128x128@2x.png",
      "icons/icon.icns",
      "icons/icon.ico"
    ],
    "windows": {
      "allowDowngrades": true,
      "certificateThumbprint": null,
      "digestAlgorithm": null,
      "nsis": null,
      "signCommand": null,
      "timestampUrl": null,
      "tsp": false,
      "webviewInstallMode": {
        "silent": true,
        "type": "downloadBootstrapper"
      },
      "wix": {
        "language": "zh-CN"
      }
    }
  }
11月
26
自古以来,对于桌面应用,系统托盘是不可缺少的一部分。tauri 2 也是一样。
官网文档:https://v2.tauri.app/learn/system-tray/
参考博客:https://blog.csdn.net/xiaoyuanbaobao/article/details/143781484
对于 tarui 2,很多服务端的功能,前端也可以实现。它会提供一套 api,使得前端可以构建服务端的能力。当然,也可以在服务端去实现,然后用前端去调用。
简单记录一下
有上边的文档和博客,就可以完成基础的托盘创建。这里做以下简单的记录。
继续阅读
11月
26
- Error failed to bundle project:
https://github.com/wixtoolset/wix3/releases/download/wix3141rtm/wix314-binaries.zip: Connection Failed: Connect error: 由于连接方在一段时间后没有正确答复或连接的主机没有反 应,连接尝试失败。 (os error 10060)
执行 pnpm tauri build,然后就会遇到上边这个问题。不管你是否用了梯子,都会出现这个问题。的却是有点坑。既然上边提示下载 zip 失败,那就手动下载下来,然后解压放到对应的位置就可以。这里放在
C:\Users\{user}\AppData\Local\tauri 下,可以在终端中使用 cd ~/AppData/Local/tauri 即可达到。然后将文件夹重命名为 WixTools314 即可,这个很重要,一定要命名为 WixTools314 而不是 WixTools
- Error failed to bundle project: error running light.exe:
failed to run C:\Users\Windows\AppData\Local\tauri\WixTools314\light.exe
编辑 tauri.conf.json ,bundle 节点中新增以下配置。
    "windows": {
      "allowDowngrades": true,
      "certificateThumbprint": null,
      "digestAlgorithm": null,
      "nsis": null,
      "signCommand": null,
      "timestampUrl": null,
      "tsp": false,
      "webviewInstallMode": {
        "silent": true,
        "type": "downloadBootstrapper"
      },
      "wix": {
        "language": "zh-CN"
      }
    }
主要就是 wix 的 language 一定要设置成 zh-CN。这个是配置中,包名使用中文引起的。
参考
https://blog.csdn.net/qq_41614928/article/details/128145938
https://blog.csdn.net/weixin_44786530/article/details/143132166
11月
26
tauri 2 创建 webview。这里前端使用的 vue3。需要以下两步就可以。
- 配置权限和安全。
- 编写前端逻辑。
配置权限和安全
src-tauri/capabilities/default.json
增加以下配置。
{
   ……,
  "permissions": [
    "core:default",
    "shell:allow-open",
    {
      "identifier": "http:default",
      "allow": [
        {
          "url": "https://www.yuepaibao.com/"
        }
      ],
      "deny": [
        {
          "url": "https://private.tauri.app"
        }
      ]
    },
    "core:webview:allow-create-webview",
    "core:window:allow-show",
    "core:webview:allow-create-webview-window",
    "core:webview:allow-webview-close"
  ]
}
编写前端逻辑
src/App.vue
<script setup lang="ts">
  import { WebviewWindow } from "@tauri-apps/api/webviewWindow";

  const webview = new WebviewWindow("search", {
    center: true,
    width: 540,
    height: 960,
    alwaysOnTop: true,
    skipTaskbar: true,
    decorations: true,
    closable: true,
    url: "https://www.yuepaibao.com",
  });

  webview.once("tauri://created", function () {
    console.log("webview created");
  });
  webview.once("tauri://error", function (e) {
    console.log("error creating webview", e);
  });
</script>
如果想创建 webview 后,马上进入全屏。可以这样弄。
- 在权限配置那里,将设置全屏的权限配置进去。
- 在 webview 创建成功的回调里,设置全屏。
增加配置
"core:window:allow-set-fullscreen"
编写代码,修改和编辑
  import { Window } from "@tauri-apps/api/window";

  webview.once("tauri://created", async function () {
    console.log("webview created");
    const window = await Window.getByLabel("search");
    if (window) {
      window
        .setFullscreen(true)
        .then(() => {
          console.log("Window is now fullscreen");
        })
        .catch((error) => {
          console.error("Error setting fullscreen:", error);
        });
    }
  })
9月
17
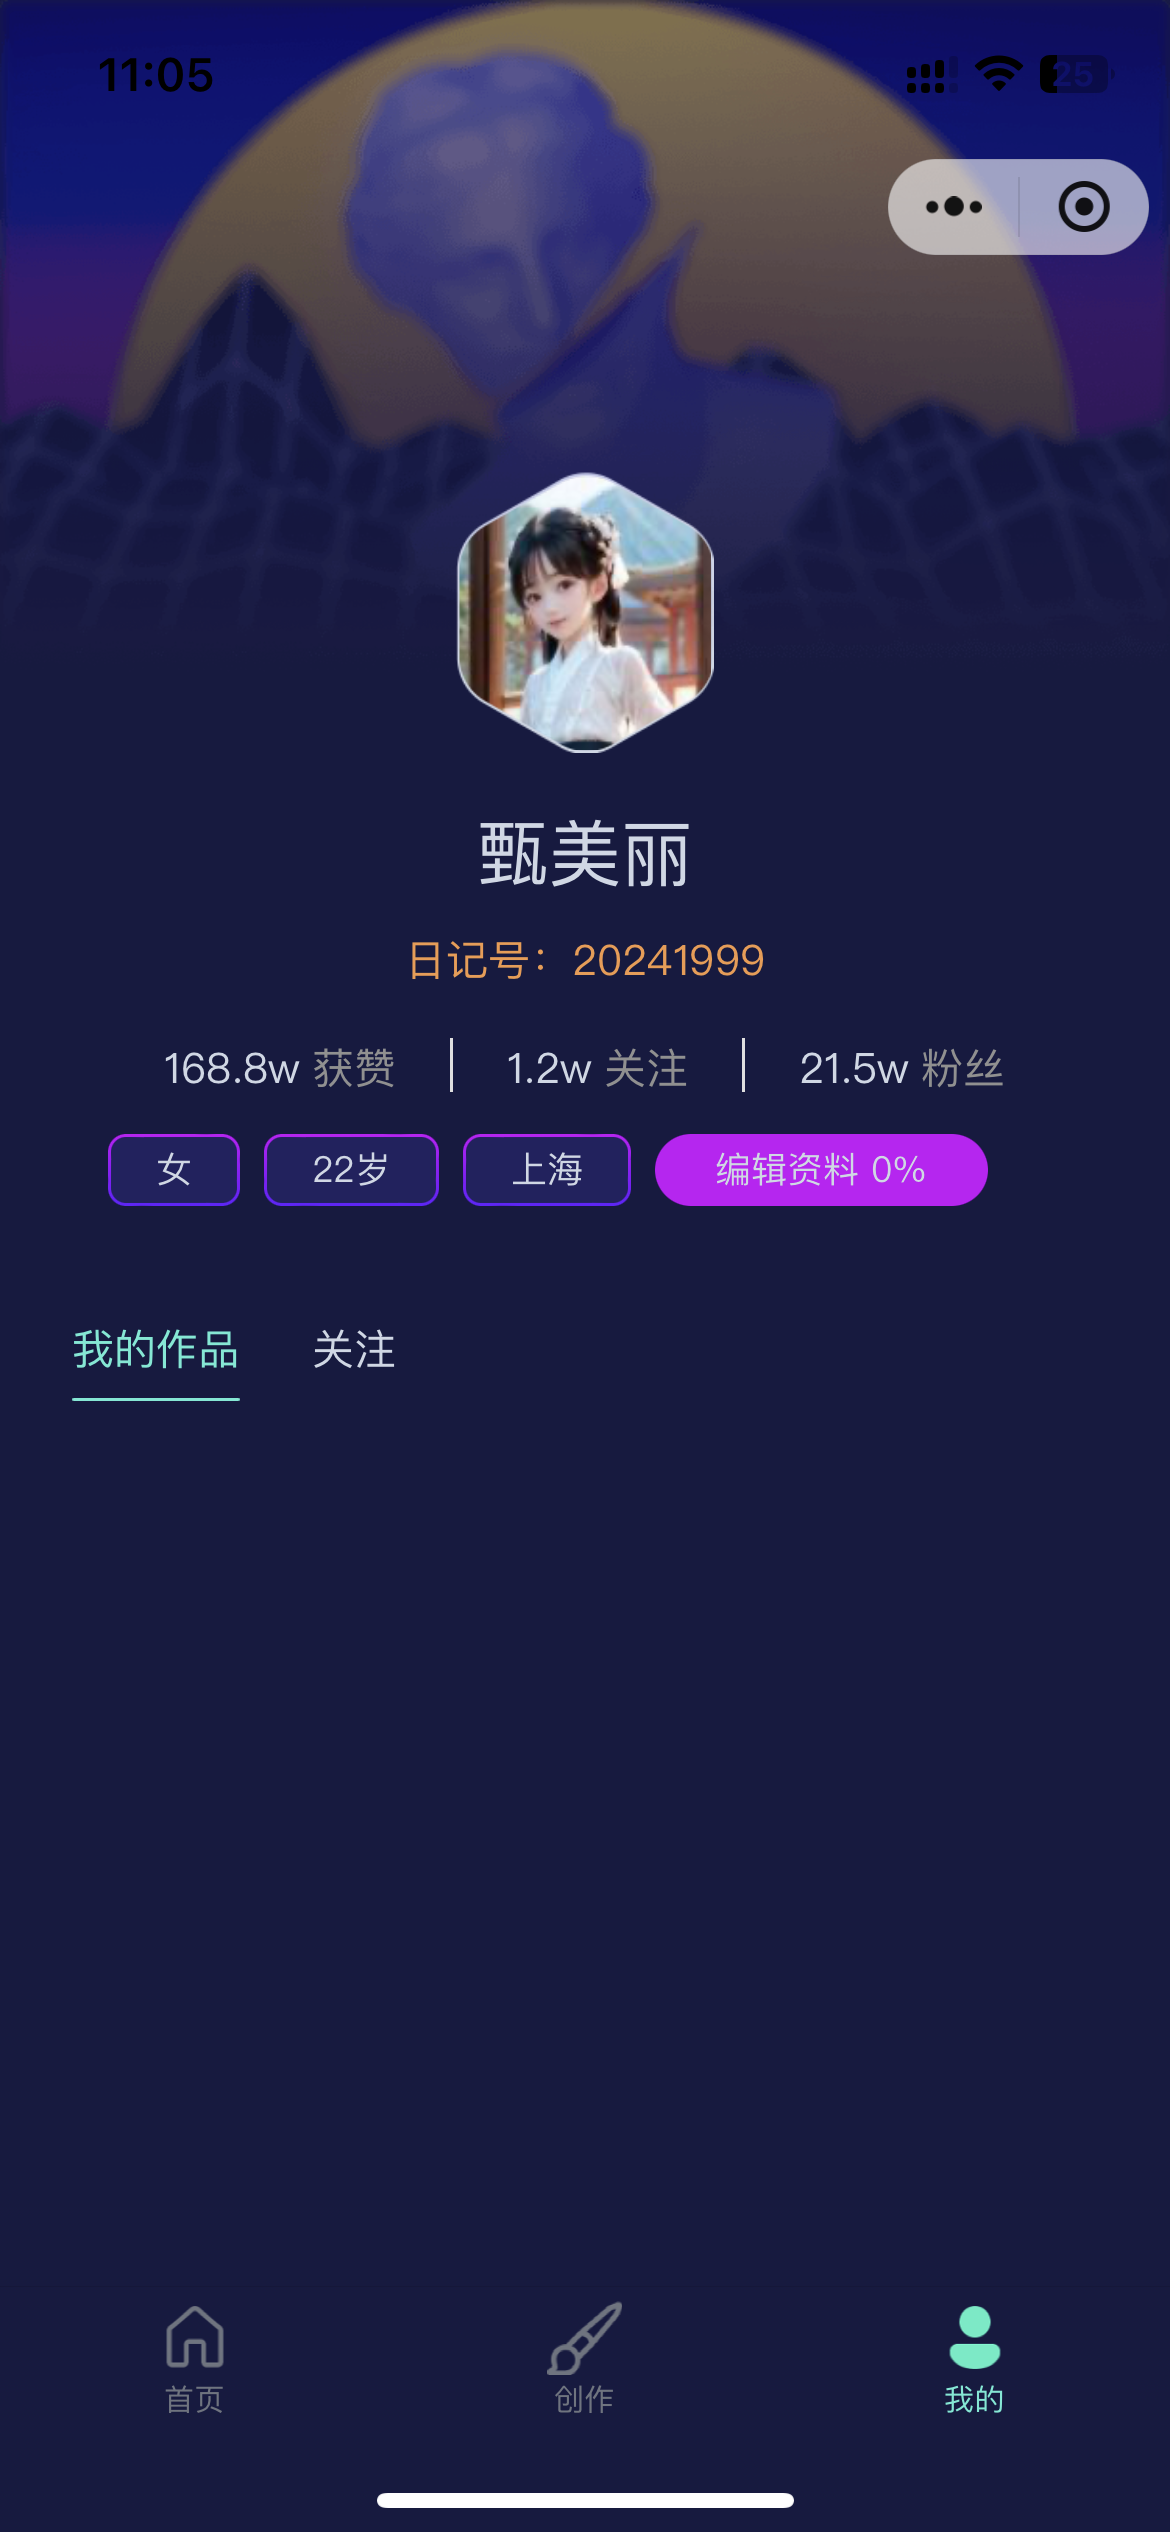
在某些场景中,css 的遮罩真的很好用。小程序也可以用。如其名,遮罩就是遮住的地方才能罩得住,才能显示出来。adobe 的 flash 和 ps 也是这样提现的。
https://developer.mozilla.org/zh-CN/docs/Web/CSS/mask-image
如下图,用户的头像是个六边形区域。如果用传统 css 实现六边形的裁切,很难实现这样好的效果。这个不仅有 border,边边交接处还有圆角,看起来更圆润。这个时候,遮罩就能很好的实现。只要用图中所示的区域的 png 图片作为遮罩来对目标图片进行遮罩处理就可以很好的实现。border 可以通过嵌套和内层 margin 来实现。
继续阅读