6月
15
dify 默认的数据库表,不一定是自己想要的。这个时候就需要取修改数据库表。修改数据库表最爽的方式就是用迁移文件。在 dify 原本的迁移目录下新增迁移文件会出现迁移版本错位的问题。比如你当前建立了一个迁移文件,过段时间拉 dify 官网代码合并后,迁移有改动,这个时候就会出现迁移版本对不上。为了解决这个问题,自定义个人迁移目录,新建迁移文件就很有必要了。
现在想给 api_tokens 表新增一个 account_id 字段。因为之前的 api_tokens 表只和 tenant 表进行关联,满足不了需求。
新建自定义迁移文件夹【该思路放弃】
修改 docker-compose.yaml 的 api 的配置。主要修改 volumes,因为默认是没有挂载目录,就会出现在容器中生成的文件在宿主机上没有。
api:
    volumes:
    - ../api:/app/api
    # 匿名卷:让 .venv 目录不被宿主机覆盖,保留镜像内的内容
    - /app/api/.venv
然后启动服务,开始干活。(从尝试到放弃)
# 启动 docker 服务
docker compose up -d

# 进入 api 容器
docker exec -it docker-api-1 bash

# 创建自定义迁移目录
flask db init --directory migrations_custom

# 查看官方迁移当前版本
flask db current

# 给自定义迁移库打基线(7bad07dc267d 是上一步查询出来的)
flask db stamp --directory migrations_custom 7bad07dc267d --purge
从尝试到放弃
想法是很美好,可是执行起来,各种问题就来了。所以,还是放弃自建迁移文件的想法了。既然迁移文件不好使,那就调用 sql 来达到实现修改字段的目的了。
在 api/extensions 目录下,新建 ext_database_custom.py 文件。代码入下。
# ext_database_custom.py
from sqlalchemy import text as sql_text
from extensions.ext_database import db
from dify_app import DifyApp

def init_custom_db_fields():
    """初始化自定义数据库字段/索引,启动自动执行"""
    try:
        with db.engine.connect() as conn:
            # 新增 account_id 字段
            conn.execute(
                sql_text(
                    "ALTER TABLE api_tokens ADD COLUMN IF NOT EXISTS account_id UUID;"
                )
            )
            # 新增联合索引
            conn.execute(
                sql_text(
                    "CREATE INDEX IF NOT EXISTS api_token_account_idx ON api_tokens(account_id, type);"
                )
            )
            conn.commit()
        print("[CustomDB] 自定义字段&索引初始化完成")
    except Exception as e:
        print(f"[CustomDB] 初始化异常: {str(e)}")

# 关键:实现 Dify 扩展标准接口 init_app
def init_app(app: DifyApp):
    # 这里要在 app 上下文里执行,否则 db 可能没绑定
    with app.app_context():
        init_custom_db_fields()
然后在 api/app_factory.py 的 initialize_extensions 函数中,引入注册插件。放在 ext_database 后边即可。
最后执行 docker compose restart 就可以了。
运行起来,查看数据库,会看到 在 api_tokens 表中已经有 account_id 字段了。
虽然数据库表里字段有了。但是模型这里也要加。
# api\models\model.py

class ApiToken(Base):
    account_id = mapped_column(StringUUID, nullable=True)
4月
22
3月
23
dify 官方仓库: https://github.com/langgenius/dify/
下载 dify 和建立 git 仓库
# 先 clone 最新版本,体积小,不容易出错
git clone --depth 1 https://github.com/langgenius/dify.git

# 更新完整历史
git fetch --unshallow

# 添加官方仓库为 upstream(用于同步更新)
git remote add upstream https://github.com/langgenius/dify.git

# 移除默认的 origin,添加自己的 git 仓库
git remote remove origin
git remote add origin git@github.com:xxxx/dify.git
建立自己的项目分支
假如你的项目叫 mimo
# 创建 mimo 分支。后期修改都在这个分支做。
git checkout -b mimo

# 将代码推送到远程服务器上
git push -u origin mimo
开发日常
# 切换到 mimo 分支
git checkout mimo

# 修改代码后,提交代码
git add .
git commit -m '修改 ui界面,替换 logo 等'

# 推送到服务端
git push
同步更新
# 切换到 main 分支
git checkout main

# 拉取官方最新的代码
git pull upstream main

# 推送更新后的 main 分支
git push origin main

# 切换到项目分支
git checkout mimo

# 合并 main 分支
git merge main
3月
18
当初想移动硬盘在 win 系统和 mac 系统,选择了 exFAT 文件系统。现在却出现了一个很烦的问题。在 mac 电脑上,没有安全退出(直接拔出或电脑关机重启)移动硬盘,下次再插入移动硬盘就识别不了。
用 mac 自己的修复工具也修复不了。只能去用 win 系统来修复。
但是,在 mac 下识别不了的移动硬盘,在 win 上却是可以直接识别的。但是,现在是要修复移动硬盘使得在 mac 上继续使用。
修复
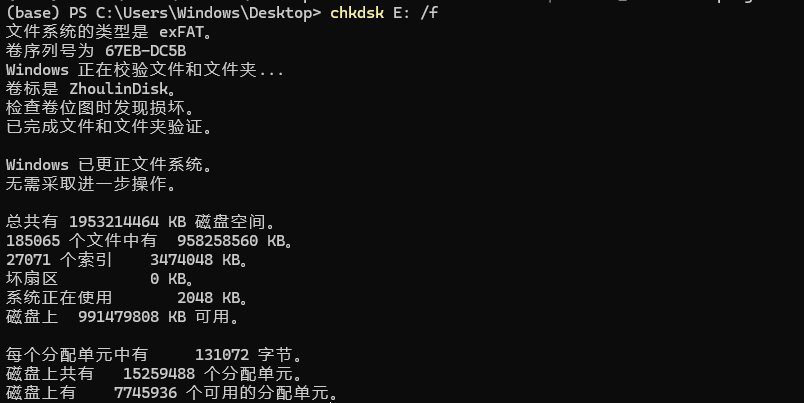
将移动硬盘插入到 win 系统上。执行下边命令开始修复。
# E 是移动硬盘插入到 win 系统显示的盘符。 /f 是修复的意思,不加参数就是只检查
chkdsk E: /f
等待修复完成就好。这个修复时间不确定,快的几分钟,慢的话几个小时。固态硬盘貌似会快一些。
退出移动硬盘
虽然修复完成了,却发现移动硬盘不能安全退出,就是右键没有安全退出还有在设备那里也没有。找了好几个方法都不太行。最后还是使用命令行解决的问题。
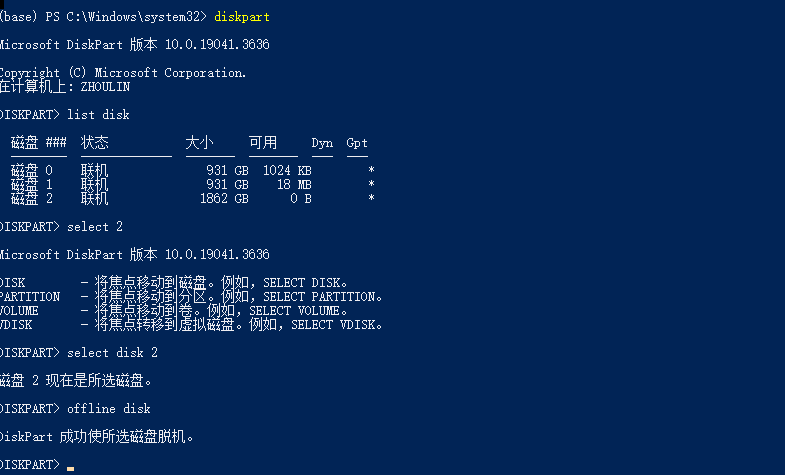
使用 win的磁盘管理命令工具。
使用管理员身份打开终端。
# 进入磁盘管理
diskpart

# 显示磁盘列表
list disk

# 选择磁盘(这个时候不再是盘符 C、D、E这些了,而是 0,1,2)
select disk 3

# 磁盘脱机
offline disk
这样就好了,在磁盘列表里也不见移动硬盘了。然后直接拔出,插入到 mac 电脑上,又可以继续识别和读写了。
1月
30
“Skills”(技能)是当前 AI 编程和智能体(Agent)生态中一个核心机制,它的目标是:让大模型从“通用聊天机器人”变成“具备特定领域专业能力的数字员工”。
一、Skills 是干什么的?
核心作用:
把人类的“领域经验”打包成可复用、可调用的标准化流程(SOP),交给 AI 执行。
- 比如:你有一套写爆款公众号文章的方法论(选题→查数据→列大纲→润色→配图),你可以把它做成一个 Skill。
- 当你下次说“帮我写一篇关于AI编程的爆款文”,AI 就会自动调用这个 Skill,按你的 SOP 执行。
技术本质:
- Skills 是一种 结构化的提示工程 + 脚本执行 + 资源绑定 的组合。
- 典型结构包括:
- SKILL.md:描述技能名称、用途、触发条件、执行步骤(SOP)
- **scripts/"":Python/Bash 等可执行脚本
- refs/ 或 references/:参考资料、模板、示例
二、Skills 解决了什么问题?
| 问题 |
Skills 如何解决 |
| 大模型“泛而不精” |
通过绑定领域 SOP,让它在特定任务上表现专业 |
| 提示词不稳定、效果差 |
把最佳实践固化为代码+文档,确保一致性 |
| 重复劳动无法自动化 |
一次创建,多次调用,甚至可共享、可变现 |
| Token 浪费严重 |
采用“渐进式加载”:只在需要时注入详细指令 |
| 幻觉率高 |
通过脚本在沙盒中执行复杂逻辑,结果更可靠 |
💡 简单说:Skills = 把你的“工作经验”变成 AI 能执行的“入职培训手册”。
三、怎么入门 Skills?
三种主流入门方式(以 Claude / Coze / Antigravity 等平台为例):
✅ 方式1:用自然语言让 AI 帮你创建(推荐新手)
- 在支持 Skills 的平台(如 Coze 2.0、Claude with skill-creator)中:
- 输入:“帮我创建一个技能,能自动生成小红书爆款文案”
- AI 会引导你定义输入、输出、步骤,并自动生成完整技能包
- 支持一键测试、部署、上架
✅ 方式2:手动编写 SKILL.md(适合开发者)
安装到指定目录(见下文)
✅ 方式3:下载现成的 Skills 使用
- 推荐资源站:
- skills.directory(超6万个开源 Skills)
- GitHub 搜索 awesome-claude-skills 或 antigravity-skills
- Coze / 通义万相 / Cosmic 的官方技能商店
四、怎么安装 Skills?
不同工具安装路径不同,但逻辑一致:
🔧 通用规则:
Skills 分两类作用域:
项目级(Project-level):只在当前项目生效→ 放在项目根目录下的 .skills/ 或 skills/ 文件夹
全局级(Global):所有项目可用→ 放在用户主目录或工具指定的全局目录,如:
- Antigravity:~/.antigravity/skills/
- Cosmic:~/.cosmic/skills/
- Cloud-based 工具(如 Coze):直接在 Web 界面“安装”即可,无需本地操作
📦 安装步骤(以 Antigravity 为例):
- 升级到 v1.14+
- 在项目中新建 skills/ 目录
- 下载技能(如 ui-ux-pro)放入该目录
- 确保包含 SKILL.md
- 在对话中提及任务(如“设计一个商品列表页”),AI 自动匹配并调用
⚠️ 注意:部分工具(如早期 Antigravity)不支持直接读取 Cloud 目录的技能,需手动拷贝;而 Coze、Cosmic 2.4+、通义万相等已支持云端技能直连。
五、目前有哪些热门 Skills?
以下是 2026 年初最火的几类 Skills:
| 类别 |
热门技能示例 |
功能 |
| 内容创作 |
花叔写作技能、爆款选题分析器 |
自动生成选题、大纲、润色、多平台适配 |
| UI/UX 设计 |
UI UX ProMax、Tailwind Generator |
输入文字 → 输出精美网页代码 |
| 数据分析 |
超级分析师(含12种分析框架) |
用第一性原理、SWOT 等方法论分析问题 |
| 自媒体运营 |
公众号自动采集+热度分析 |
抓取100+公众号,生成Top10选题报告 |
| 办公自动化 |
PPT 生成器(16:9 + 3:4 双比例) |
文案 → 多页PPT图片/PDF |
| 开发辅助 |
Code Reviewer、API Tester |
自动审查代码、生成测试用例 |
文章来源
https://cloud.tencent.com/developer/article/2625392?policyId=1003
相关
https://github.com/antfu/skills
https://mp.weixin.qq.com/s?__biz=MzIyMzA5NjEyMA==&mid=2647679068&idx=1&sn=6b3ae5770982ec685d57fe8a006e6317
1月
07
生成
假如 app 的名字叫抖音,拼音就是 douyin。然后使用下边命令生成。
keytool -genkey -alias douyin -keyalg RSA -keysize 2048 -validity 36500 -keystore douyin.dev.keystore
输出密码,组织信息,城市,地区这些,回车生成。比如。
douyin2026
姓氏: douyin
组织: douyin
单位: douyin
城市: shanghai
地区:  shanghai
地区代码: cn
查看证书
keytool -list -v -alias douyin -keystore douyin.dev.keystore
win 系统,如果出现错误:
keytool 错误: java.util.IllegalFormatConversionException: d != java.lang.String
java.util.IllegalFormatConversionException: d != java.lang.String
请用下边的命令。
cmd /c "set JAVA_TOOL_OPTIONS=-Duser.language=en & keytool -list -v -alias douyin -keystore douyin.dev.keystore"
输入密码后,就可以看到内容了。但是,这个命令只能看到 sha1 和 sha256 的值。如果想看 md5 值,还得生成 cer 证书,在证书中查看。因为腾讯开放平台添加 android app 的时候,需要用到签名,这个签名就是 md5值去掉 : 的字符串,长度是 32。
导出 cer 并查看 cer
cmd /c "set JAVA_TOOL_OPTIONS=-Duser.language=en & keytool -exportcert -alias douyin -keystore douyin.dev.keystore -file cert.cer"

openssl x509 -inform DER -in cert.cer -fingerprint -md5
这里就可以看到 md5 值。
相关链接
https://ask.dcloud.net.cn/article/35777
https://developers.weixin.qq.com/doc/oplatform/Mobile_App/Downloads/Android_Resource.html
https://developers.weixin.qq.com/miniprogram/dev/platform-capabilities/miniapp/handbook/build/android-cert.html
12月
24
示例:
linux 、macOs
curl -o /dev/null -s \
-w "\n\
DNS 解析:       %{time_namelookup} s\n\
TCP 握手:       %{time_connect} s\n\
TLS 握手:       %{time_appconnect} s\n\
首字节 TTFB:    %{time_starttransfer} s\n\
总耗时:         %{time_total} s\n\
下载大小:       %{size_download} bytes\n\
HTTP 状态:      %{http_code}\n" \
https://xxx.xxx/xxx.js
win :
curl.exe -o nul -s \
-w "\n\
DNS 解析:       %{time_namelookup} s\n\
TCP 握手:       %{time_connect} s\n\
TLS 握手:       %{time_appconnect} s\n\
首字节 TTFB:    %{time_starttransfer} s\n\
总耗时:         %{time_total} s\n\
下载大小:       %{size_download} bytes\n\
HTTP 状态:      %{http_code}\n" \
https://xxx.xxx/xxx.js
-s 静默模式,屏蔽进度条和错误信息,只输出 -w 的内容。
输出结果示例如下:
DNS 解析:       0.029579 s
TCP 握手:       0.033574 s
TLS 握手:       0.044148 s
首字节 TTFB:    0.052129 s
总耗时:         0.491568 s
下载大小:       2159257 bytes
HTTP 状态:      200
11月
12
好几年前,ssl 免费证书有效期为 3 个月。搞一个能生成证书的环境就比较方便。
构建带 certbot 的 nginx 镜像
- 准备 Dockerfile 文件。
FROM nginx:1.29.3

# 安装 certbot https://certbot.eff.org/instructions?ws=nginx&os=snap
# 也可以在 nginx 之外使用 certbot 镜像 https://hub.docker.com/r/certbot/certbot
RUN apt-get update && \
    apt-get install -y python3-venv && \
    python3 -m venv /opt/certbot && \
    /opt/certbot/bin/pip install certbot certbot-nginx && \
    ln -s /opt/certbot/bin/certbot /usr/local/bin/certbot && \
    apt-get clean && \
    rm -rf /var/lib/apt/lists/*
-
打包镜像
docker build -t xr-nginx:1.29.3 .
-
运行镜像,生成容器服务。然后打开浏览器,输入 http://localhost 查看情况。
docker run --rm -it -p 80:80 --name xr-nginx xr-nginx:1.29.3

# 查看日志
docker run --rm -it -p 80:80 xr-nginx:1.29.3

# 进入容器
received
然后镜既有 nginx 的功能,还能生成证书。
生成证书
- 生成证书需要域名解析指向服务器。
- 需要挂载好证书存储位置,防止 docker 关闭启动后 丢失证书。( ./conf/nginx/letsencrypt:/etc/letsencrypt)
# 容器外运行
docker exec -i xr-nginx sh -c "certbot -d xxx.com"

# 进入容器运行
docker exec -it xr-nginx bash
certbot -d xxx.com
其他
https://blog.vini123.com/1299
https://blog.vini123.com/1293