MCP(模型上下文协议)是一个使大型语言模型(LLMs,如 Claude)能够与外部工具和数据源交互的协议。使用 MCP,您可以:
- 构建为 LLMs 提供工具和数据的服务器
- 将这些服务器连接到兼容 MCP 的客户端
- 通过自定义功能扩展 LLM 的能力
下载好 dify 源码后,就可以使用 docker 开始运行 dify。
cd docker

cp .env.example .env

docker compose up -d
等待拉取镜像,构建服务,初始化。
如果宿主机的80,443 端口已经被使用了。请在 .env 中修改 dify 的本地映射端口为其他端口。比如:
EXPOSE_NGINX_PORT=8080
EXPOSE_NGINX_SSL_PORT=8443
这个时候,如果宿主机的 nginx 想访问 dify 的服务,可以用宿主机的 ip + dify 本地映射端口来访问。
通过 hostname -I 可以查看宿主机的 ip,第一个就是的。下边给一个 nginx 的示例。
# 映射 WebSocket 升级头
map $http_upgrade $connection_upgrade {
    default upgrade;
    '' close;
}

server {
    listen       80;
    server_name  xxx.yuepaibao.com;

    return 301 https://$host$request_uri;
}

server {
    listen       443 ssl;
    server_name  xxx.yuepaibao.com;

    charset utf-8;
    index  index.php index.html index.htm;

    ssl_certificate /etc/letsencrypt/live/xxx.yuepaibao.com/fullchain.pem; # managed by Certbot
    ssl_certificate_key /etc/letsencrypt/live/xxx.yuepaibao.com/privkey.pem; # managed by Certbot
    ssl_dhparam /etc/letsencrypt/ssl-dhparams.pem; # managed by Certbot
    ssl_session_timeout 5m;
    ssl_ciphers ECDHE-RSA-AES128-GCM-SHA256:ECDHE:ECDH:AES:HIGH:!NULL:!aNULL:!MD5:!ADH:!RC4;
    ssl_protocols TLSv1.1 TLSv1.2 TLSv1.3;
    ssl_prefer_server_ciphers on;
    add_header Strict-Transport-Security "max-age=31536000; includeSubDomains" always;
    add_header X-XSS-Protection "1; mode=block";
    add_header X-Frame-Options SAMEORIGIN always;
    add_header X-Content-Type-Options nosniff always;

    add_header X-Frame-Options "ALLOW-FROM https://www.yuepaibao.com";
    add_header Content-Security-Policy "frame-ancestors https://www.yuepaibao.com";

    location / {
    proxy_pass http://172.17.0.1:8080;
        proxy_set_header Host $host;
        proxy_set_header X-Real-IP $remote_addr;
        proxy_set_header X-Forwarded-For $proxy_add_x_forwarded_for;
        proxy_set_header X-Forwarded-Proto $scheme;
        proxy_set_header X-Forwarded-Host $server_name;

        # WebSocket 支持(Dify 实时聊天必需)
        proxy_http_version 1.1;
        proxy_set_header Upgrade $http_upgrade;
        proxy_set_header Connection $connection_upgrade;

        # 超时配置:适配长连接
        proxy_read_timeout 3600s;
        proxy_send_timeout 3600s;
        proxy_connect_timeout 60s;
    }

    # API 路径:增大文件上传限制
    location /api {
        proxy_pass http://172.17.0.1:8080;
        proxy_set_header Host $host;
        proxy_set_header X-Real-IP $remote_addr;
        proxy_set_header X-Forwarded-For $proxy_add_x_forwarded_for;
        proxy_set_header X-Forwarded-Proto $scheme;
        client_max_body_size 100M;
    }

    location /xxabcxxx.txt {
        return 200 "33b454d18da17ebb845c9e046e2c4956";
    }

    error_page   500 502 503 504  /50x.html;
    location = /50x.html {
        root   /usr/share/nginx/html;
    }

    access_log  /var/log/nginx/xxx.yuepaibao.com.log  main;
    error_log  /var/log/nginx/xxx.yuepaibao.com.error.log  warn;
}
使用 docker compose ps -a 可以查看服务的情况。其中 docker-init_permissions-1 只是在启动的时候调用一下,然后就退出了。
运行起来后,输入 http://localhost/ 会进入安装配置管理员界面。设置好邮箱,账号和密码确定好就可以。
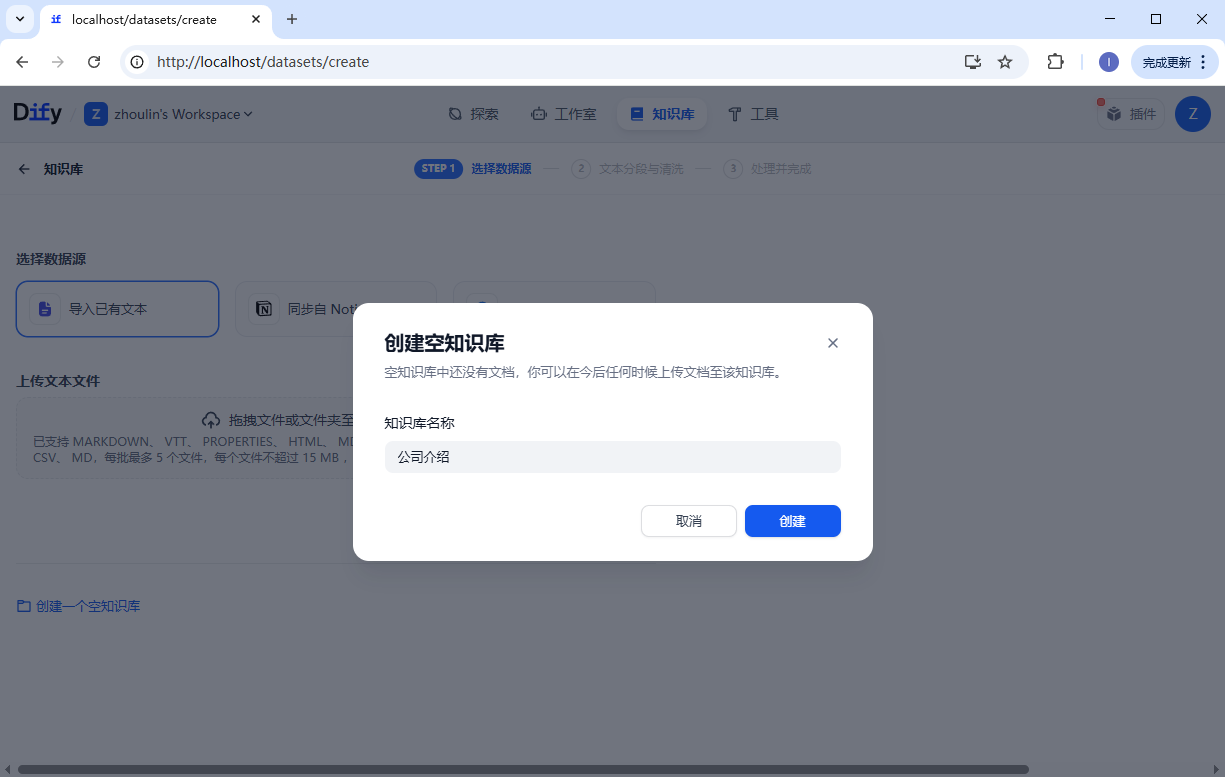
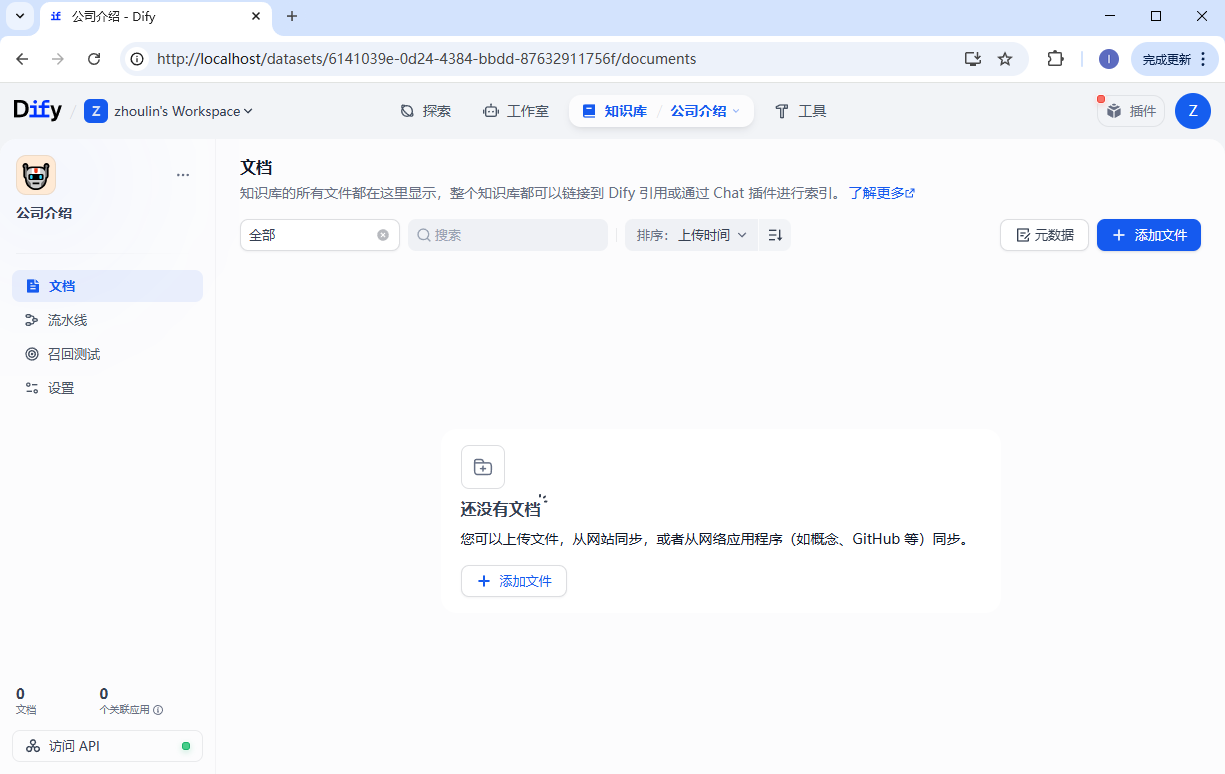
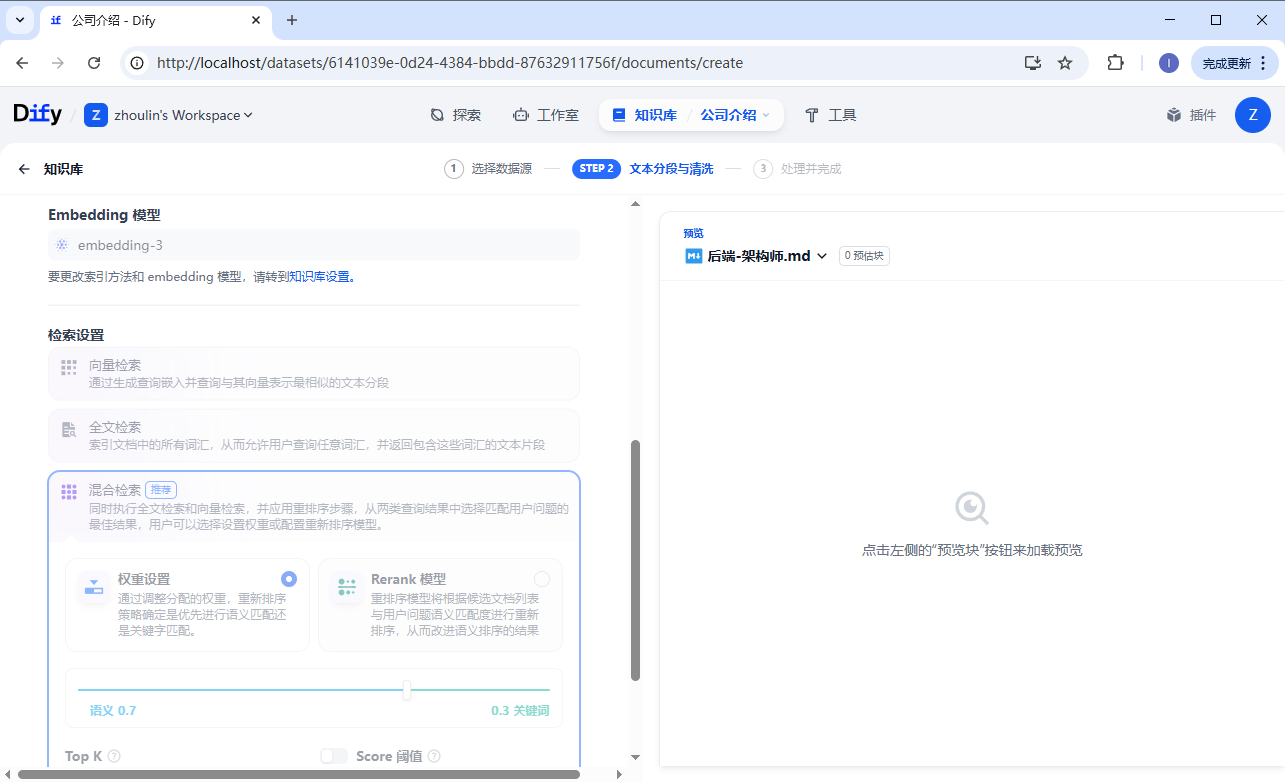
然后开始配置知识库。
Dify 里的知识库检索必须用 Embedding 模型,作用是:把文字变成向量 → 让系统能计算相似度 → 实现文档检索、问答匹配。
知识库 embedding 模型选择,可以选择使用云端,也可以使用本地的。都是以插件的方式进行安装,配置和使用。
1 选择云端。
| 模型 | 优点 | 缺点 |
|---|---|---|
| OpenAI text-embedding-3-small | 效果顶级、稳定、Dify 原生支持 | 需要付费 API Key |
| 阿里通义 Embedding | 国内速度快、便宜 | 需要阿里云账号 |
| 百度千帆 Embedding | 国内稳定、免费额度高 | 需要百度智能云 |
| 智谱 GLM Embedding | 中文效果好 | 需要 API Key |
先配置云端插件。

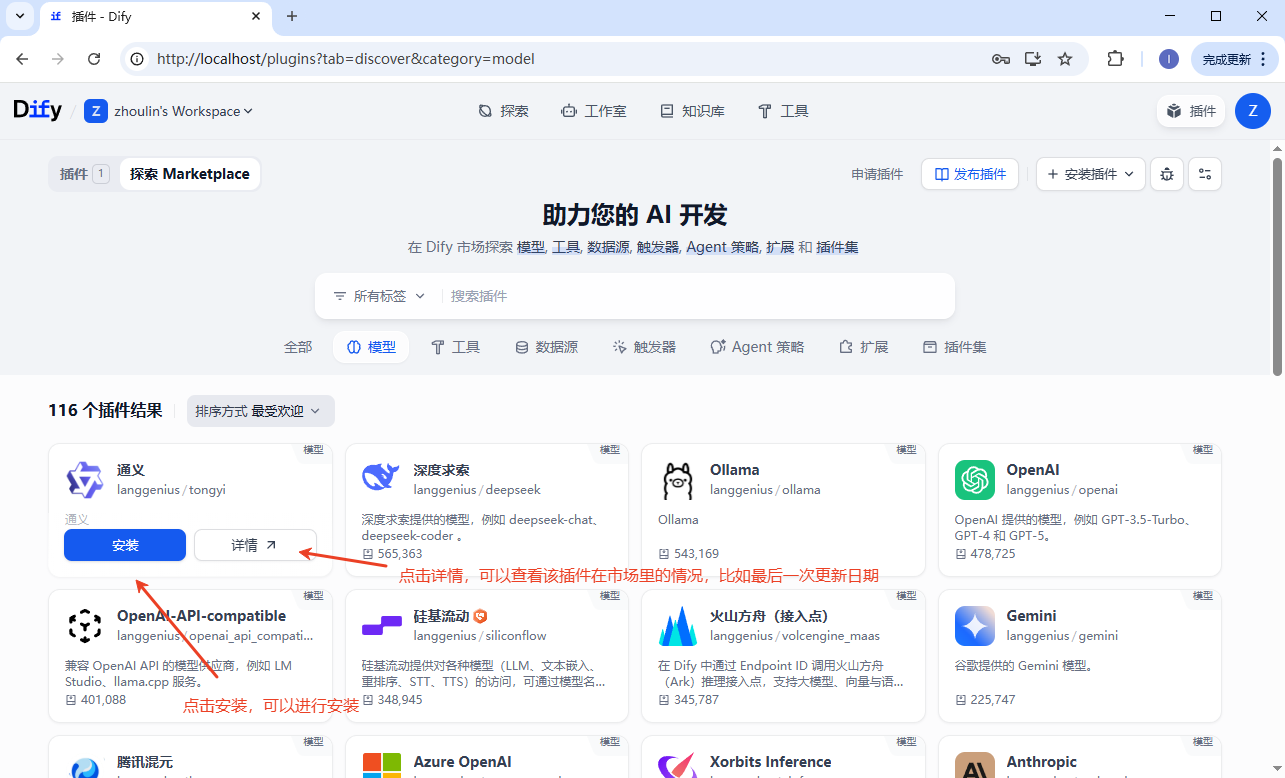
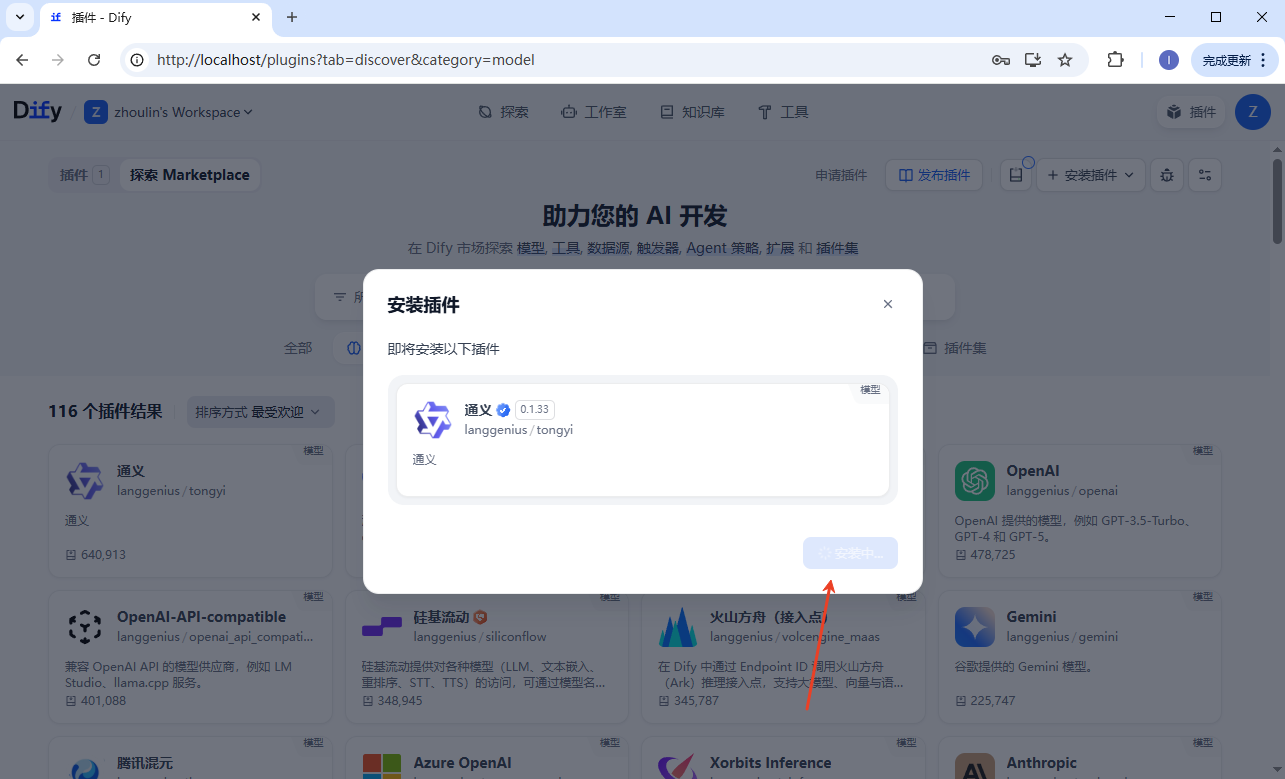
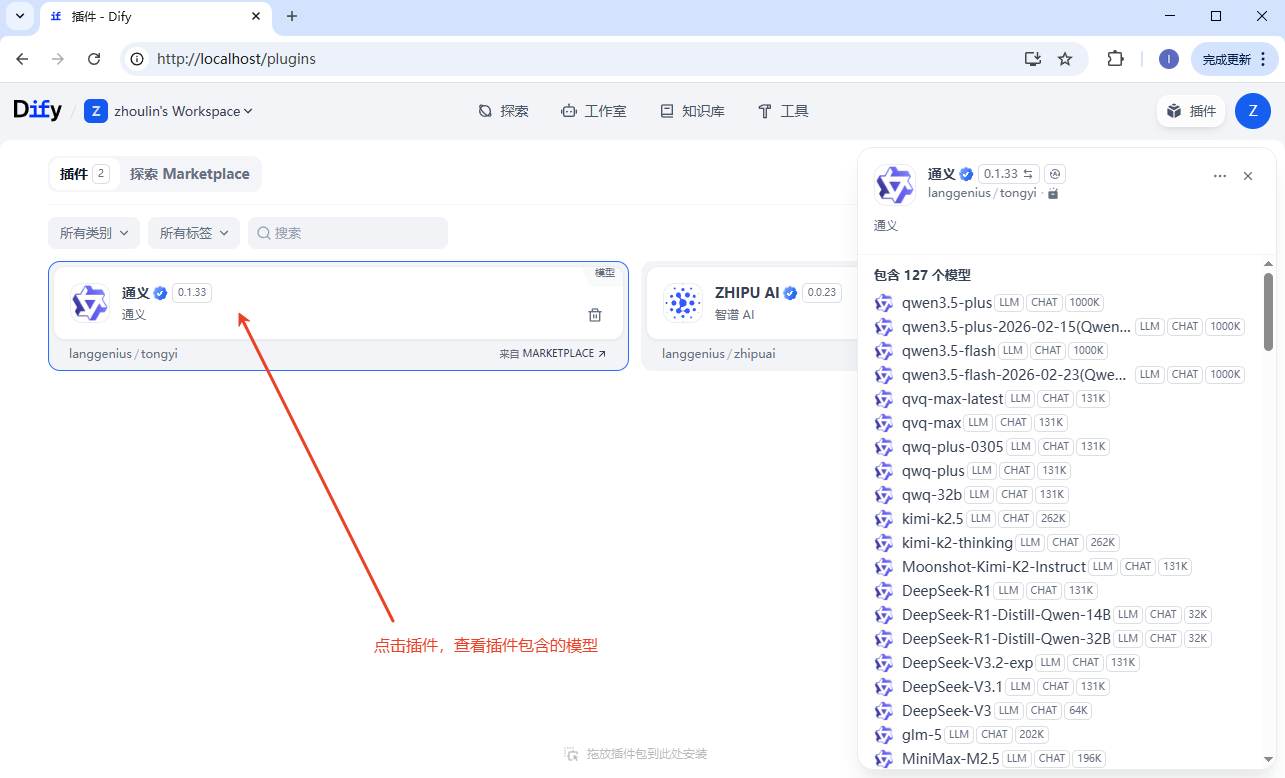
插件已经下载安装,还需要配置。去对应的官网获取 apikey 信息,配置进去。
然后添加知识库文件,配置 embedding 模型,继续下去。
https://blog.csdn.net/weixin_28931449/article/details/156266015
dify 官方仓库: https://github.com/langgenius/dify/
# 先 clone 最新版本,体积小,不容易出错
git clone --depth 1 https://github.com/langgenius/dify.git

# 更新完整历史
git fetch --unshallow

# 添加官方仓库为 upstream(用于同步更新)
git remote add upstream https://github.com/langgenius/dify.git

# 移除默认的 origin,添加自己的 git 仓库
git remote remove origin
git remote add origin git@github.com:xxxx/dify.git假如你的项目叫 mimo
# 创建 mimo 分支。后期修改都在这个分支做。
git checkout -b mimo

# 将代码推送到远程服务器上
git push -u origin mimo# 切换到 mimo 分支
git checkout mimo
# 修改代码后,提交代码
git add .
git commit -m '修改 ui界面,替换 logo 等'
# 推送到服务端
git push# 切换到 main 分支
git checkout main
# 拉取官方最新的代码
git pull upstream main
# 推送更新后的 main 分支
git push origin main
# 切换到项目分支
git checkout mimo
# 合并 main 分支
git merge main人脸录入,人脸识别
使用 sdk 开发。这里如果是 laravel,请优先安装指定产品的 sdk。
# https://packagist.org/packages/tencentcloud/tencentcloud-sdk-php
# https://github.com/TencentCloud/tencentcloud-sdk-php
# 具体产品名查看 https://github.com/TencentCloud/tencentcloud-sdk-php/blob/HEAD/products.md
# 人脸录入,识别
composer require tencentcloud/iai官方地址:https://github.com/TMElyralab/MuseV
在这里,可以看到生成的样例。这里总结下部署和安装,几乎和官网一样。
先创建一个项目目录, museVtask。将 github 代码拉下来。
git clone --recursive https://github.com/TMElyralab/MuseV.git 这里一定要加上recursive参数,这样会将 diffusers 等子模块一起下载下来。
下载模型文件。这里不使用 git 下载,毕竟模型文件 32.3 G。使用 huggingface cli,还得要梯子。huggingface-cli download --resume-download TMElyralab/MuseV --local-dir ./MuseV/checkpoints
在下载的同时,可以将 docker-compose 配置文件搞起来。先创建 Dockerfile 文件,代码如下:
FROM anchorxia/musev:latest

# 设置工作目录
WORKDIR /workspace/MuseV

# 将宿主机的 MuseV 目录复制到容器的对应目录
COPY ./MuseV /workspace/MuseV

# 设置 PYTHONPATH 环境变量
ENV PYTHONPATH=/workspace/MuseV:${PYTHONPATH}
ENV PYTHONPATH=/workspace/MuseV/MMCM:${PYTHONPATH}
ENV PYTHONPATH=/workspace/MuseV/diffusers/src:${PYTHONPATH}
ENV PYTHONPATH=/workspace/MuseV/controlnet_aux/src:${PYTHONPATH}

# 这里可以设置默认的命令,但如果你想要 bash 交互式 shell,则不需要
# CMD ["python", "your_script.py"]
再创建 docker-compose.yaml 文件,代码如下:
services:
  musev:
    build:
      context: .
      dockerfile: Dockerfile
    image: musev
    container_name: musev-latest
    runtime: nvidia
    restart: always
    volumes:
      - ./MuseV:/workspace/MuseV
    stdin_open: true
    tty: true
如果报错 docker: Error response from daemon: unknown or invalid runtime name: nvidia,请参考 https://blog.vini123.com/1206
随着 AI 聊天的兴起,流式展现数据的需求变得更常见。前端 EventSource 的使用频率也会更高。接openai,文心一言,通义千问这些接口,并以流式的方式在页面展现出来。就得自己的接口服务端也以流式的方式返回给自己的前端,自己的服务器端接它们,让它们也要以流的方式返回。这个时候服务端不仅要做接口的对接和数据的转发,还得做数据的解析和存储。
这里前端以 vue3,后端使用 laravel 的方式,来简单介绍下怎么搞。
https://developer.mozilla.org/zh-CN/docs/Web/API/EventSource
前端选择 fetch,并没有选择 EventSource。
因为 fetch 本身就可以支持 EventSource 的方式接受数据,使用方式也会像使用 axios 类似。而单纯 EventSource 的使用会收到请求方式,不能自定义Header头,连接数目等方式的限制。fetch 就像在调用接口,EventSource 就像是 websocket。
EventSource 示例:
const sse = new EventSource("/api/v1/sse");

sse.addEventListener("notice", (e) => {
  console.log(e.data);
});

sse.addEventListener("update", (e) => {
  console.log(e.data);
});

sse.addEventListener("message", (e) => {
  console.log(e.data);
});https://github.com/harry0703/MoneyPrinterTurbo
部署比较简单,操作使用也很简单(网页操作)。 需要申请 pexels api keys、通义千问 api keys,当然也可以使用 openai 等。
效果不是很好,就是将 pexels 上的视频组合成一个视频。
https://www.bilibili.com/video/BV12g4y1m7Uw/?vd_source=6993ce0cd88c9947ac7681b6864a99d0
https://github.com/RVC-Boss/GPT-SoVITS?tab=readme-ov-file
这个还不错,更有用(达成目标)。
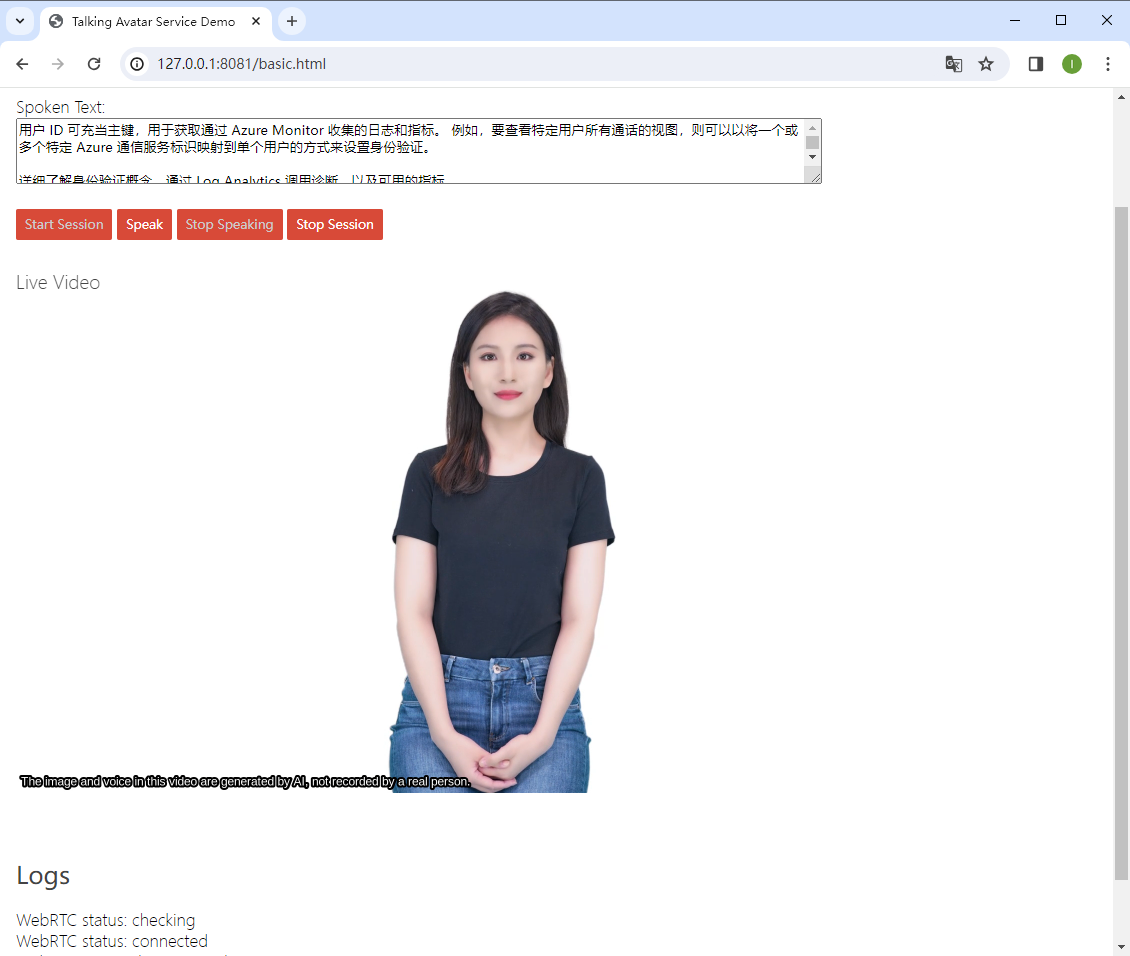
在自己的服务器环境使用语音转视频,需要配置 ice server。而这个玩意先得创建通信资源。创建通信资源,在后台就可以实现。ice server 可以使用编程语言去获取。
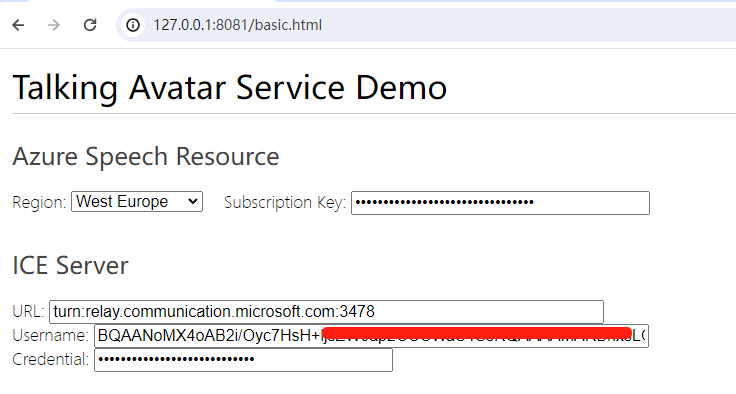
这里以 python 来获取。只需要准备好连接字符串(endpoint)就好,这个就是需要去后台创建通信资源。
# issue-relay-tokens.py
from azure.communication.networktraversal import CommunicationRelayClient
from azure.identity import DefaultAzureCredential
from azure.communication.identity import CommunicationIdentityClient

# You can find your endpoint and access token from your resource in the Azure Portal
connection_str = "endpoint=https://xxxx.communication.azure.com/;accesskey=xxxx"
endpoint = "https://xxxx.communication.azure.com/"

# To use Azure Active Directory Authentication (DefaultAzureCredential) make sure to have
# AZURE_TENANT_ID, AZURE_CLIENT_ID and AZURE_CLIENT_SECRET as env variables.
# We also need Identity client to get a User Identifier
# identity_client = CommunicationIdentityClient(endpoint, DefaultAzureCredential())
# relay_client = CommunicationRelayClient(endpoint, DefaultAzureCredential())

#You can also authenticate using your connection string
identity_client = CommunicationIdentityClient.from_connection_string(connection_str)
relay_client = CommunicationRelayClient.from_connection_string(connection_str)

identity_client.create_user()

relay_configuration = relay_client.get_relay_configuration()

for iceServer in relay_configuration.ice_servers:
    assert iceServer.username is not None
    print('Username: ' + iceServer.username)

    assert iceServer.credential is not None
    print('Credential: ' + iceServer.credential)

    assert iceServer.urls is not None
    for url in iceServer.urls:
        print('Url:' + url)
执行 python .\issue-relay-tokens.py,如果配置都正确,就会得到 ice 相关信息。
Username: xxx1
Credential: cre1
Url:stun:relay.communication.microsoft.com:3478
Url:turn:relay.communication.microsoft.com:3478
Username: xxx2
Credential: cre2
Url:stun:20.202.255.225:3478
Url:turn:20.202.255.225:3478