Write the Code. Change the World.

分类目录
9月 24

副本镜像地址:https://quay.io/repository/coreos/etcd

这里会列出 etcd 的最新版本。当前最新版本 3.7.2

注意:放弃使用 bitnami/etcd 镜像。

基于环境变量的单节点 etcd 部署

services:
  etcd:
    image: quay.io/coreos/etcd:v3.7.2
    container_name: etcd-server
    environment:
      - TZ=${TZ:-Asia/Shanghai}
      - ETCD_NAME=etcd-server
      - ETCD_DATA_DIR=/var/etcd
      # listen:容器内部监听全部网卡,不要改0.0.0.0
      - ETCD_LISTEN_CLIENT_URLS=http://0.0.0.0:2379
      - ETCD_LISTEN_PEER_URLS=http://0.0.0.0:2380
      # 对外客户端广播地址,同docker网络业务容器使用 etcd‑server:2379
      - ETCD_ADVERTISE_CLIENT_URLS=http://etcd-server:2379
      # peer广播地址,单节点这里就用域名
      - ETCD_INITIAL_ADVERTISE_PEER_URLS=http://etcd-server:2380
      - ETCD_INITIAL_CLUSTER_TOKEN=etcd-cluster
      # initial‑cluster 和 advertise peer保持一致,全部域名
      - ETCD_INITIAL_CLUSTER=etcd-server=http://etcd-server:2380
      # 单节点docker环境,全新初始化打开 force‑new‑cluster,规避启动瞬间DNS时序问题
      - ETCD_FORCE_NEW_CLUSTER=${ETCD_FORCE_NEW_CLUSTER:-false}
      # 生产常态使用 existing;清空数据首次初始化改成 new
      - ETCD_INITIAL_CLUSTER_STATE=${ETCD_INITIAL_CLUSTER_STATE:-existing}
      - ETCD_LOGGER=zap
      - ETCD_LOG_LEVEL=${ETCD_LOG_LEVEL:-info}
      # 调优参数
      - ETCD_HEARTBEAT_INTERVAL=250
      - ETCD_ELECTION_TIMEOUT=2000
      - ETCD_MAX_REQUEST_BYTES=104857600
      - ETCD_SNAPSHOT_COUNT=50000
      # 设置 root 账号密码
      # - ETCD_ROOT_PASSWORD=xxxxxx
    volumes:
      - ${DOCKER_VOLUME_DIRECTORY:-./etcd-data}:/var/etcd
    ports:
      - "127.0.0.1:2379:2379"
      - "127.0.0.1:2380:2380"
    restart: always
    networks:
      - xr-net

networks:
  xr-net:
    name: xr-net
    driver: bridge

下边是 .env 文件

TZ=Asia/Shanghai

# 数据卷
DOCKER_VOLUME_DIRECTORY=./etcd-data

# 全新初始化:new;日常运行:existing
ETCD_INITIAL_CLUSTER_STATE=new
ETCD_LOG_LEVEL=info

运行起来: docker compose up -d

查看:docker compose ps

# docker compose ps
NAME          IMAGE                        COMMAND                 SERVICE   CREATED          STATUS          PORTS
etcd-server   quay.io/coreos/etcd:v3.7.2   "/usr/local/bin/etcd"   etcd      10 minutes ago   Up 10 minutes   127.0.0.1:2379-2380->2379-2380/tcp

在浏览器中打开:http://127.0.0.1:2379/version

会看到输出: {"etcdserver":"3.7.2","etcdcluster":"3.7.0","storage":"3.7.0"}

相关参考

https://oldme.net/article/32
https://cloud.tencent.com/developer/article/2392231

9月 18

https://golang.google.cn/

安装 gRPC

go install google.golang.org/protobuf/cmd/protoc-gen-go@latest
go install google.golang.org/grpc/cmd/protoc-gen-go-grpc@latest

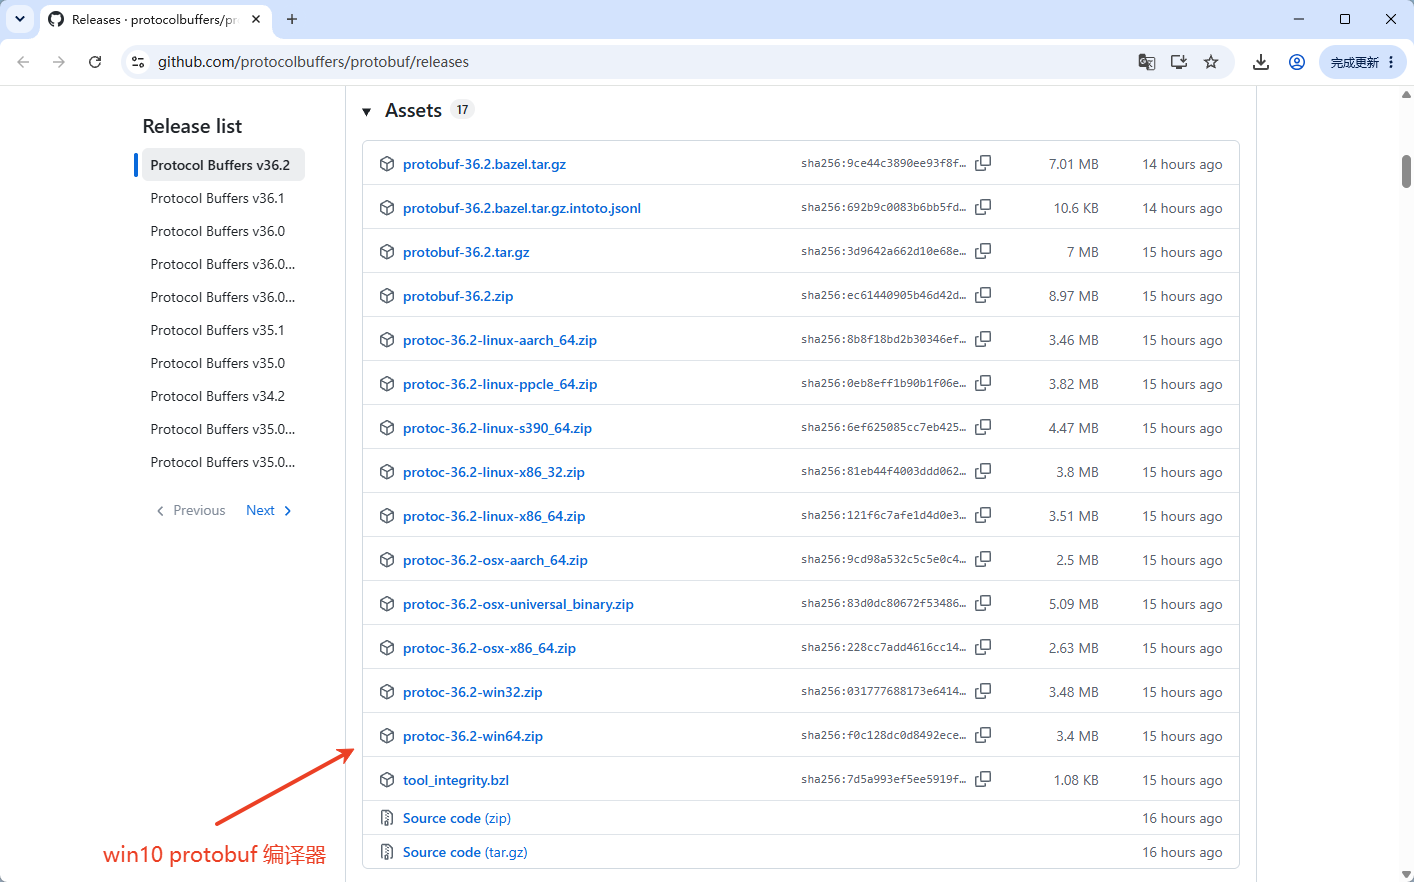
安装 protobuf 编译器

官网下载链接: https://protobuf.dev/downloads/

Github 下载链接: https://github.com/protocolbuffers/protobuf/releases

  1. 下载 ProtoBuf 编译器

解压后,有下边这些目录。

# 只需把 bin 目录下的 exe 文件放在环境变量目录下就可以用了。
├─bin
└─include
    └─google
        └─protobuf
            └─compiler
  1. 当前用户使用,模拟 Linux 新建 ~/.local/bin 目录。

    New-Item -ItemType Directory -Force "$env:USERPROFILE\.local\bin"
  2. 将这个目录添加到环境变量中。

    # 获取现有用户PATH
    $userPath = [Environment]::GetEnvironmentVariable("PATH","User")
    if(-not $userPath.Contains("$env:USERPROFILE\.local\bin")){ [Environment]::SetEnvironmentVariable("PATH","$userPath;$env:USERPROFILE\.local\bin","User")
    }
  3. 将下载解压后的 bin 目录下的 protoc.exe 放到 ~/.local/bin 目录下。(如果 2,3步曾经做过,直接从第一步到这步)

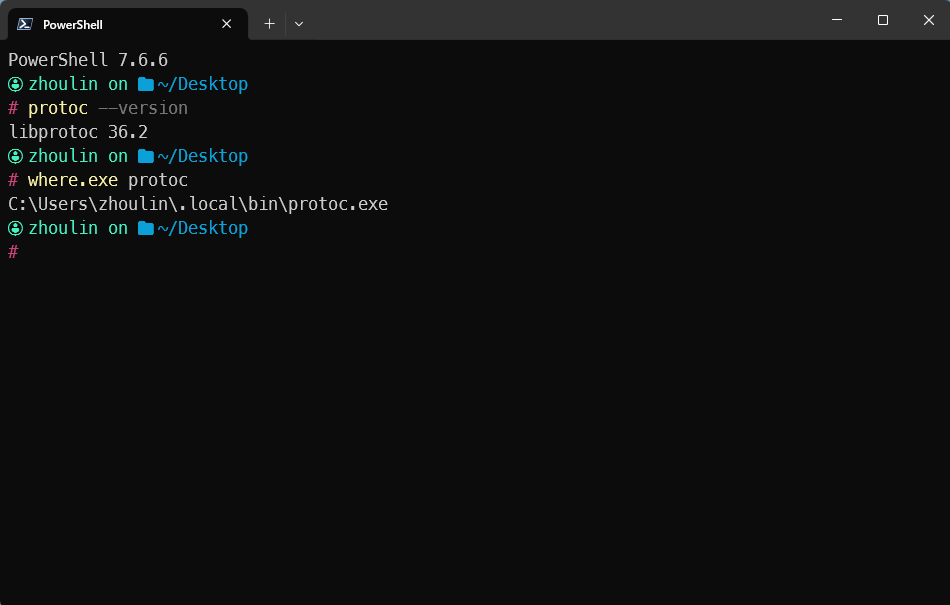
  4. 重新打开终端测试。

protoc --version

where.exe protoc

安装 protoc‑gen‑go 和 protoc-gen-go-grpc

go install google.golang.org/protobuf/cmd/protoc-gen-go@latest
go install google.golang.org/grpc/cmd/protoc-gen-go-grpc@latest

安装 etcd

系统中,安装了 docker。服务端也会是 docker 部署,就用 docker 来构建 etcd 服务。

https://blog.vini123.com/1429

8月 19

为了让 git 版本控制和 goframe 的配置文件能和谐相处,引入了 gomplate。 git 只对模板进行控制,敏感数据只在本地。

https://github.com/hairyhenderson/gomplate

创建

  1. 初始化项目
gf init -u test

cd test 

gf up -a
  1. 创建 manifest/config/config.template, 填入以下配置
# https://goframe.org/docs/web/server-config-file-template
server:
  address: "{{(ds "env").SERVER_PORT}}"
  openapiPath: "/api.json"
  swaggerPath: "/swagger"

# https://goframe.org/docs/core/glog-config
logger:
  path: "storage/logs/daily" # 日志文件路径。默认为空,表示关闭,仅输出到终端
  file: "{Y-m-d}.log" # 日志文件格式。默认为"{Y-m-d}.log"
  prefix: "" # 日志内容输出前缀。默认为空
  level: "all" # 日志输出级别
  timeFormat: "2006-01-02T15:04:05" # 自定义日志输出的时间格式,使用Golang标准的时间格式配置
  ctxKeys: [] # 自定义Context上下文变量名称,自动打印Context的变量到日志中。默认为空
  header: true # 是否打印日志的头信息。默认true
  stdout: true # 日志是否同时输出到终端。默认true
  rotateSize: 0 # 按照日志文件大小对文件进行滚动切分。默认为0,表示关闭滚动切分特性
  rotateExpire: 0 # 按照日志文件时间间隔对文件滚动切分。默认为0,表示关闭滚动切分特性
  rotateBackupLimit: 0 # 按照切分的文件数量清理切分文件,当滚动切分特性开启时有效。默认为0,表示不备份,切分则删除
  rotateBackupExpire: 0 # 按照切分的文件有效期清理切分文件,当滚动切分特性开启时有效。默认为0,表示不备份,切分则删除
  rotateBackupCompress: 0 # 滚动切分文件的压缩比(0-9)。默认为0,表示不压缩
  rotateCheckInterval: "1h" # 滚动切分的时间检测间隔,一般不需要设置。默认为1小时
  stdoutColorDisabled: false # 关闭终端的颜色打印。默认开启
  writerColorEnable: false # 日志文件是否带上颜色。默认false,表示不带颜色
  error:
    path: "storage/logs/error/"
    file: "{Y-m-d}.log"
    stdout: true
  test:
    path: "storage/logs/test"
    file: "{Y-m-d}.log"
    stdout: true

plantform:
  tencent:
    secretId: {{(ds "env").TENCENT_SECRETID}}
    secretKey: {{(ds "env").TENCENT_SECRETKEY}}
  1. 在项目根目录下创建 .env.dev 、 .env.prod 、 .env.example 这三个文件。仅 .env.example 添加到版本控制中。内容如下。其他文件根据示例文件,按场景需要配置。
# 端口号
SERVER_PORT=:8090

# 平台信息
TENCENT_SECRETID=
TENCENT_SECRETKEY=
  1. 创建 hack/config.mk 文件。内容如下:
# 环境: dev / prod
# https://docs.gomplate.ca/
# https://github.com/hairyhenderson/gomplate
ENV ?= dev
ENV_FILE := .env.$(ENV)
TPL_SRC  := manifest/config/config.template
TPL_OUT  := manifest/config/config.yaml

.PHONY: config
config:
    @echo ----------------------------------------
    @echo create config template using $(ENV_FILE)
    @echo ----------------------------------------
    @echo. 
    gomplate -d env=$(ENV_FILE)?type=application/x-env -f $(TPL_SRC) -o $(TPL_OUT)
    @echo.
    @echo Config created: $(TPL_OUT)
    @echo.
  1. 在根目录下的 Makefile 文件追加配置。
…
include ./hack/config.mk
  1. 添加 git 版本控制
git init -b main

# 在 .gitignore 中增加忽略文件
.env.dev
.env.prod

# 添加配置
git add .
git commit -m 'initialize'

使用

# 生成测试环境配置
make config

# 生成正式服环境配置
make config ENV=prod

使用上边命令就可以在 manifest/config/ 下生成对应的配置文件。

12月 08

goframe 框架中,引入其他 proto 文件时会报错 Import "xxx.proto" was not found or had errors.

比如在 manifest/protobuf 下,有 base.proto 和 game.proto 文件,如果在 game.proto 文件中引入 base.proto,vscode会报错 Import "base.proto" was not found or had errors.

处理

在项目根目录下创建 .vscode 目录,在该目录下新建 settings.json。添加以下配置就好。

{
  "protoc": {
    // 指定 protoc 编译器的路径(可选,但更准确)
    // "path": "D:\\ProgramData\\anaconda3\\Library\\bin\\protoc.exe",
    // 关键:指定导入文件的搜索路径,与 gf gen pb 保持一致
    "compile_on_save": false,
    "options": [
      "--proto_path=${workspaceFolder}/manifest/protobuf"
    ]
  }
}
7月 11

AI 对话项目,会用到流式返回。一般客户端不会直接调用 AI 对话,而是调用自己的服务,自己的服务再调用 AI. 服务端可以通过 websocket 的方式来达到这个效果,也可以通过 SSE 的方式来达到这个效果。而 AI 也可能会提供这两种方式来提供服务。这样一来,项目就可能有四种组合方式来进行 AI 对话。如下:

客户端 服务端 AI
APP、浏览器 websocket websocket
APP、浏览器 websocket SSE
APP、浏览器 SSE websocket
APP、浏览器 SSE SSE

https://developer.mozilla.org/zh-CN/docs/Web/API/Server-sent_events/Using_server-sent_events

找 AI

websocket 阵营

https://www.xfyun.cn/doc/spark/Web.html#_1-%E6%8E%A5%E5%8F%A3%E8%AF%B4%E6%98%8E

SSE 阵营

https://agents.baidu.com/docs/develop/out-deployment/conversation/

尝试实现四种组合

从最简单的开始。服务端通过 SSE 的方式, AI 也是 SSE 的方式。

先封装一个 curl 工具包,创建 internal/pkg/curl/curl.go,内容如下。

package curl

import (
    "bytes"
    "context"
    "fmt"
    "io"
    "net/http"

    "github.com/gogf/gf/v2/frame/g"
    "github.com/gogf/gf/v2/net/gclient"
)

type HttpClient struct {
    client *gclient.Client
}

func NewHttpClient() *HttpClient {
    return &HttpClient{
        client: g.Client(),
    }
}

func (h *HttpClient) Get(ctx context.Context, url string, headers map[string]string) (string, error) {
    res, err := h.client.Get(ctx, url, headers)
    if err != nil {
        return "", err
    }
    defer res.Close()

    return res.ReadAllString(), nil
}

func (h *HttpClient) Post(ctx context.Context, url string, data interface{}, headers map[string]string) (string, error) {
    for k, v := range headers {
        h.client.SetHeader(k, v)
    }

    res, err := h.client.Post(ctx, url, data, headers)
    if err != nil {
        return "", err
    }
    defer res.Close()
    return res.ReadAllString(), nil
}

func (h *HttpClient) PostStream(ctx context.Context, url string, data interface{}, headers map[string]string) (io.ReadCloser, error) {
    // 将 data 转换为 io.Reader
    var body io.Reader
    switch v := data.(type) {
    case string:
        body = bytes.NewReader([]byte(v))
    case []byte:
        body = bytes.NewReader(v)
    default:
        return nil, fmt.Errorf("unsupported data type: %T", v)
    }

    // 创建 HTTP 请求
    req, err := http.NewRequestWithContext(ctx, "POST", url, body)
    if err != nil {
        return nil, err
    }

    // 设置请求头
    for k, v := range headers {
        req.Header.Set(k, v)
    }

    // 发起请求
    resp, err := http.DefaultClient.Do(req)
    if err != nil {
        return nil, err
    }

    // 检查响应状态码
    if resp.StatusCode != http.StatusOK {
        return nil, fmt.Errorf("request failed with status code: %d", resp.StatusCode)
    }

    return resp.Body, nil
}

现在来完善 chat 接口。

7月 11

AI 聊天,会用到流式返回的接口。用 goframe 框架尝试尝试。

开始

初始化项目

gf init stream.demo -u

cd stream.demo

gf run main.go

默认路由信息是这样的。

build: main.go
go build -o .\main.exe  main.go
.\main.exe
build running pid: 44364
2025-07-11T13:44:19.160+08:00 [INFO] pid[44364]: http server started listening on [:8000]
2025-07-11T13:44:19.160+08:00 [INFO] {ac79854f201c51188f16b244dba07b30} swagger ui is serving at address: http://127.0.0.1:8000/swagger/
2025-07-11T13:44:19.161+08:00 [INFO] {ac79854f201c51188f16b244dba07b30} openapi specification is serving at address: http://127.0.0.1:8000/api.json

  ADDRESS | METHOD |   ROUTE    |                           HANDLER                           |           MIDDLEWARE
----------|--------|------------|-------------------------------------------------------------|----------------------------------
  :8000   | ALL    | /api.json  | github.com/gogf/gf/v2/net/ghttp.(*Server).openapiSpec       |
----------|--------|------------|-------------------------------------------------------------|----------------------------------
  :8000   | GET    | /hello     | stream.demo/internal/controller/hello.(*ControllerV1).Hello | ghttp.MiddlewareHandlerResponse
----------|--------|------------|-------------------------------------------------------------|----------------------------------
  :8000   | ALL    | /swagger/* | github.com/gogf/gf/v2/net/ghttp.(*Server).swaggerUI         | HOOK_BEFORE_SERVE
----------|--------|------------|-------------------------------------------------------------|----------------------------------

提交版本

git init -b main
git add .
git commit -m 'initialize'

定义接口,创建控制器,定义路由

新建 api/chat/v1/chat.go 文件,定义以下请求和返回

package v1

import "github.com/gogf/gf/v2/frame/g"

type ChatReq struct {
    g.Meta  `path:"/chat" method:"post" tags:"聊天"  summary:"聊天请求"`
    Uid     uint64 `v:"required#用户ID不能为空" json:"uid" dc:"用户ID"`
    Message string `v:"required#消息内容不能为空" json:"message" dc:"消息内容"`
}

type ChatRes struct {
    IsEnd bool `json:"is_end" dc:"是否结束"`
}

执行 gf gen ctrl 生成控制器。修改 internal/cmd/cmd.go,增加路由配置。

import (
    ……
    "stream.demo/internal/controller/hello"
)

……
s.Group("/api", func(group *ghttp.RouterGroup) {
    group.Bind(
        chat.NewV1(),
    )
})

再运行 gf run main.go,把项目跑起来看看。发现 chat 路由已经好了。

build: main.go
go build -o .\main.exe  main.go
.\main.exe
build running pid: 44148
2025-07-11T14:13:29.676+08:00 [INFO] pid[44148]: http server started listening on [:8000]
2025-07-11T14:13:29.676+08:00 [INFO] {5065f8ccb71d5118823d646fdde40224} swagger ui is serving at address: http://127.0.0.1:8000/swagger/
2025-07-11T14:13:29.677+08:00 [INFO] {5065f8ccb71d5118823d646fdde40224} openapi specification is serving at address: http://127.0.0.1:8000/api.json

  ADDRESS | METHOD |   ROUTE    |                           HANDLER                           |           MIDDLEWARE
----------|--------|------------|-------------------------------------------------------------|----------------------------------
  :8000   | ALL    | /api.json  | github.com/gogf/gf/v2/net/ghttp.(*Server).openapiSpec       |
----------|--------|------------|-------------------------------------------------------------|----------------------------------
  :8000   | POST   | /api/chat      | stream.demo/internal/controller/chat.(*ControllerV1).Chat   | ghttp.MiddlewareHandlerResponse
----------|--------|------------|-------------------------------------------------------------|----------------------------------
  :8000   | GET    | /hello     | stream.demo/internal/controller/hello.(*ControllerV1).Hello | ghttp.MiddlewareHandlerResponse
----------|--------|------------|-------------------------------------------------------------|----------------------------------
  :8000   | ALL    | /swagger/* | github.com/gogf/gf/v2/net/ghttp.(*Server).swaggerUI         | HOOK_BEFORE_SERVE
----------|--------|------------|-------------------------------------------------------------|----------------------------------

开始流式 demo

编辑 internal/controller/chat/chat_v1_chat.go

package chat

import (
    "context"
    "fmt"
    "time"

    "github.com/gogf/gf/v2/net/ghttp"

    v1 "stream.demo/api/chat/v1"
)

func (c *ControllerV1) Chat(ctx context.Context, req *v1.ChatReq) (res *v1.ChatRes, err error) {
    r := ghttp.RequestFromCtx(ctx)
    r.Response.Header().Set("Content-Type", "text/event-stream")
    r.Response.Header().Set("Cache-Control", "no-cache")
    r.Response.Header().Set("Connection", "keep-alive")
    r.Response.Header().Set("Content-Encoding", "identity")

    for i := range 10 {
        data := fmt.Sprintf(`{"uid":%d, "message":"%s","index":%d}`, req.Uid, req.Message, i)
        r.Response.Writefln("data: %s\n\n", data)
        r.Response.Flush()
        time.Sleep(time.Millisecond * 1000)
    }

    fmt.Println("发送结束")
    res = &v1.ChatRes{}
    res.IsEnd = true
    return
}

重新运行项目。

测试

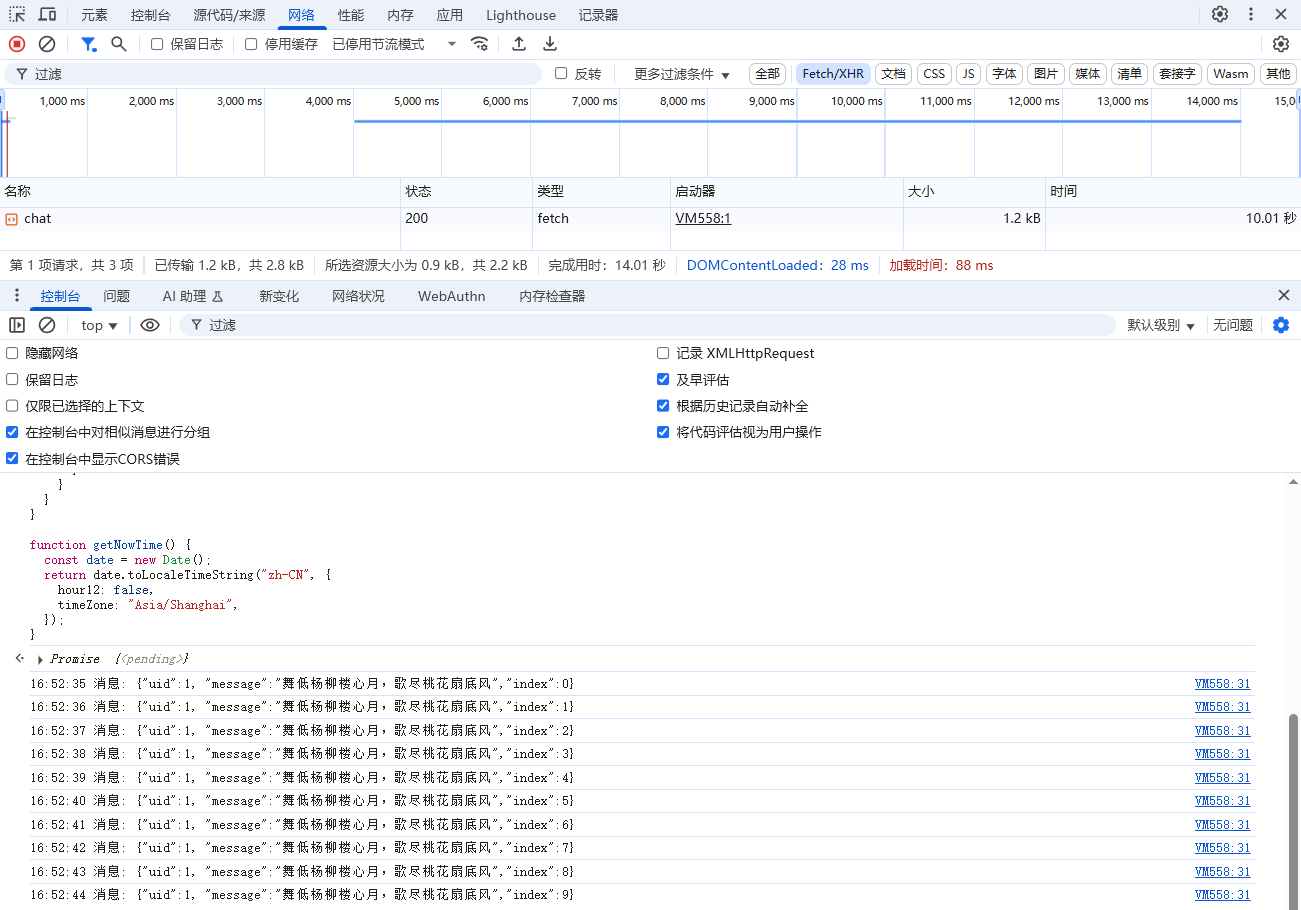
可以使用 curl 命令,可以使用 apifox 这种工具,也可以使用浏览器。 这里使用浏览器加 js 的方式来搞。

使用 chrome 打开 http://127.0.0.1:8000 ,然后打开控制台。输入以下测试代码,回车。

fetch("http://127.0.0.1:8000/api/chat", {
  method: "POST",
  headers: {
    "Content-Type": "application/json",
  },
  body: JSON.stringify({
    message: "舞低杨柳楼心月,歌尽桃花扇底风",
    uid: 1,
  }),
})
  .then(readStream)
  .catch(console.error);

async function readStream(res) {
  const reader = res.body.getReader();
  const decoder = new TextDecoder("utf-8");
  let buffer = "";

  while (true) {
    const { done, value } = await reader.read();
    if (done) break;
    buffer += decoder.decode(value, { stream: true });

    let lines = buffer.split("\n\n");
    buffer = lines.pop();

    for (const chunk of lines) {
      const dataLine = chunk.trim();
      if (dataLine.startsWith("data: ")) {
        const data = dataLine.slice(6);
        console.log(getNowTime(), "消息:", data);
      }
    }
  }
}

function getNowTime() {
  const date = new Date();
  return date.toLocaleTimeString("zh-CN", {
    hour12: false,
    timeZone: "Asia/Shanghai",
  });
}

截图如下:

提交版本控制。

git add .
git commit -m '增加 chat 接口,并测试流式响应'

nginx 处理

如果走 nginx 代理,需要处理关闭相应缓冲

location /api/ {
    proxy_pass http://你的后端服务地址;
    proxy_set_header Host $host;
    proxy_set_header X-Real-IP $remote_addr;
    proxy_set_header X-Forwarded-For $proxy_add_x_forwarded_for;
    proxy_buffering off;
    proxy_cache off;
    proxy_request_buffering off;
    chunked_transfer_encoding on;
}

4月 26

goframe 生成不重复的 7 位数字,并和数据库 user 表中字段不重复

func generateUniqueID() int {
    src := rand.NewSource(time.Now().UnixNano())
    min := 1000000
    max := 10000000
    return rand.New(src).Intn(max-min) + min
}

func generateUniqueViewID(ctx context.Context) (int, error) {
    for {
        viewId := generateUniqueID()
        id, err := dao.Users.Ctx(ctx).Where(do.Users{Viewid: viewId}).Fields("id").Value()
        if err != nil {
            return 0, err
        }

        if id == nil {
            return viewId, nil
        }
    }
}
9月 18

不能只让 go 在本地跑,得让 go 编译后,在服务器上跑。

好,那就这么干

  • 编译。
  • 放到服务端,使用守护进程的方式启动它。比如可以用 nohub、supervisord、systemctl 等。
  • 使用 nginx 做重定向或代理,配置域名访问。

编译

先看看我的服务器信息。

lsb_release -a

LSB Version:    :core-4.1-amd64:core-4.1-noarch
Distributor ID: AlibabaCloud
Description:    Alibaba Cloud Linux release 3 (Soaring Falcon)
Release:    3
Codename:   SoaringFalcon

在 hack/config.yaml 中,增加编译的配置信息

  build:
    name:     "main"
    arch:     "amd64"
    system:   "linux"
    mod:      "none"
    packSrc:  "resource,manifest"
    version:  "v1.0.0"
    output:   "./out"
    cgo:      0
    extra:    ""

注意,manifest/config 下的 mysql,redis 等配置,一定要和服务端一致。好了,可以打包了。

gf build

继续阅读

9月 11

orm with 处理也轻微使用了下。现在来处理输出。处理大输出。抱怨总是包裹一层太久了,抱怨无论啥都返回 http 200 。现在要改变这个状况。

在处理这个问题之前,我们得先找到整个框架的返回是怎么实现的。其实,在之前也想到了用后置中间件来处理。看官方自己也确实是用后置中间件来统一处理返回的。我们建立一个自己的中间件,替换掉官方自己的中间件不就好了。

官方默认中间件。

import  "github.com/gogf/gf/v2/net/ghttp"
ghttp.MiddlewareHandlerResponse

之前也说过一次。gf 中间件的函数都有且仅有一个参数 r *ghttp.Request。只要实现了该方法即可。当然 r.Middleware.Next() 这个方法是要调用的。

在这个方法之前处理的逻辑,叫前置。在这个方法之后处理的逻辑,叫后置。

go 的中间件的思路和 laravel 的也是一样的。估计其他语言也是这个思路。就是前端的 axios 等的拦截器也是有着这方面的思路。

继续阅读

9月 10

该后台使用 vite + ts + pnpm + vue3 + element-plus + tailwindcss 等技术栈构成。没有添加任意可视化图标等插件。以最小功能,最基础功能展现。用户可以额外添加可使用的插件逻辑。

该后台后端使用 php8.2 + laravel 10 + mysql

该后台后端 go 语言版本开发中。将使用 gframe2.5.2

源码: https://github.com/vini123/simpleAdmin

在线体验: https://www.zeipan.com/admin

权限以及密码一键复位: https://v3test.yuepaibao.com/admin/api/reset

测试账号以及密码: zhoulin@xiangrong.pro、 111111 (如果发现登录不了,可一键复位谢谢)

继续阅读