11月
09
在做一些特殊的展示的网站的时候,只需要按照一定比例的缩放就可以。这种不像栅格化的自适应(比如 bootstrap),这种也更好写。按照设计图的尺寸,换算做出来就可以。下边有两种方案。
https://juejin.cn/post/6966103143402700837
上边链接介绍的是满屏的自适应缩放。有的时候,是根据宽度做自适应。就是设计页高度远远大于宽度的情况。这个时候,只需要按照宽度自适应就可以。其实,还是用到上边的思路。采用上边的第二种方案,使用 rem 自适应。只是计算方法稍微改变一下。
# js
function setFontSize() {
    const designWidth = 1440
    const fontSize = document.documentElement.clientWidth < designWidth ?
                12 * (document.documentElement.clientWidth / designWidth) : 12

    const htmlElement: HTMLHtmlElement | null = document.querySelector('html')
    if (htmlElement) {
        htmlElement.style.fontSize = fontSize + 'px'
    }
}

# scss
$design_width: 1440; //设计稿的宽度,根据实际项目调整

@function px2rem($px) {
    $design_font_size: 12;
    @return ($px/$design_font_size) + rem;
}
这个时候,似乎和高度已经没有关系了。
在这个情况下,如果媒体宽度大于设计图的宽度,内容宽度就是设计图宽度。对内容做居中处理。
# bootstrap 居中就是这么写的
margin-left: auto;
margin-right: auto;

# dom 结构
<div class="full-container">
    <div class="design-wrap">

    </div>
</div>
10月
13
很久很久以前,第三方授权登录就开始流行。比如 qq、微博、github、微信这些。如果有一个大的平台来做这个服务的确是很方便的一个事情。在这些授权后都会有一个回调页面,就是从自己的网页跳转到授权页面,再跳转回来。但是,小程序是没提供这个服务的。但是自己可以构造类似的方式。
整个环节,代码都是由自己控制,可以很灵活的视线需求。仅仅是生成小程序码和扫码登录上小程序是腾讯那边做的。
示例:https://www.zeipan.com/admin
步骤
关键点:这里以 jwt 的认证方式来实现授权登录。
- 登录页获取并展示生成携带参数的小程序码
- 登录页面轮询获取登录状态(这里是 token)
- 手机微信扫描小程序码并授权同意登录
继续阅读
9月
21
9月
10
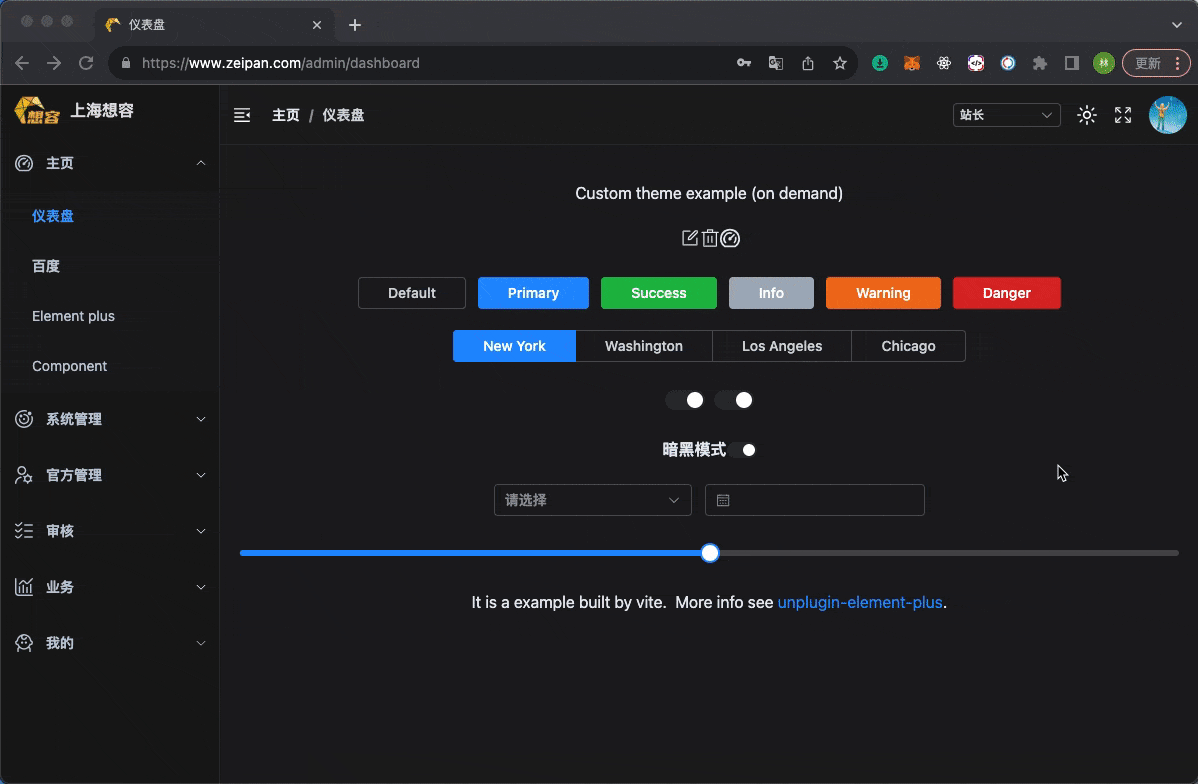
该后台使用 vite + ts + pnpm + vue3 + element-plus + tailwindcss 等技术栈构成。没有添加任意可视化图标等插件。以最小功能,最基础功能展现。用户可以额外添加可使用的插件逻辑。
该后台后端使用 php8.2 + laravel 10 + mysql
该后台后端 go 语言版本开发中。将使用 gframe2.5.2
源码: https://github.com/vini123/simpleAdmin
在线体验: https://www.zeipan.com/admin
权限以及密码一键复位: https://v3test.yuepaibao.com/admin/api/reset
测试账号以及密码: zhoulin@xiangrong.pro、 111111 (如果发现登录不了,可一键复位谢谢)
继续阅读
8月
28
el-tooltip 和 el-popover 嵌套使用的时候,可能会遇到你意向不到的情况。怎么处理呢。
- el-tooltip 嵌套 el-popover
- 在嵌套 el-popover 的时候,加一层 div
仅此而已,就会出现你想看到的效果了。
<el-tooltip content="我不知道风是往哪一个方向吹" placement="top">
        <div>
              <el-popover placement="bottom-start" trigger="click">
              </el-popover>
        </div>
</el-tooltip>
就这样咯。
8月
24
前端项目,打包后,运行起来就可能会出现一些提示。描述语是 Violation 。看着不舒服,还是要解决的。列举一下
[Violation] Added non-passive event listener to a scroll-blocking 'touchstart' event.
出现报错的原因:
Chrome51 版本以后,Chrome 增加了新的事件捕获机制-Passive Event Listeners;
Passive Event Listeners:被动事件侦听器是 DOM 规范中的一项新功能,它使开发人员能够通过消除滚动来阻止触摸和滚轮事件侦听器来选择加入以获得更好的滚动性能。
开发人员可以使用 {passive: true} 来设置监听器后内部不会调用 preventDefault() 来阻止默认滑动行为,Chrome 浏览器称这类型的监听器为被动(passive)监听器。
Passive Event Listeners 就是告诉前页面内的事件监听器内部是否会调用 preventDefault 函数来阻止事件的默认行为,以便浏览器根据这个信息更好地做出决策来优化页面性能。
目前Chrome主要利用该特性来优化页面的滑动性能,所以Passive Event Listeners特性当前仅支持mousewheel/touch相关事件。
参考这篇课解决 https://juejin.cn/post/7230806990452588581
[Violation] Forced reflow while executing JavaScript
8月
23
列举列举
interface HTMLElementTagNameMap {
    "a": HTMLAnchorElement;
    "abbr": HTMLElement;
    "address": HTMLElement;
    "applet": HTMLAppletElement;
    "area": HTMLAreaElement;
    "article": HTMLElement;
    "aside": HTMLElement;
    "audio": HTMLAudioElement;
    "b": HTMLElement;
    "base": HTMLBaseElement;
    "bdi": HTMLElement;
    "bdo": HTMLElement;
    "blockquote": HTMLQuoteElement;
    "body": HTMLBodyElement;
    "br": HTMLBRElement;
    "button": HTMLButtonElement;
    "canvas": HTMLCanvasElement;
    "caption": HTMLTableCaptionElement;
    "cite": HTMLElement;
    "code": HTMLElement;
    "col": HTMLTableColElement;
    "colgroup": HTMLTableColElement;
    "data": HTMLDataElement;
    "datalist": HTMLDataListElement;
    "dd": HTMLElement;
    "del": HTMLModElement;
    "details": HTMLDetailsElement;
    "dfn": HTMLElement;
    "dialog": HTMLDialogElement;
    "dir": HTMLDirectoryElement;
    "div": HTMLDivElement;
    "dl": HTMLDListElement;
    "dt": HTMLElement;
    "em": HTMLElement;
    "embed": HTMLEmbedElement;
    "fieldset": HTMLFieldSetElement;
    "figcaption": HTMLElement;
    "figure": HTMLElement;
    "font": HTMLFontElement;
    "footer": HTMLElement;
    "form": HTMLFormElement;
    "frame": HTMLFrameElement;
    "frameset": HTMLFrameSetElement;
    "h1": HTMLHeadingElement;
    "h2": HTMLHeadingElement;
    "h3": HTMLHeadingElement;
    "h4": HTMLHeadingElement;
    "h5": HTMLHeadingElement;
    "h6": HTMLHeadingElement;
    "head": HTMLHeadElement;
    "header": HTMLElement;
    "hgroup": HTMLElement;
    "hr": HTMLHRElement;
    "html": HTMLHtmlElement;
    "i": HTMLElement;
    "iframe": HTMLIFrameElement;
    "img": HTMLImageElement;
    "input": HTMLInputElement;
    "ins": HTMLModElement;
    "kbd": HTMLElement;
    "label": HTMLLabelElement;
    "legend": HTMLLegendElement;
    "li": HTMLLIElement;
    "link": HTMLLinkElement;
    "main": HTMLElement;
    "map": HTMLMapElement;
    "mark": HTMLElement;
    "marquee": HTMLMarqueeElement;
    "menu": HTMLMenuElement;
    "meta": HTMLMetaElement;
    "meter": HTMLMeterElement;
    "nav": HTMLElement;
    "noscript": HTMLElement;
    "object": HTMLObjectElement;
    "ol": HTMLOListElement;
    "optgroup": HTMLOptGroupElement;
    "option": HTMLOptionElement;
    "output": HTMLOutputElement;
    "p": HTMLParagraphElement;
    "param": HTMLParamElement;
    "picture": HTMLPictureElement;
    "pre": HTMLPreElement;
    "progress": HTMLProgressElement;
    "q": HTMLQuoteElement;
    "rp": HTMLElement;
    "rt": HTMLElement;
    "ruby": HTMLElement;
    "s": HTMLElement;
    "samp": HTMLElement;
    "script": HTMLScriptElement;
    "section": HTMLElement;
    "select": HTMLSelectElement;
    "slot": HTMLSlotElement;
    "small": HTMLElement;
    "source": HTMLSourceElement;
    "span": HTMLSpanElement;
    "strong": HTMLElement;
    "style": HTMLStyleElement;
    "sub": HTMLElement;
    "summary": HTMLElement;
    "sup": HTMLElement;
    "table": HTMLTableElement;
    "tbody": HTMLTableSectionElement;
    "td": HTMLTableDataCellElement;
    "template": HTMLTemplateElement;
    "textarea": HTMLTextAreaElement;
    "tfoot": HTMLTableSectionElement;
    "th": HTMLTableHeaderCellElement;
    "thead": HTMLTableSectionElement;
    "time": HTMLTimeElement;
    "title": HTMLTitleElement;
    "tr": HTMLTableRowElement;
    "track": HTMLTrackElement;
    "u": HTMLElement;
    "ul": HTMLUListElement;
    "var": HTMLElement;
    "video": HTMLVideoElement;
    "wbr": HTMLElement;
}
8月
23
很多很多年前,网页端图片裁切都会想到 cropper.js 。到了当前, cropper.js 还是值得一选。这个是基于 js,ts 的插件,不局限你使用 vue 还是 使用 react 或其他的。反正,还是很好用。当下 2.0 版本更好用。
官网: https://fengyuanchen.github.io/cropperjs/v2/zh/
演练场:https://fengyuanchen.github.io/cropperjs/v2/zh/playground.html
这个插件越来越自由,也越来越集中。它只关注输入(img dom)和输出(canvas)[转换成 base64 可能会存在跨域问题]。大只分以下几个模块(每个模块都可以单独使用)。
Cropper

CropperCanvas

CropperImage

CropperSelection

CropperShade

CropperGrid

CropperViewer
# 等等
这些,都各自有各自的渲染职责。加上就有,配置就改变。不加则没有。想加就加,想减就减。是真的好用。 先看一个我做的一个 demo。是基于vue3 + ts 实现的。(不对。里边还加了一些 element-plus 的组件)
构建的时候,也很方便。使用其接口就可以。更好的是是基于组件的方式来处理。最终的目的是什么,是要渲染到 dom 中,让人看到。 组件不就是最直接的方式吗。这个时候,你可以很方便的使用 css 去美化你的产品。只需要少量关注一些配置就好。比如裁切比例,覆盖比列等。
继续阅读
8月
17
有封装好的 useDark useToggle 这些插件,做项目就很方便。可是用的时候,会遇到一些问题。其实到最后,不是问题了。比如改变主题的时候,transition 失效了。因为没 transition,强行改变背景颜色等就会很生硬。transition 失效是因为 userColorMode 在处理改变的时候,先禁用 transition 再取消禁用导致的。在创建 useDark 的时候,options 的 disableTransition 可以控制该行为,只是不传值的时候,默认就是 true,就是禁用 trasition。那么默认传入 disableTransition 为 false 的值就可以搞定了。
https://github.com/vueuse/vueuse/blob/main/packages/core/useColorMode/index.ts#L122
const isDark = useDark({disableTransition: false})
 const toggleDark = useToggle(isDark)
只需上边这样实现即可。
继续阅读