11月
12
好几年前,ssl 免费证书有效期为 3 个月。搞一个能生成证书的环境就比较方便。
构建带 certbot 的 nginx 镜像
- 准备 Dockerfile 文件。
FROM nginx:1.29.3

# 安装 certbot https://certbot.eff.org/instructions?ws=nginx&os=snap
# 也可以在 nginx 之外使用 certbot 镜像 https://hub.docker.com/r/certbot/certbot
RUN apt-get update && \
    apt-get install -y python3-venv && \
    python3 -m venv /opt/certbot && \
    /opt/certbot/bin/pip install certbot certbot-nginx && \
    ln -s /opt/certbot/bin/certbot /usr/local/bin/certbot && \
    apt-get clean && \
    rm -rf /var/lib/apt/lists/*
-
打包镜像
docker build -t xr-nginx:1.29.3 .
-
运行镜像,生成容器服务。然后打开浏览器,输入 http://localhost 查看情况。
docker run --rm -it -p 80:80 --name xr-nginx xr-nginx:1.29.3

# 查看日志
docker run --rm -it -p 80:80 xr-nginx:1.29.3

# 进入容器
received
然后镜既有 nginx 的功能,还能生成证书。
生成证书
- 生成证书需要域名解析指向服务器。
- 需要挂载好证书存储位置,防止 docker 关闭启动后 丢失证书。( ./conf/nginx/letsencrypt:/etc/letsencrypt)
# 容器外运行
docker exec -i xr-nginx sh -c "certbot -d xxx.com"

# 进入容器运行
docker exec -it xr-nginx bash
certbot -d xxx.com
其他
https://blog.vini123.com/1299
https://blog.vini123.com/1293
11月
12
https://blog.csdn.net/weixin_39938069/article/details/144372076
构建国产东方通
- 准备好安装包和 license。
- 准备 Dockerfile 文件。
FROM alpine:3.18

# 1. 安装编译依赖
RUN apk add --no-cache \
        gcc g++ make autoconf automake libtool bison flex \
        openssl-dev zlib-dev pcre-dev tar

# 2. 复制源码和 license
COPY TongHttpServer_6.0.1.5_alpine_x86_64.tar.gz /tmp/
COPY license.dat /tmp/

# 3. 解压
RUN tar -zxf /tmp/TongHttpServer_6.0.1.5_alpine_x86_64.tar.gz -C /usr/local/ && \
    cp /tmp/license.dat /usr/local/THS/ && \
    rm -f /tmp/TongHttpServer_6.0.1.5_alpine_x86_64.tar.gz && \
    rm -f /tmp/license.dat

# 4. 设置工作目录
WORKDIR /usr/local/THS

# 暴露端口,根据需要修改
EXPOSE 80 443 8011 8000

# 启动 TongHttpServer
CMD ["./bin/start.sh"]
安装包有 x86 和 arm64,请和服务器对应上。
-
打包镜像。Dockerfile 文件、安装包、license 文件放一起。
docker build -t tong-http-server:6.0.1 .
-
运行镜像,看看效果
docker run -d --rm -p 8000:8000 -p 80:80 --name t1 \
  tong-http-server:6.0.1 \
  /bin/sh -c "./bin/start.sh && ./bin/startConsole.sh && tail -f /dev/null"

# 进入容器查看
docker exec -it t1 bash
浏览器访问 http://localhost:8000 进入控制台。
7月
24
dify 使用 docker 部署是最方便的。只是拉取镜像的时候经常会失败。
配置 docker 镜像可方便拉取。
{
    "registry-mirrors": [
        "https://docker.1panel.live",
        "https://docker.nju.edu.cn",
        "https://docker.m.daocloud.io",
        "https://dockerproxy.com",
        "https://hub-mirror.c.163.com",
        "https://docker.mirrors.ustc.edu.cn",
        "https://registry.docker-cn.com",
        "https://registry.cn-hangzhou.aliyuncs.com"
    ]
}
5月
08
如果不需要泛域名证书,可以不用安装对应域名运营商的 cli 工具
nginx 镜像
仅安装 certbot 的 Dockerfile
ARG NGINX_IMAGE
FROM ${NGINX_IMAGE}

# 安装 certbot https://certbot.eff.org/instructions?ws=nginx&os=snap
# 也可以在 nginx 之外使用 certbot 镜像 https://hub.docker.com/r/certbot/certbot
RUN apt-get update && \
    apt-get install -y python3-venv && \
    python3 -m venv /opt/certbot && \
    /opt/certbot/bin/pip install certbot certbot-nginx && \
    ln -s /opt/certbot/bin/certbot /usr/local/bin/certbot && \
    apt-get clean && \
    rm -rf /var/lib/apt/lists/*
安装 certbot 和 aliyun cli 的Dockerfile
ARG NGINX_IMAGE
FROM ${NGINX_IMAGE}

# 安装 certbot https://certbot.eff.org/instructions?ws=nginx&os=snap
# 也可以在 nginx 之外使用 certbot 镜像 https://hub.docker.com/r/certbot/certbot
RUN apt-get update && \
    apt-get install -y wget python3-venv && \
    python3 -m venv /opt/certbot && \
    /opt/certbot/bin/pip install certbot certbot-nginx && \
    ln -s /opt/certbot/bin/certbot /usr/local/bin/certbot && \
    apt-get clean && \
    rm -rf /var/lib/apt/lists/*

# 安装阿里云 cli https://help.aliyun.com/zh/cli/install-cli-on-linux?spm=a2c4g.11174283.0.0.5df9478dHNZ4T9
# https://help.aliyun.com/zh/cli/run-alibaba-cloud-cli-in-a-docker-container
RUN mkdir -p /soft && \
    cd /soft && \
    wget -q https://aliyuncli.alicdn.com/aliyun-cli-linux-latest-amd64.tgz && \
    tar -xzvf aliyun-cli-linux-latest-amd64.tgz && \
    cp aliyun /usr/local/bin/ && \
    rm -rf /soft/aliyun-cli-linux-latest-amd64.tgz

# 验证阿里云 CLI 是否安装成功
RUN aliyun version
构建镜像,当前 nginx 最新版本是 1.28.0
docker build --build-arg NGINX_IMAGE=nginx:1.28.0 -t nginx-certbot .
手动生成证书
假设服务器上已经使用了该 nginx 镜像。并且配置文件目录是 /etc/nginx/。假如某个 .conf 文件使用了 vini123.com 的证书。就可以通过一下命令生成。
# 找到容器的名字或 id 前三位
docker ps

# 生成证书
docker exec -i nginx1.28.0 certbot --nginx --nginx-server-root=/etc/nginx -d vini123.com -d www.vini123.com
docker exec 常用 option 说明。
常用选项
-d:在后台运行命令。
-i:保持 STDIN 打开,即使没有附加。
-t:分配一个伪终端。
-u:指定在容器内执行命令的用户。
--workdir:指定容器内的工作目录。
注意
因为 certbot 安装在了 nginx 容器内。如果执行 docker-compose down 再执行 docker-compose up -d 就会丢失证书。所以在构建 nginx 容器的时候,一定要配置好证书的 volume。就是 certbot 生成的证书位置和本地宿主机的一个映射。
5月
26
brotli 有很好的解压缩效率,但 nginx 默认又不包含 brotli 模块,只能额外搞了
步骤
- 准备 Dockerfile 文件
- 准备 nginx.conf 文件
- 准备 docker-compose.yaml 文件
- 生成镜像,构建容器
准备 dockerfile
先
# 创建一个 env 目录,基于该目录为项目根目录
mkdir env && cd env

# 下载 Dockerfile
curl -o docker/nginx/Dockerfile https://raw.githubusercontent.com/nginxinc/docker-nginx/master/modules/Dockerfile
准备 nginx.conf
https://github.com/google/ngx_brotli/blob/master/README.md
这里 nginx.conf 位于 ./conf/nginx/nginx.conf 中。
user  nginx;
worker_processes  auto;

error_log  /var/log/nginx/error.log warn;
pid        /var/run/nginx.pid;

 load_module modules/ngx_http_brotli_filter_module.so;
 load_module modules/ngx_http_brotli_static_module.so;

events {
    worker_connections  1024;
}

http {
    include       /etc/nginx/mime.types;
    default_type  application/octet-stream;

    log_format  main  '$remote_addr - $remote_user [$time_local] "$request" '
                      '$status $body_bytes_sent "$http_referer" '
                      '"$http_user_agent" "$http_x_forwarded_for"';

    access_log  /var/log/nginx/access.log  main;

    sendfile        on;
    #tcp_nopush     on;

    keepalive_timeout  65;

    #gzip  on;
     brotli on;
    include /etc/nginx/conf.d/*.conf;
}
准备 docker-compose.yaml 文件
docker-compose.yaml 文件直接就在项目根目录下。
…
nginx:
    build:
      context: ./docker/nginx
      args:
        ENABLED_MODULES: brotli
    image: xr-nginx-brotli
    container_name: xr-nginx-brotli
    restart: always
    privileged: false
    ports:
      - 80:80
      - 443:443
    volumes:
      - ./conf/nginx/nginx.conf:/etc/nginx/nginx.conf
生成镜像,构建容器
# 生成镜像
docker-compose build nginx

# 构建启动容器
docker-compose up
其实,可以直接执行 docker-compose up, 没有镜像的时候,会先去生成镜像的
检查
当你发起请求经过 nginx 时,返回的请求头中有 Accept-Encoding: br 表示 brotli 生效了。
相关文章
https://github.com/nginxinc/docker-nginx/tree/master/modules
https://github.com/google/brotli/
https://github.com/google/ngx_brotli
https://github.com/nginxinc/docker-nginx/issues/332
4月
30
在 docker 容器中运行 python 项目时,报 RuntimeError: Found no NVIDIA driver on your system. Please check that you have an NVIDIA GPU and installed a driver from http://www.nvidia.com/Download/index.aspx 错误,这个时候需要 docker 开启 nvidia engin 的支持。至少电脑是装了 nvidia 的显卡的。
docker 中启用 nvidia:
https://blog.vini123.com/1206
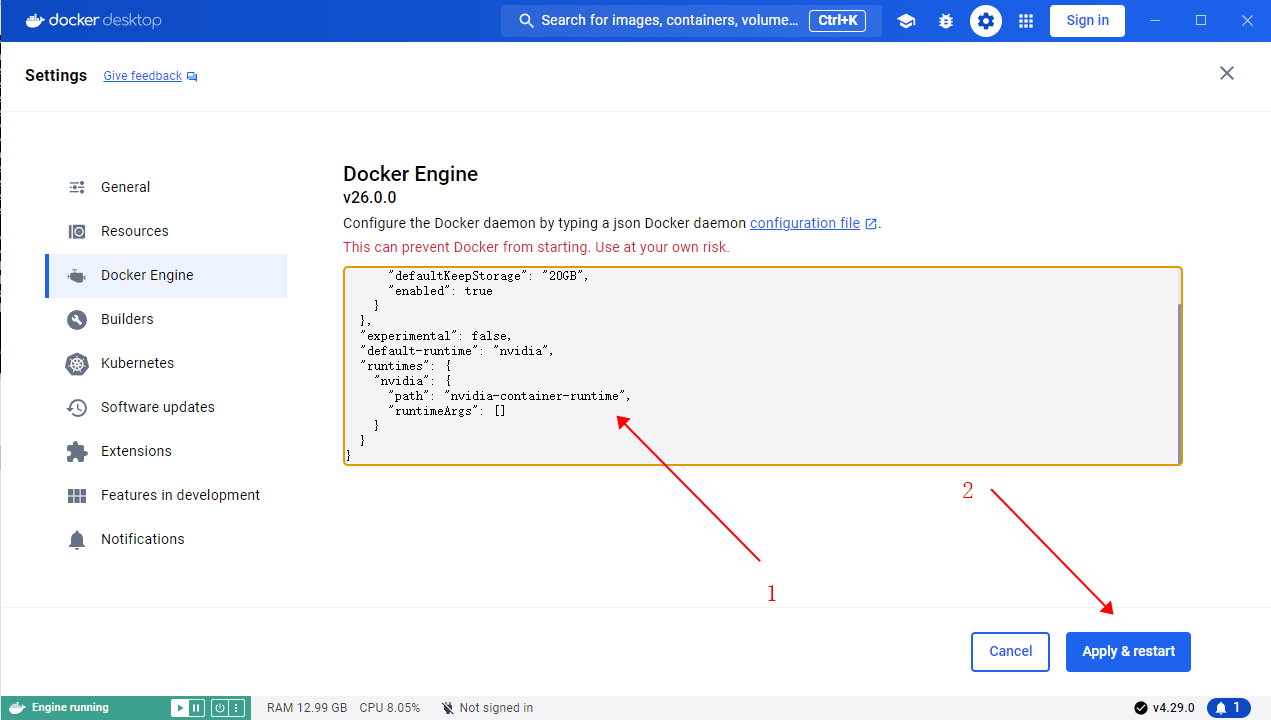
4月
30
在 docker 中,docker-compose.yaml 配置了 nvida 参数时,执行 docker-compose up -d 时报docker: Error response from daemon: unknown or invalid runtime name: nvidia 错误。
如果是非 win 系统,修改 /etc/docker/daemon.json,并添加以下配置。
{
  "runtimes": {
    "nvidia": {
      "path": "nvidia-container-runtime",
      "runtimeArgs": []
    }
  },
  "default-runtime": "nvidia"
}
然后重启 docker。
如果是 win 系统,需要手动打开 docker 桌面应用,点击右上角的设置,进入 docker engine 项进行配置。配置内容也是和上边的一样。如下截图。