7月
15
什么是nginx
Nginx(发音同“engine X”)是异步框架的网页服务器,也可以用作反向代理、负载平衡器和HTTP缓存。该软件由伊戈尔·赛索耶夫创建并于2004年首次公开发布。2011年成立同名公司以提供支持。2019年3月11日,Nginx公司被F5 Networks以6.7亿美元收购。
nginx的应用场景
nginx安装
下载nginx_modules(ps:编译的时候会用到)
链接: https://pan.baidu.com/s/1MjVdVkF4EAjhPfLImRfWMA 密码: wwgb
7月
07
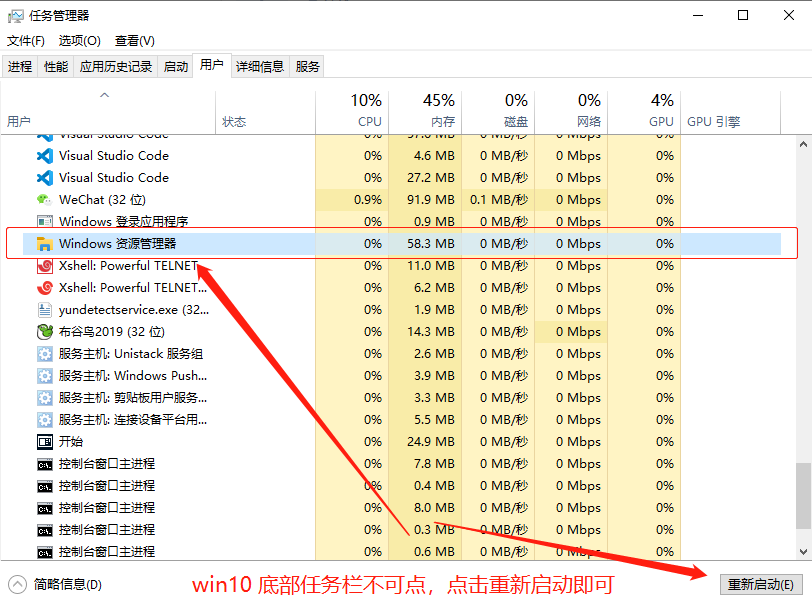
最近,电脑休眠激活后,底部任务栏点击不了,win 快捷键也用不了。这个着实让人郁闷。第一次,重新启动电脑,解决了这个问题。今天又发现了。总不能每次都重启电脑吧,搜了一下,有几种方法,但只有一种方法,我这个情况就解决掉了。
操作一波
- ctrl + alt + del 打开任务管理器。
-
选择用户,展开用户的进程,选中 Window资源管理器 , 点击窗口右下角的重新启动即可。
这样就解决问题了。记住上边第二步,一定要选到用户这个页签,在主页签找不到 windos资源管理器这个进程。
7月
01
一、建表规约
1.【强制】表达是与否概念的字段,必须使用 is_xxx 的方式命名,数据类型是 unsigned tinyint( 1 表示是,0 表示否),此规则同样适用于 odps 建表。
说明:任何字段如果为非负数,必须是 unsigned。
2.【强制】表名、字段名必须使用小写字母或数字;禁止出现数字开头,禁止两个下划线中间只出现数字。数据库字段名的修改代价很大,因为无法进行预发布,所以字段名称需要慎重考虑。
正例:getter_admin,task_config,level3_name
反例:GetterAdmin,taskConfig,level_3_name
3.【强制】表名不使用复数名词。
说明:表名应该仅仅表示表里面的实体内容,不应该表示实体数量,对应于 DO 类名也是单数形式,符合表达习惯。
4.【强制】禁用保留字,如 desc、range、match、delayed 等,请参考 MySQL 官方保留字。
6月
28
最近越来越频繁地遇到需要配置反向代理的场景,在自己搭建博客的时候,也不可避免要用到 Nginx,所以这段时间集中学习了一下 Nginx,同时做了一些笔记,希望也可以帮助到大家~ 😜
这篇文章会在 CentOS 环境下安装和使用 Nginx,如果对 CentOS 基本操作还不太清楚的,可以先看看 半小时搞会 CentOS 入门必备基础知识 一文先做了解。
相信作为开发者,大家都知道 Nginx 的重要,废话不多说,一起来学习吧。
CentOS 版本: 7.6
Nginx 版本: 1.16.1
1. Nginx 介绍
传统的 Web 服务器,每个客户端连接作为一个单独的进程或线程处理,需在切换任务时将 CPU 切换到新的任务并创建一个新的运行时上下文,消耗额外的内存和 CPU 时间,当并发请求增加时,服务器响应变慢,从而对性能产生负面影响。
Nginx 是开源、高性能、高可靠的 Web 和反向代理服务器,而且支持热部署,几乎可以做到 7 * 24 小时不间断运行,即使运行几个月也不需要重新启动,还能在不间断服务的情况下对软件版本进行热更新。性能是 Nginx 最重要的考量,其占用内存少、并发能力强、能支持高达 5w 个并发连接数,最重要的是,Nginx 是免费的并可以商业化,配置使用也比较简单。
Nginx 的最重要的几个使用场景:
- 静态资源服务,通过本地文件系统提供服务;
-
反向代理服务,延伸出包括缓存、负载均衡等;
-
API 服务,OpenResty ;
对于前端来说 Node.js 不陌生了,Nginx 和 Node.js 的很多理念类似,HTTP 服务器、事件驱动、异步非阻塞等,且 Nginx 的大部分功能使用 Node.js 也可以实现,但 Nginx 和 Node.js 并不冲突,都有自己擅长的领域。Nginx 擅长于底层服务器端资源的处理(静态资源处理转发、反向代理,负载均衡等),Node.js 更擅长上层具体业务逻辑的处理,两者可以完美组合,共同助力前端开发。
下面我们着重学习一下 Nginx 的使用。
2. 相关概念
2.1 简单请求和非简单请求
首先我们来了解一下简单请求和非简单请求,如果同时满足下面两个条件,就属于简单请求:
Content-Type 只限于三个值 application/x-www-form-urlencoded、multipart/form-data、text/plain;
凡是不同时满足这两个条件的,都属于非简单请求。
浏览器处理简单请求和非简单请求的方式不一样:
简单请求
对于简单请求,浏览器会在头信息中增加 Origin 字段后直接发出,Origin 字段用来说明,本次请求来自的哪个源(协议+域名+端口)。
如果服务器发现 Origin 指定的源不在许可范围内,服务器会返回一个正常的 HTTP 回应,浏览器取到回应之后发现回应的头信息中没有包含 Access-Control-Allow-Origin 字段,就抛出一个错误给 XHR 的 error 事件;
如果服务器发现 Origin 指定的域名在许可范围内,服务器返回的响应会多出几个 Access-Control- 开头的头信息字段。
非简单请求
非简单请求是那种对服务器有特殊要求的请求,比如请求方法是 PUT 或 DELETE,或 Content-Type 值为 application/json。浏览器会在正式通信之前,发送一次 HTTP 预检 OPTIONS 请求,先询问服务器,当前网页所在的域名是否在服务器的许可名单之中,以及可以使用哪些 HTTP 请求方法和头信息字段。只有得到肯定答复,浏览器才会发出正式的 XHR 请求,否则报错。
2.2 跨域
在浏览器上当前访问的网站向另一个网站发送请求获取数据的过程就是跨域请求。跨域是浏览器的同源策略决定的,是一个重要的浏览器安全策略,用于限制一个
文章来源
https://xie.infoq.cn/article/2051e9a2e76e80393353d826a
6月
26
6月
11
年轻的时候受点委屈,恨不得全世界的人都来安慰我。长大后却学会将苦难不动声色地自己消化。大概成长就是这样,越长大越沉默。
太阳不会因为你的失意,明天不再升起;月亮不会因为你的抱怨,今晚不再降落。蒙住自己的眼睛,不等于世界就漆黑一团;蒙住别人的眼睛,不等于光明就属于自己!
时光如水,从容依旧,从不因为任何人或事而稍做停歇,而我们,拼命的追逐着,不停的忙碌着。想来,这世间有许多人与我一样,踽踽独行于红尘巷陌。
人生,就是这样,很多时候,越是简单,越是快乐;越是在贫穷的时候,越能体现自己的真心,和自己的真情。
淡淡的日子淡然地过。生活如水,人生似茶,再好的茶放到水中一泡,时间久了,也就淡了。也许是棱角平了,或许是成熟稳重了,脚步越来越踏实,日子越来越平淡。
生活就像一杯白开水,你每天都在喝,不要羡慕别人喝的饮料有各种颜色,其实未必有你的白开水解渴,人生不是靠心情活着,而要靠心态去生活。调整心态看生活,处处都是阳光。
人生总有意想不到的风景,生命里的一份美好,往往在你最不经意的时刻来临。人就是大自然里的一颗尘埃,享受漂泊,享受远行,和一路的风雨阳光,飞扬和落定都是一种美丽的行走!
人生聚散离合,就是缘来缘尽, 生活是一件艺术品, 每个人都有自己认为最美的一笔, 每个人也都有认为不尽如人意的一笔, 人没有最好, 有德天地高, 人生有尺,做人有度。
人生的故事,充满了多少不可预料,但它却无比真实地发生着,让你惊诧,让你不知所措,让你笑,让你哭,心却无比的酸痛,却躲在角落深处不敢发声。
不要把自己活得像落难者一样,急着告诉所有人你的不幸。总有一天你会发现,酸甜苦辣要自己尝,漫漫人生要自己过,你要努力强大起来,然后独当一面。
查看原文
6月
10
摘要
版本格式:主版本号.次版本号.修订号,版本号递增规则如下:
- 主版本号:当你做了不兼容的 API 修改,
- 次版本号:当你做了向下兼容的功能性新增,
- 修订号:当你做了向下兼容的问题修正。
先行版本号及版本编译元数据可以加到“主版本号.次版本号.修订号”的后面,作为延伸。
6月
05
6月
04
在某些时候,为了数据的安全和保密性,需要对来回的数据进行加密处理。如果是 laravel 框架,中间件绝对是个好东西。
一波操作
laravel 中间件包含一个完整的工作流,即请求前中间件(request)和请求后中间件(response)。在我们这次的场景中,刚好很好的用到了整个流程。
操作开始: