
小白一枚,从前端开始,开发区块链项目。
需要知道的事情
- chrome 浏览器,先要安装 metaMask 插件。
- 代码中,检测 metaMask 插件是否已经安装,并是可行的状态。
# 不需要任何引入,就是这样直接判断
if (window.ethereum != null)  {
}
小白一枚,从前端开始,开发区块链项目。
# 不需要任何引入,就是这样直接判断
if (window.ethereum != null) {}
通过给 div 定义 id 属性,然后在 a 标签中 href 设置定义好的 id,用户点击 a 标签,页面就可以滑到目标位置。只是这样,点击的时候,url 会出现变化。这里了还有一种方法。
 const goView = function() {
    document.querySelector("#roll_user").scrollIntoView(true);
 }
这种,是通过 js 调用方法来实现。优点是 url 地址不变,还可以设置更多的参数。显得安静丝滑。缺点是,如果刷新浏览器,位置会变化。
当然,还可以通过 js 用其他方式实现这种结果。只是不划算。
使用 vite 来作为构建前端的工具,是有一些缺陷的。
However, it lacks some features that Laravel Mix supports, such as the ability to copy arbitrary assets into the build that are not referenced directly in your JavaScript application.https://laravel.com/docs/10.x/vite
https://github.com/laravel/vite-plugin/blob/main/UPGRADE.md#migrating-from-vite-to-laravel-mix
注册,登录这些页面,以及 request 错误的提示,都是英文的。想要中文的,就得有对应的语言配置。
https://laravel-lang.com/installation/
composer require laravel-lang/common --dev

php artisan lang:add zh_CN

php artisan lang:update
然后,在 config/app.php 中,将 lang 设置成 'zh_CN' 即可。
Inertia 是为希望构建整体应用程序的人而构建的。他们通常更喜欢控制器和视图之间的紧密结合,但又希望使用现代客户端框架来构建其应用程序。
上边这个描述,的确是很贴切。比如 laravel 框架,自身使用的是 blade 模板来渲染页面。所有处理都是服务端完成。也可以在其中部分使用 vue、react这些。
Laravel 提供了两全其美的解决方案。Inertia 可以桥接您的 Laravel 应用程序和现代 Vue 或 React 前端,使您可以使用 Vue 或 React 构建完整的现代前端,同时利用 Laravel 路由和控制器进行路由、数据注入和身份验证 - 所有这些都在单个代码存储库中完成。使用这种方法,您可以同时享受 Laravel 和 Vue / React 的全部功能,而不会破坏任何一种工具的能力。
https://laravel.com/docs/10.x/frontend
而 Inertia.js ,则是可以作为一个胶水的目的,就是服务端还是那个服务端,使用 vue,react,svelte 还是一样使用。但这些都是服务端来完成的。传统的 vue, react,svelte 这些(非 ssr 实现的),都是在前端处理,比如状态,页面 dom等都是在前端实现的。
官网: https://inertiajs.com/who-is-it-for
几年前构建的 demo: http://demo.inertiajs.com/login
中文文档(这个文档太旧了,当前最新版本是 1.0 版本):https://learnku.com/docs/inertia/0.11
文本形式的一问一答,公众号这种场景还是不错。今天就尝试用 laravel10 接入一个 chatgpt 的功能。并使用到公众号上。
使用 chatgpt,我们需要使用下边这个包。
https://packagist.org/packages/geekr/openai-laravel
composer create-project laravel/laravel gzh.com --prefer-dist

# 查看当前 laravel 版本 (Laravel Framework 10.3.3)
php artisan --version

# 添加到版本控制
git init -b main
git add .
git commit -m 'laravel initialize'

# 安装 geekr/openai-laravel
composer require geekr/openai-laravel
如果报 Could not find a version of package geekr/openai-laravel matching your minimum-stability (stable). Require it with an explicit version constraint allowing its desired stability. 这个错误。 可以这么操作。这个包对框架版本限定的死死的,通过这个方式来安装。
rm -rf composer.lock

# 在 composer.json 中增加配置
"require": {
        …
        "geekr/openai-laravel": "dev-master"
    },

composer install

# 添加到版本控制
git add .
git commit -m '安装 geekr/openai-laravel'
如果上边步骤都 ok 了,继续。
# 生成配置文件
php artisan vendor:publish --provider="GeekrOpenAI\Laravel\ServiceProvider"
上边命令,会在 config 目录下,生成一个 openai.php 的配置文件。
然后要配置 OPENAI_API_KEY 。这个 key, 我们在 https://platform.openai.com/account/api-keys 这里申请。
到写这里,已经过去了 2 个多小时。饭也没吃,好难啊。不仅要绿色上网,还要有一些特定国家的手机号码接收短信。接受短信后,询问你用这个来干啥,然后就一直 502,死活过不去。后来用 postman,将 token 以及 body 复制过去请求还是不行。再后来快要放弃的时候,尝试着将 postman body 里边的中文改成字母,竟奇迹般的创建成功了。再然后进入首页,进入 keys 列表。点击创建,马上就可以生成 key 了。
https://www.hztdst.com/9514.html
https://sms-activate.org/getNumber
上边这种方式是花钱的,花钱的果然好使,好用。后来找啊找,好像也有免费这种服务的。
https://sms24.info/en/messages/OpenAI
既然拿到了 key。那就继续。我们在 .env.example 中创建 key 和 url 的配置。这样做是因为 .env.example 参与版本控制,.env 是不参与的。
# chatgpt 配置
OPENAI_API_KEY=
OPENAI_BASE_URI=open.aiproxy.xyz/v1
然后,我们在 .env 中配置好上边的配置。填入 key 和 url。
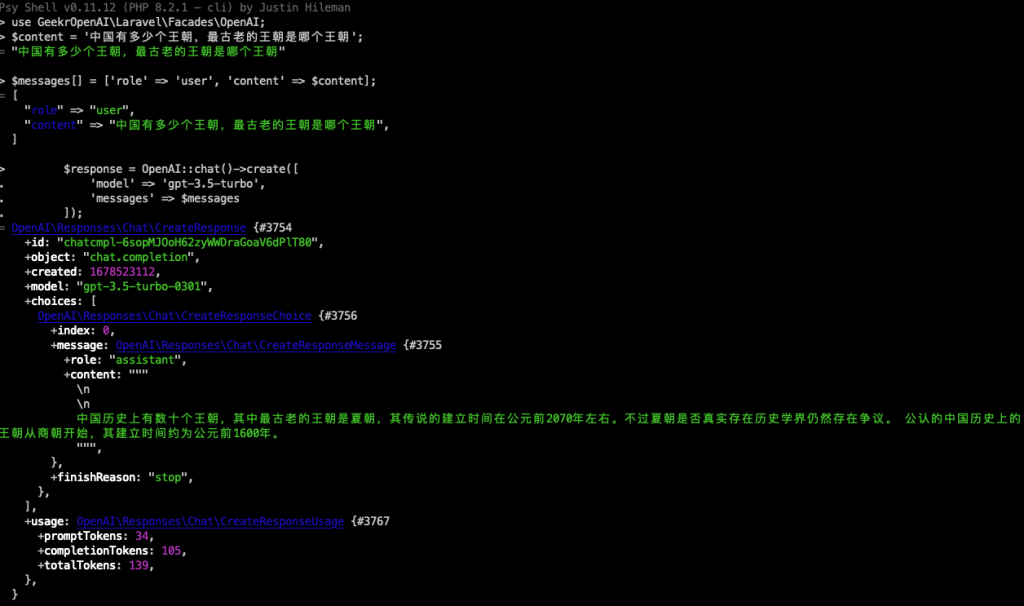
先用 tinker 进行调试。有问有答就好。
# 打开 tinker
php artisan tinker

# 敲入下边的命令
use GeekrOpenAI\Laravel\Facades\OpenAI;

$content = '中国有多少个王朝,最古老的王朝是哪个王朝';

$messages[] = ['role' => 'user', 'content' => $content];

$response = OpenAI::chat()->create([
    'model' => 'gpt-3.5-turbo',
    'messages' => $messages
]);
坐等结果。看到是有结果返回的。如下图所示。
这仅仅是一个测试,需要多多测试。不过总得持有怀疑的态度。这个接口接的就是 chatgpt,不是其他的接口。给个错误的 key 试试,看是否能有正常的反馈。
只要有问有答,接入公众号就简单的。用户给公众号输入文本信息(如果所有文本信息都用 chatgpt来处理),那就在服务端将接到的信息作为 GeekrOpenAI\Laravel\Facades\OpenAI 的请求参数来直接请求,再将请求结果解析,再处理,拿到结果。然后按照公众号的规则,输出给用户就可以了。
如果你的文本信息还有其他用途。那就得让用户带上标志了。比如让用户在问之前加上前缀 gpt xxxx 这样的。服务端拿到后,再做特殊处理。
话是这么说,可是真正做起来又会出现意外。
gpt 的请求时间太长了。复杂的问题会超出 10 秒,简单的问题也比较久。这个就会引发微信公众号里的异常机制。
腾讯个坑爹货,用户给服务端发送消息,只要 5 秒内,没回复,腾讯会再继续调用,一直调用三次。三次后,还没返回或有错误解构都会显示 “该公众号提供的服务出现故障,请稍后再试”。 网上也有很多解决方法,说直接返回一个空字符串或”success“字符串或使用客服消息。都试过,没有用。空字符串和”success“是没有用,客服消息是有用,只是这玩意不能阻止它连续请求三次的问题。
一直在挣扎。在入口那,用 redis 对请求做一次记录,下次重复请求过滤掉。只是这样做,太不好看了。
还是使用 Redis::setex($key, 20, $key) 来标记。哎。
体验效果如下图。

服务器快到期了,所以在阿里云又从新买了一台。这两天一直在忙新服务器环境的搭建,和数据迁移的处理。
购买的服务器

dnf upgrade-minimal --security

dnf update

//  记得这样重启,要不登录系统后,还是会提醒你进行安全更新
rebootvim /etc/ssh/sshd_config
// 末尾追加(数字自己定义合适的)
ClientAliveInterval 60
ClientAliveCountMax 5
// 重启 ssh
service sshd restart如果登录进去,显示的主机名是一堆字母数字组成的杂乱的名字。你可以通过阿里云控制台进行设置主机名。也可以在服务器,通过命令行来完成。这么做,一方面是好看,二方面如果服务器多,好知道是哪台服务器。
禁用 root 用户远程登录服务器。使用密匙+密码的方式进行登录。这样可以增加服务器的安全。
做好这些,记得进行做镜像。方便后边出错了,不好解决的时候,进行回滚处理。
安装开发环境。
暂时先装了这么多。为了性能以及可靠性,数据库也可以单独阿里云购买。只是这个要单独花钱啊。
wordpress 用来做博客和cms系统都还不错。这些年,虽然也想着自己用 laravel 写一个博客系统起来。后来还是搁浅了。 wordpress 可以很方便使用主题和插件。一个好的主题的好,用过就知道。
不得不换服务器了。在做迁移之前在想,我现在的服务器环境安装的开发环境都是最新的,曾经的 wordpress 还能迁移过来吗。之前一种思路是只要把数据弄过来就行。其实,还真行。后来尝试了下,在旧的服务器上,将 wordpress 直接更新到最新版本,也就是当前的 6.1 版本。再做迁移也是可以的。
操作。
我有两套博客。最久的那套是 2013 年左右安装的。太旧没更新了。以为更新不了,没想到更新几次竟然能更新成功。于是按照上边的方法进行操作,结果有好几个地方修改不好。于是就有这个方式。
https://wordpress.org/download/
后来想想。wordpress 的更新应该不是所有的代码都更新。要不也不会出现之前的错误还需要修复。既然方式二能实现版本更新,那方式一似乎不是很有用。
不过很重要一点。要备份好文件和数据库。这样方便多次试错。还有如果域名有更换了,媒体文件或某些链接会失效。这个方面的确做不好。不过好在是很容易升级更新。
如果遇到错误,可以在 wp-config.php 中打开 debug 模式,进行查看跟踪。
如果后台只有英文,可以在 wp-config.php 中增加 define('WPLANG', 'zh_CN') 配置,然后在后台多语言那设置下就好。
对于主题,可以去网上找,觉得好看的好用的都可以,不过代码都是别人的,也要注意安全性相关的东西。还有代码是别人的,也要注意别人的使用说明。下载好主题后,将主题文件包放在 wp-content/themes 下,然后在后台中设置激活,再进行细致化设置就好。
还有,如果对主题部分不满意,你也可以修改源码。如果仅仅是样式方面的问题,可以通过增加 css,来覆盖样式来解决。比如隐藏一些不需要 div,修改某些div 的布局等等。
对于插件更新,默认是要你配置 ftp。这个不是太方便也不太安全。单独给它配个有点麻烦,把权限大的给它又觉得不放心。干脆就不使用 ftp 的方式来安装更新就好了。在配置文件 wp-config.php 中增加 define('FS_METHOD','direct'); 配置。然后将项目的用户和组都是设置成 php 对应的用户组。比如我的php 和 nginx 都公用 nginx:nginx 用户组。 使用 chown nginx:nginx xxx 就好了。
博客是一方面,我的主要服务端逻辑,都是通过 laravel 开发的。 laravel 的依赖包比较多,对 php 的版本都有很严格的控制。我之前的 php 版本是 7.4 不是太古老,但也是不好使。现在都是 php8.2.3。是大版本的更新。不过好在,一般的功能语法都会有向下兼容。开始吧。
# 将代码拉到新的服务器对应位置

git clone xxx

composer install
这个时候,如果遇到 Your lock file does not contain a compatible set of packages. Please run composer update. 可以加上 --ignore-platform-reqs 参数来忽略版本的匹配。但只是尝试,如果即使安装成功了,并不一定能使用成功。
composer install --ignore-platform-reqs这次是成功安装了。
但发现报个错误。
Carbon\Carbon::setLastErrors(): Argument #1 ($lastErrors) must be of type array
果然某些依赖还是有改变。这个单独更新 carbon 包就可以。
composer update nesbot/carbon

composer install --ignore-platform-reqs
到此,框架算是安装好了。
cp .env .example .env

php artisan key:generate

php artisan migrate --seed
laravel 常规安装流程操作是上边边这样的。而我们这里都是完整的项目,里边配置很多,通过上边边这种方式要修改的太多了。我是直接创建一个 .env 文件,然后将旧的文件内容复制过来就好。
vim .env

# 复制配置过来就行.env 中数据库的配置正确后
php artisan migrate --seed对相关报错进行处理。
composer update facade/ignition --ignore-platform-reqs文件权限操作
chmod 777 storage -R
chmod bootstrap/cach -R
安装前端脚手架
yarn
yarn dev
发现有版本等相关信息报错。一种方式是直接删除 yarn.lock 文件,删除 node_modules 文件夹。再进行安装。
安装后台环境。
cd resources/admin

yarn
报 error @achrinza/node-ipc@9.2.2: The engine "node" is incompatible with this module. Expected version "8 || 10 || 12 || 14 || 16 || 17". Got "18.14.2"
我们直接设置 yarn config set ignore-engines true
yarn

yarn run build:prod
发现报错 Building for production...Error: error:0308010C:digital envelope routines::unsupported。出现这个错误是因为 node.js V17版本中最近发布的OpenSSL3.0, 而OpenSSL3.0对允许算法和密钥大小增加了严格的限制,可能会对生态系统造成一些影响。
再继续
export NODE_OPTIONS=--openssl-legacy-provider

yarn run build:prod
然后又是 *These dependencies were not found: core-js/modules/es.array.push.js** 错误。
yarn add core-js --dev

yarn run build:prod
到此,总算是好了。凡是遇到问题解决问题就好。
配置 nginx,修改域名映射。检查测试。
就是将整个项目打包,复制过去,解压。然后配置下。
有这样一个场景。mysql 数据库有个表的字段里边存了一些图片链接信息。关键是这些链接信息是整个域名都包含在内的。如果有一天,域名换了,随着新域名一起,文件也搬过来了。这个时候,就需要把这个字段里边的域名信息全部替换掉。这个时候,REGEXP_REPLACE 就很有用了。
先看看截图和 sql,就知道这个的好用了。
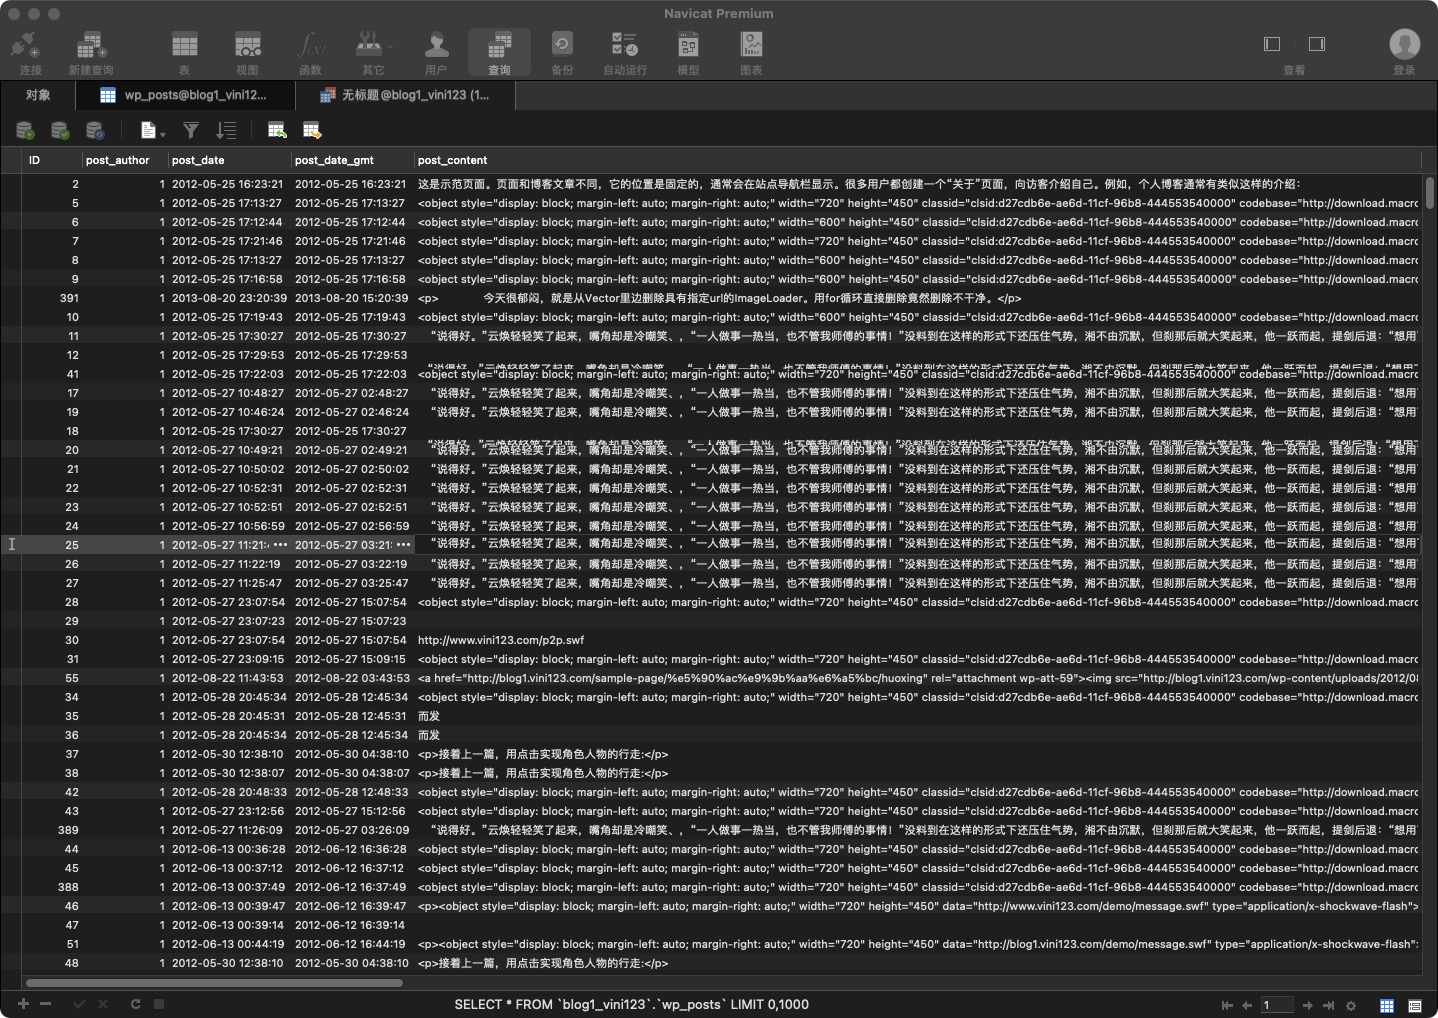
UPDATE wp_posts set `post_content` = REGEXP_REPLACE(`post_content`, 'blog.vi', 'blog1.vi') WHERE true;我这里数据少,之前全部给替换了。
regexp_replace(source, pattern, replace_string, occurrence)参数说明:
返回值:
将source字符串中匹配pattern的子串替换成指定字符串后返回。当输入source, pattern, occurrence参数为NULL时返回NULL,若replace_string为NULL且pattern有匹配,返回NULL,replace_string为NULL但pattern不匹配,则返回原串。
服务器安装好 mysql 后。需要先初始化。初始化后,需要创建用户以及分配权限。默认 root 用户是禁用远程登录的。这个时候创建一个远程登录用户就比较重要。对远程登录用户看需要,可以在多个纬度来进行控制。比如限定 ip,就是在指定的 ip 下,才可以访问。然后对权限进行控制,对表进行控制等等。
历史记录: https://blog.vini123.com/382
先创建一个远程可登录用户看看
# 内网登录 mysql
mysql -u root -p

# 创建一个远程可登录用户
create user shenqi@'%' identified by '33441314';
创建用户后,该用户只能连接到数据库服务器,但并没有操作该数据库服务器的权限。
mysql8 以后,必须先创建用户,才可以授权。这里创建用户最好限定ip,这样远程连接必须在该ip下进行。提高数据库的安全性。大多时候,使用 localhost 连接更好。
https://developer.aliyun.com/article/1132514
https://zhuanlan.zhihu.com/p/356488732
阿里云服务器活动中的通用型实例有G5、G6、G7这三个实例规格可选择,虽然通用型实例价格比共享型实例价格要高,但由于通用型实例是独享型实例,而且活动价格比计算型和内存型实例的价格又要便宜一点,而且通用型实例的云服务器通常cpu与内存的比例都是1:4,内存资源非常充足,因此很多企业级用户都通过活动购买云服务器都会选择通用型实例,那么阿里云服务器活动中的通用型G5、G6、G7实例如何选择呢?
通过活动价格、网络带宽、网络收发包PPS等指标数据这几个方面来详细说下阿里云服务器活动中的通用型G5、G6、G7实例规格价格及性能差别,以供大家参考选择。
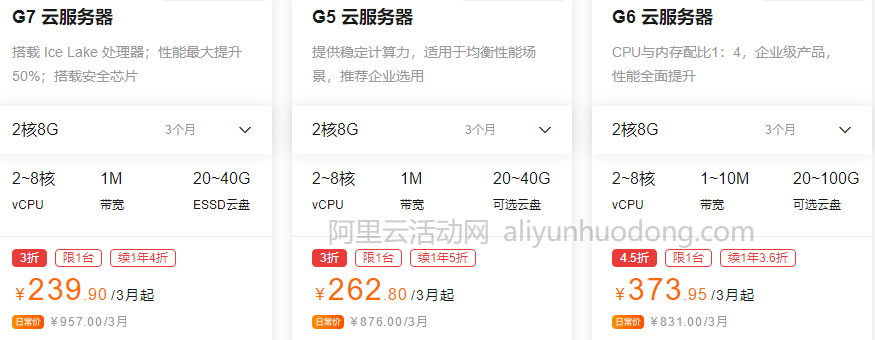
从价格高低上来说,相同配置的云服务器,通用型G7实例是最便宜的,其次是通用型G5实例,G5与G7实例的公网带宽都是1M,其实这个带宽通常都是不够用的,因此需要我们在购买之后,通过升降配功能来升级到想要的带宽值,需要支付差价。
虽然通用型G5、G6、G7实例均是企业级独享型云服务器,但是通用型G5是第五代云服务器;通用型G6是第六代云服务器;ECS通用型G7是第七代ECS实例,使用的是第三代至强®可扩展处理器(代号"IceLake") ,网络、存储IO性能都有大范围提升,其实收费标准最高的是通用型G7,只是因为最近阿里云将第七代云服务器ECS价格做了下调,因此,现在选择通用型G7实例是最划算的。
详细对比下三款云服务器的CPU处理器。
虽然这三种实例规格都能用于高网络包收发场景、中小型数据库系统、缓存、搜索集群和网站和应用服务器等场景,但是具体的适用场景还是有所区别的,例如区块链场景和安全可信计算场景就应该选择通用型G7实例更好,下面是阿里云官方公布的通用型G5、G6、G7实例各自的适用场景,如下表所示:
| 实例规格 | 适用场景 |
|---|---|
| 通用型G5 | 高网络包收发场景,例如视频弹幕、电信业务转发等。各种类型和规模的企业级应用。中小型数据库系统、缓存、搜索集群。数据分析和计算。计算集群、依赖内存的数据处理 |
| 通用型G6 | 高网络包收发场景,例如视频弹幕、电信业务转发等。各种类型和规模的企业级应用。网站和应用服务器。游戏服务器。中小型数据库系统、缓存、搜索集群。数据分析和计算。计算集群、依赖内存的数据处理 |
| 通用型G7 | 高网络包收发场景,例如视频弹幕、电信业务转发等。游戏服务器。中小型数据库系统、缓存、搜索集群。各种类型和规模的企业级应用。网站和应用服务器。数据分析和计算。安全可信计算场景。区块链场景 |
后台的接口授权问题已经解决。现在做移动端的接口。移动端接口路由写在 routes/api.php 中。测试用 postman 就可以。不用去做 ui 界面。
移动端一般都是使用微信授权登录或手机号登录,这样比较贴近场景和方便。为了测试,这里使用邮箱和密码登录。
routes/api.php
<?php

use Illuminate\Support\Facades\Route;
use App\Http\Controllers\Api\UserController;

// 登录
Route::post('login', [UserController::class, 'login'])->name('api.login');

Route::group([
    'middleware' => ['auth:sanctum'],
], function () {
    Route::get('userinfo', [UserController::class, 'getUserInfo'])->name('api.getUserInfo');
});
当前,UserController.php 文件还没有,我们创建一个。
php artisan make:controller Api/UserController
里边加入相应的逻辑。
<?php

namespace App\Http\Controllers\Api;

use App\Http\Controllers\Controller;
use Illuminate\Support\Facades\Auth;
use Illuminate\Http\Request;
use App\Http\Requests\Admin\LoginRequest;
use App\Models\User;

class UserController extends Controller
{
    public function login(LoginRequest $request)
    {
        $data = $request->only(['email', 'password']);

        if (!Auth::validate($data)) {
            return response()->json(['message' => '账号密码错误'], 403);
        }

        $user = User::where('email', $data['email'])->first();

        $user['token'] = $user->createToken('auth')->plainTextToken;

        return response()->json($user);
    }

    public function getUserInfo(Request $request)
    {
        $user = $request->user();

        return response()->json($user);
    }
}
这里依然使用了 LoginRequest 来进行字段的验证。
下边,打开 postman 来进行验证验证。
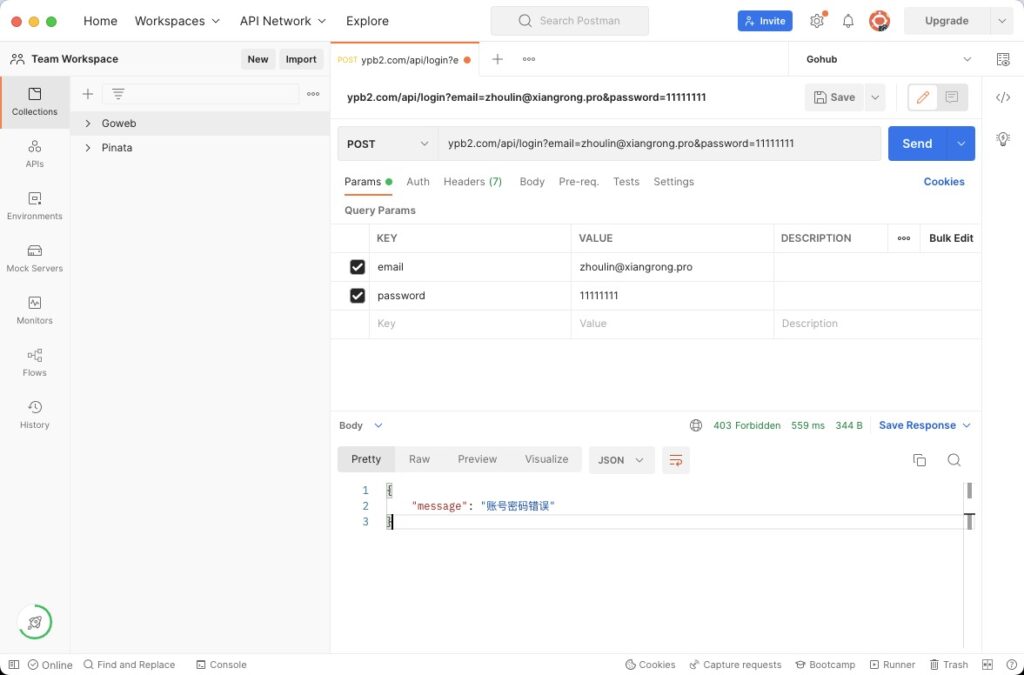
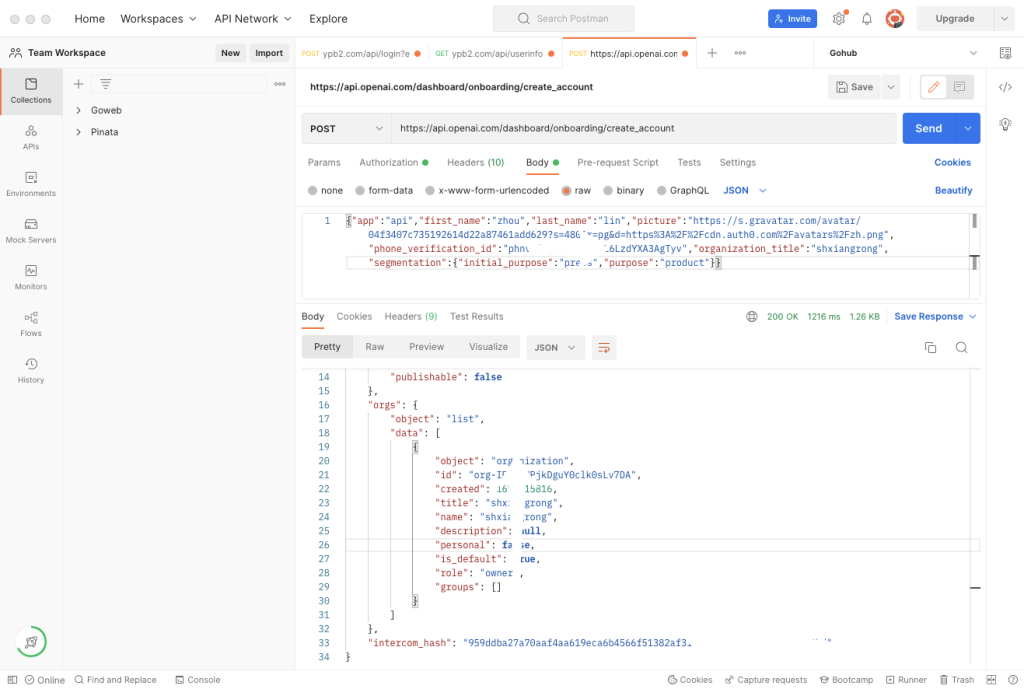
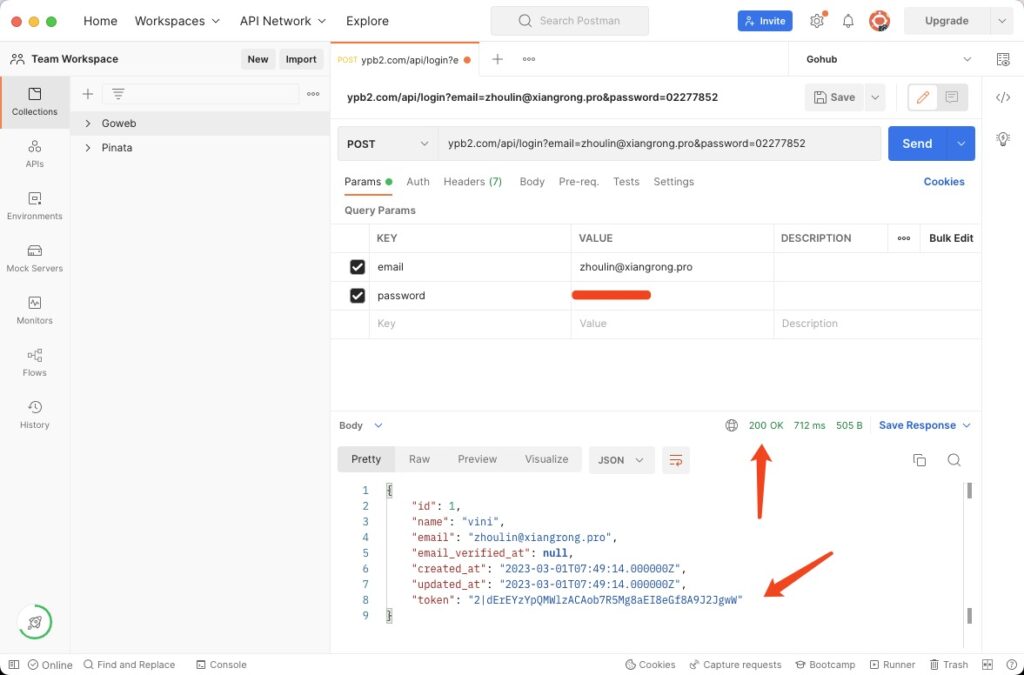
故意写错密码。返回了错误提示,http 状态码是指定的 403。故意不写 401,401 有它独有的作用。然后修改为正确密码再测试。
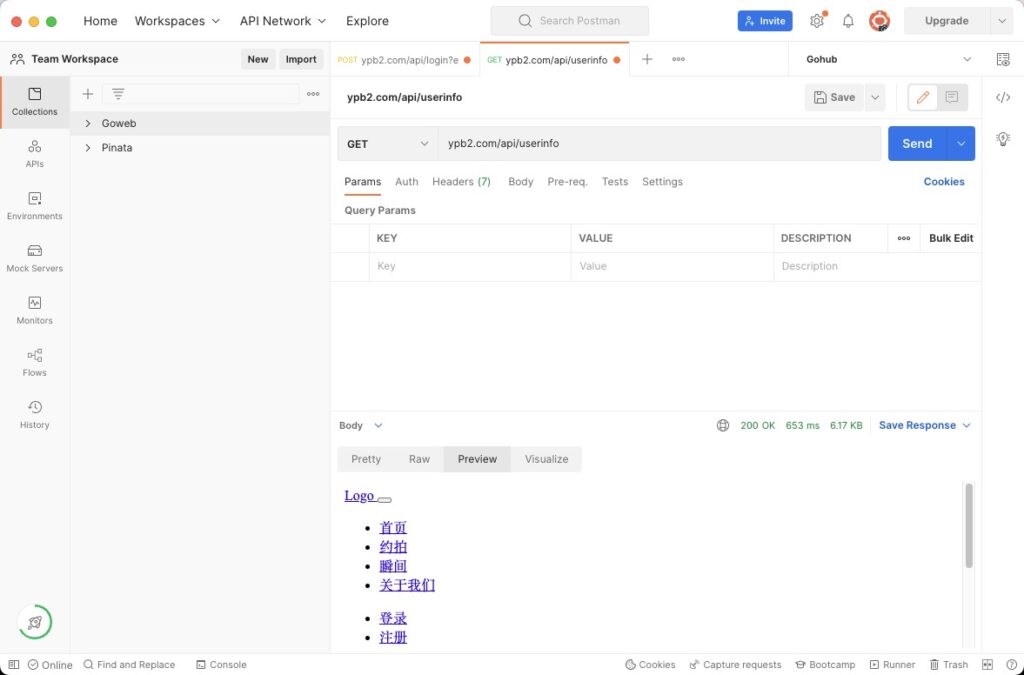
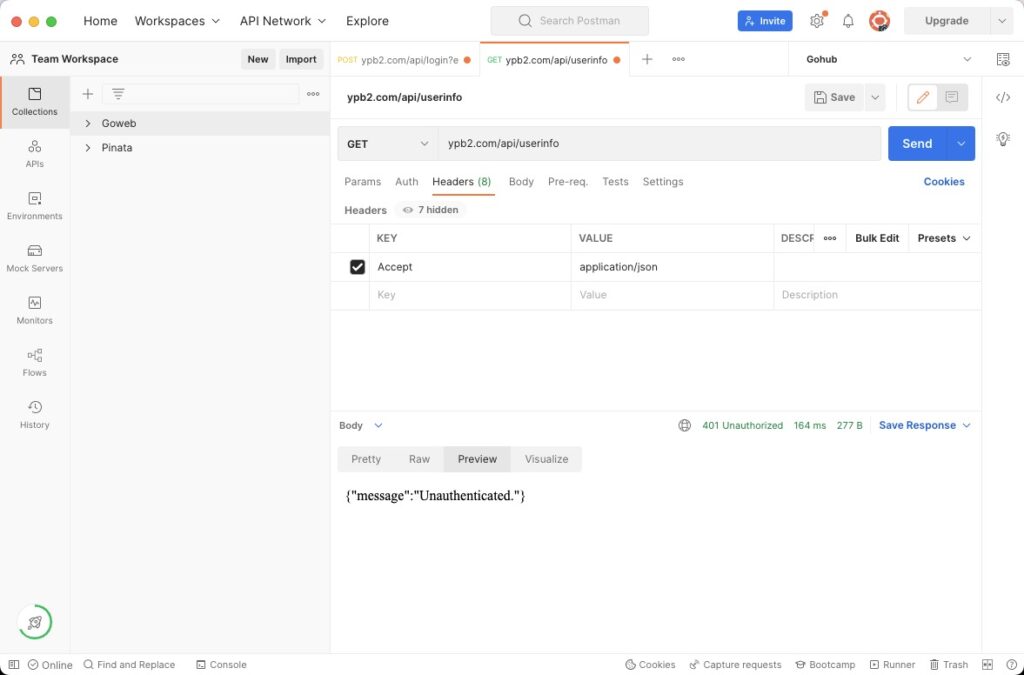
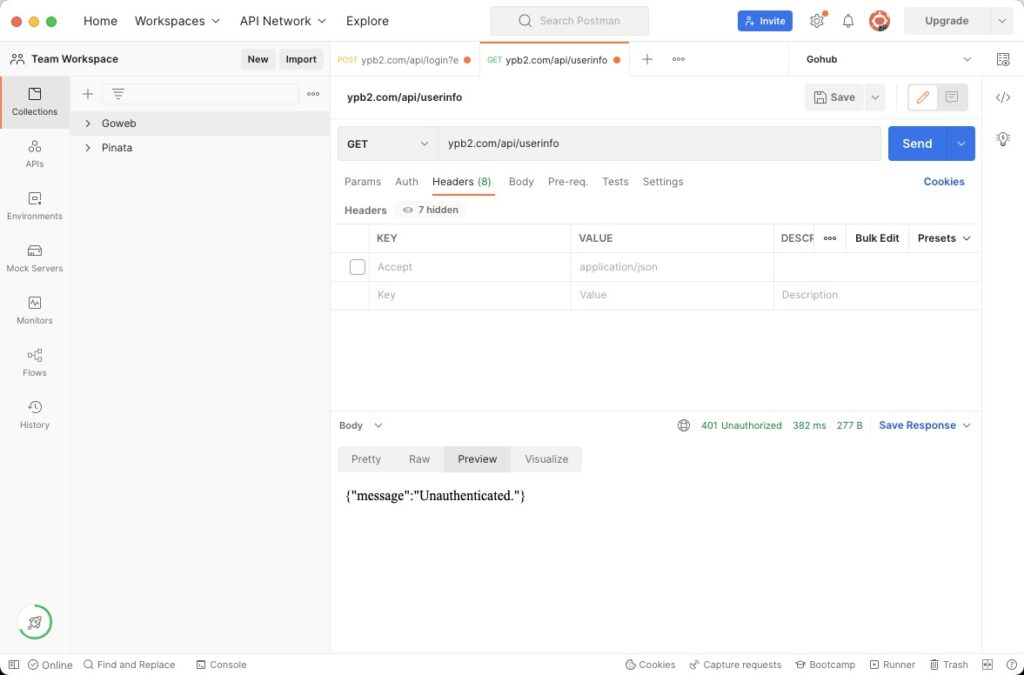
这个是在 header 中没有加入 token,返回的结果。这里存在两个问题,第一不能返回正确的结果,第二这里返回的是 html。我们接口通常需要返回的是 json 。给个 html 算啥。这个有两个解决方法,第一就是在发起请求的时候,在 header 中指定 accept 为 application/json 就好。这样框架会知道接口想要什么样的数据。测试如下。
还有一种方式,服务端在数据请求之前主动在header加上 accept。因为很 明确这里是做接口的,那我就干脆直接加上。这个场景,我们新建一个前置中间件就可以完成。
php artisan make:middleware AcceptHeader

# 主动加入 accept

<?php

namespace App\Http\Middleware;

use Closure;
use Illuminate\Http\Request;

class AcceptHeader
{
    public function handle(Request $request, Closure $next)
    {
        $request->headers->set('Accept', 'application/json');

        return $next($request);
    }
}
然后,在 $middlewareGroups 的 api 的第一个位置,配置上这个中间件就可以。
App/Http/Kernel.php
        'api' => [
            \App\Http\Middleware\AcceptHeader::class,
            \Laravel\Sanctum\Http\Middleware\EnsureFrontendRequestsAreStateful::class,
            \Illuminate\Routing\Middleware\ThrottleRequests::class.':api',
            \Illuminate\Routing\Middleware\SubstituteBindings::class,
        ],
再来试试,这样就可以了。
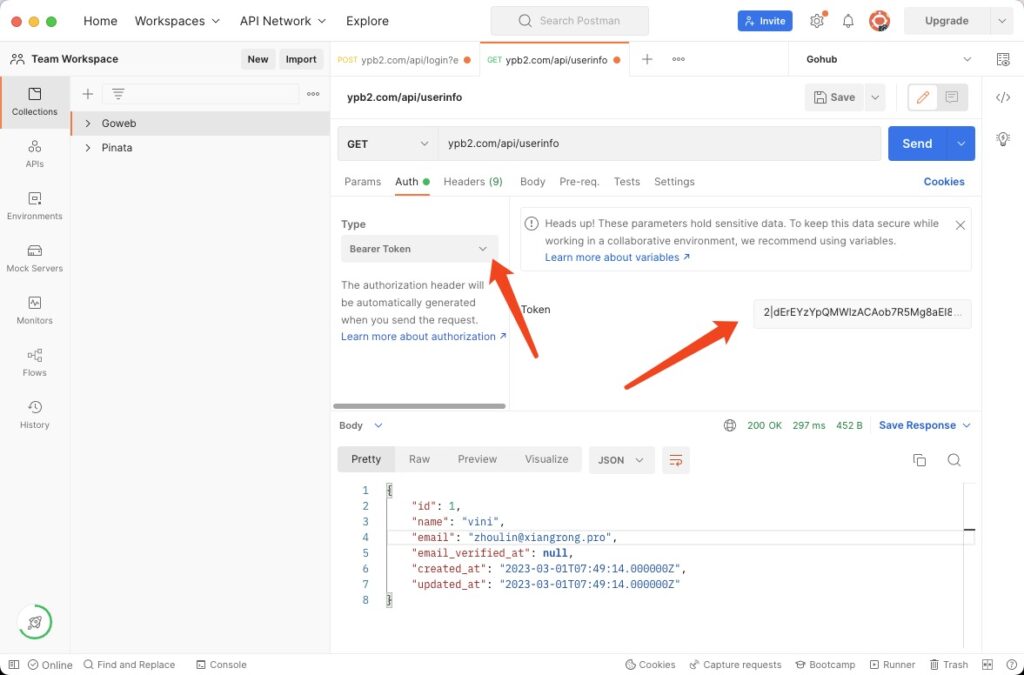
最后,我们加上正确的 token。就能正常的获取的用户信息了。
到此。一个简单多端授权使用的功能初步完成了。但对于一个完整的项目,这还远远不够。需要去舔砖加瓦,写更多符合场景需要的业务。