只要 websocket 服务。最简单化的 websocket 服务。不需要其他基于 swoole 的其他框架应用。仅仅 swoole 扩展 + php + nginx 完成 websocket 的服务。就是想最简单简洁的实现。
就像官方的实例一样 https://wiki.swoole.com/#/start/start_ws_server,就这么些代码。
$ws = new Swoole\WebSocket\Server('0.0.0.0', 9502);

//监听WebSocket连接打开事件
$ws->on('Open', function ($ws, $request) {
    $ws->push($request->fd, "hello, welcome\n");
});

//监听WebSocket消息事件
$ws->on('Message', function ($ws, $frame) {
    echo "Message: {$frame->data}\n";
    $ws->push($frame->fd, "server: {$frame->data}");
});

//监听WebSocket连接关闭事件
$ws->on('Close', function ($ws, $fd) {
    echo "client-{$fd} is closed\n";
});

$ws->start();
我们不喜欢用 ip 来连接,我们用域名。我们不喜欢用 http,我们用 https。我们不喜欢加端口号,我们用代理。这里我们用 nginx 来搞定。比如吧,我们自己的域名是: xx.com, nginx 就可以像下边这样配置:
map $http_upgrade $connection_upgrade {
    default upgrade;
    '' close;
}

server
{
    listen 443 ssl http2;
    server_name xx.com;

    ssl_certificate         /usr/local/server/nginx/conf/ssl/xx.com.pem;
    ssl_certificate_key     /usr/local/server/nginx/conf/ssl/xx.com.key;

    charset utf-8;
    index index.php index.html index.htm;
    root /www/xx/xx.com/public;

    location /wss {
        # 代理到上边的自定义的地址
        proxy_pass http://127.0.0.1:9502;
        proxy_http_version 1.1;
        proxy_set_header Upgrade $http_upgrade;
        proxy_set_header Connection "Upgrade";
        proxy_set_header Host $host;
        proxy_set_header X-Real-IP $remote_addr;
    }

    location / {
        try_files $uri $uri/  /index.php?$query_string;
    }

    location ~ \.php($|/) {
        fastcgi_pass 127.0.0.1:9000;
        fastcgi_index index.php;
        fastcgi_param HTTPS $https if_not_empty;
        fastcgi_split_path_info ^(.+\.php)(.*)$;
        fastcgi_param PATH_INFO $fastcgi_path_info;
        fastcgi_param SCRIPT_FILENAME $document_root$fastcgi_script_name;
        include fastcgi_params;
    }
}
服务端的配置构建的重要部分就算好了。需要注意的是,创建 websocket 的时候,一定不要带上 ssl 相关的参数和证书。这样你 nginx 这边请求代理过去是 http 请求,就会出错。
websocket 这里没有心跳功能,可以手动模拟创建一个,去实现类似的业务。
还有,在服务端可以使用 swoole 自己的存储结构。 https://wiki.swoole.com/#/memory/table
旧的文章
要实现 app 内版本更新得走以下几个流程:
- 对系统的获取(android 或 ios)。
-
对系统当前 app 版本的获取(1.0.1 + '.' + 100)(版本名称 + 版本号控制)。
-
对服务端接口请求 app 版本信息(定义当前最新版本号)。比如 app 之前的版本是 1.0.1.100,返回给前端就是这个。后来你新提交了一个版本 1.0.2.100,并审核通过了。当审核通过时,你修改后端配置,将版本号改成 1.0.2.100,这个时候返回前端就是 1.0.2.100。
-
用当前 app 版本信息和服务端版本信息进行对比。如果不一样,则表示服务端有新的版本。应弹窗提示用户进行 app 更新。(版本可以定义两个,android 和 ios 各一个,每个系统同一时间可能会不一样)。
-
弹窗提示用户是否要更新。用户点击确定。如果是 ios 系统,则跳转到商店更新(亲自测试可行)。如果是 android 系统,则下载安装包更新(没亲测过),ios 是必须要走商店,且只有一个商店,比较好弄,也正规。android 打个包就可以装,上商店也很多家都可以。说它简单是只要个正常的包就可以装,说它不简单就是商店太多,审核太麻烦,还得要软著,太心累。一般不到万不得已,根本就不想上 android 商店。
上边这个流程是在客户端做判断,并去处理升级。感觉不太好,因为客户端一旦上架你短时间内很难修改和改变。如果把判断放在服务端,你可以随时随地的修改。以备异常情况。(也是文章写着写着,想法也就变了)
虽然 uniapp 官方提供了套件,但还是个人用户实现的更自由些(套件的升级 ui 界面 好像不能任意自定义)。
代码操作
一定要使用条件编译,也就是 app 才需要这样。因为有些 api 只有 app 端才有的。
// #ifdef APP-PLUS
# 从服务端获取 app 版本信息
GetAppVersion().then(res => {
   // 获取当前已安装的 app 的版本信息
    let curVersion = plus.runtime.version + '.' + plus.runtime.versionCode;
    let osName = uni.getSystemInfoSync().platform;
    if (osName == 'ios') {
        if (res.ios_version && res.ios_version != curVersion) {
            // 弹提示是否要更新。如果更新,就跳转到苹果应用商店
            uni.showModal({
                title: '更新提示',
                content: '发现新版本,是否要更新?',
                cancelColor: '#383838',
                confirmColor: '#ffc80b',
                success(res) {
                    if (res.confirm) {
                        let appleId = 6443910575;
                        plus.runtime.launchApplication(
                            {
                                action: `itms-apps://itunes.apple.com/cn/app/id${appleId}?mt=8`
                            },
                            function(e) {
                                console.log(e.message);
                            }
                        );
                    }
                }
            });
        }
    } else if (osName == 'android') {
        if (res.android_version && res.android_version != curVersion && res.downUrl) {
                // 弹窗提示是否要更新。如果更新,跳转到特定商店更新或下载更新。(弹窗省略了,去商店也省了)
                var downTask = plus.downloader.createDownload(url, {}, function(d, status) {
                //d为下载的文件对象
                if (status == 200) {
                    //下载成功,d.filename是文件在保存在本地的相对路径,使用下面的API可转为平台绝对路径
                    var fileSaveUrl = plus.io.convertLocalFileSystemURL(d.filename);
                    plus.runtime.openFile(d.filename); //选择软件打开文件
                    uni.showToast({
                        icon: 'none',
                        title: '更新成功'
                    })
                } else {
                    //下载失败
                    plus.downloader.clear(); //清除下载任务
                    uni.showToast({
                        icon: 'none',
                        title: '更新失败'
                    })
                }
            })
            //开始下载
            downTask.start();

            //监听下载进度
            downTask.addEventListener('statechanged', (task) => {
                let percentage = parseInt(
                    (parseFloat(task.downloadedSize) /
                        parseFloat(task.totalSize)) *
                    100
                );
                if (percentage == 100) {
                    // 更新完成
                }
            })
        }
    }
});
// #endif
上边仅供参考,实际情况需调试。后一个思路,由服务端判断是否要更新,并提供更新信息(下载地址,商店地址等)这种方式比较好。还有 android 这边如果自己做下载更新,还得做个好看的 ui 升级界面。有进度条显示那种。
看过小红书的推送的朋友肯定会觉得这种推送很有个性。能够自由定义用户的头像作为推送的通知图标。下边这个文章有说明。
app 接受到推送消息后,如果用户点击消息,一般是到达目标页面。这个时候解析消息并进行处理。
操作流程
- 当用户点击消息栏的消息时,通过 uni.onPushMessage 方法来接受消息。
- 获取接受消息里边的 payload 数据。payload 里边可以传递一些自定义的参数过来。
- 我们可以将想跳转的页面和参数定义在 page 里。并对 page 进行判断,如果 page 是 tab 页的,就做 tab 页跳转,非 tab 页就做非 tab 页跳转。
- 对消息数目角标清零
plus.runtime.setBadgeNumber(0);。
            // #ifdef APP-PLUS
            let goPage = (value) => {
                let tabbars = ['pages/home/index', 'pages/pdd/index', 'pages/message/index', 'pages/mine/index'];
                let isTab = false;
                for(let tabbar of tabbars) {
                    if (value.indexOf(tabbar) >= 0) {
                        isTab = true;
                        break;
                    }
                }

                if (isTab) {
                    uni.switchTab({
                        url: value
                    });
                } else {
                    uni.navigateTo({
                        url: value
                    });
                }
            }

            // 通过推送消息进来的
            uni.onPushMessage((res) => {

                plus.runtime.setBadgeNumber(0);

                if (res && res.data && res.data.payload && res.data.payload.page) {
                    goPage(res.data.payload.page)
                }
            });
            // #endif
消息推送补充
消息推送那边,我们把 page 参数 放在 payload 里。
{
    "appId": "__UNI__XXXX",
    "push_clientid": "6eb119fabc0123f545086eexxxxxxxx",
    "title": "小区宝来电",
    "content": "人生若只如初见,何事秋风悲画扇。",
    "payload": { "page": "pages/home/topic/detail?id=6" }
}
习惯了服务端调用接口(unipush1),没有使用过云函数的朋友,又对 unipush2 的文档没完全操作一遍。一般会觉得 unipush2 的服务端调用有些奇怪。其实,如果按照文档走下去,也会没事。
其实,unipush2 的服务端调用和传统的服务端调用接口一样的。只是这里是调用的 dcloud 的 url。把那个 url 当做是服务端要调用的接口就可以了。
那这个 url 又怎么来,就是通过对建立的云函数 url 化就可以了。这里,重点就是讲怎么建立云函数以及怎么将云函数 url 化,还有通过 postman 进行测试。
其实,通过这种方式,更自由简单。只要读 dcloud 的文档就可以了,完全不考虑个推,也不用去注册个推账号。
准备工作
如果已打包成功,在 dcloud 上推送证书也配置好了,并且通过 dcloud 的后台测试成功过推送。准备工作就不用看了。直接看最后的正题如何建云函数以及 url 化,还有调用。
这里以 ios 端为例,以手机端基座为例。(正式版就是直接打包和换个证书)
准备打包 app
1.1 - 配置 app 模块。
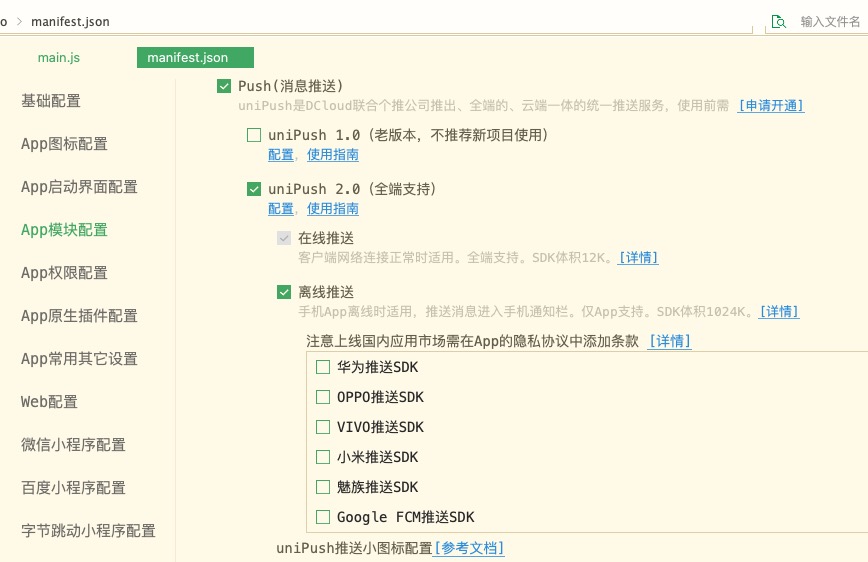
打开项目根目录下的 manifest.json 文件, 切换到 App模块配置, 按图这样勾选,保存。
1.2 打包基座。
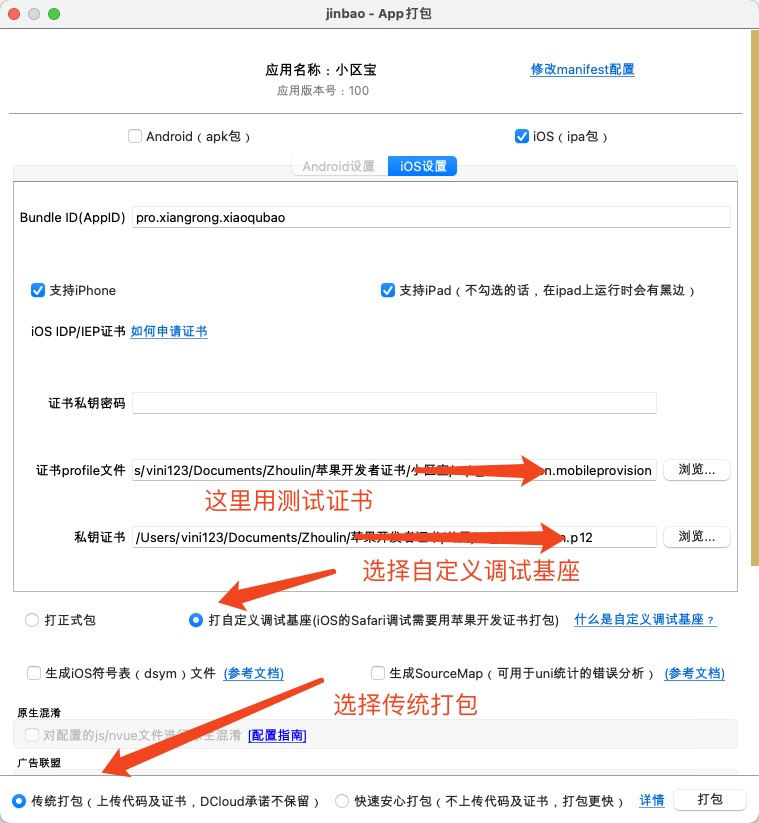
点击顶部菜单, 发行->原生App-云打包,出现弹窗, 按上图这样配置,打包基座。会提示您打包成功或失败。肯定要成功哈。有了基座就方便干事了。
1.3 运行到基座。
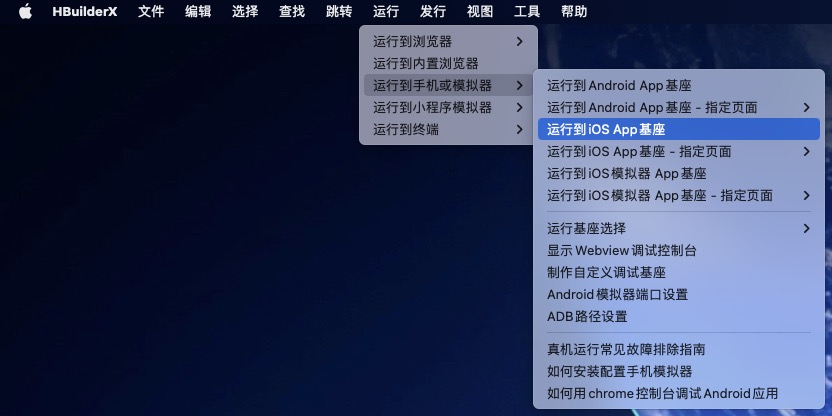
将手机和 mac 连接好。点击顶部菜单,运行->运行到手机或模拟器->运行到iOS App基座,弹窗,确定直到提示成功,手机那边启动 app就好了。
1.4 在手机端打开 app,同意各种权限。
dcloud 后台配置证书
推送虽然用到个推,可用户不用管个推,dcloud 官方自己管就可以。
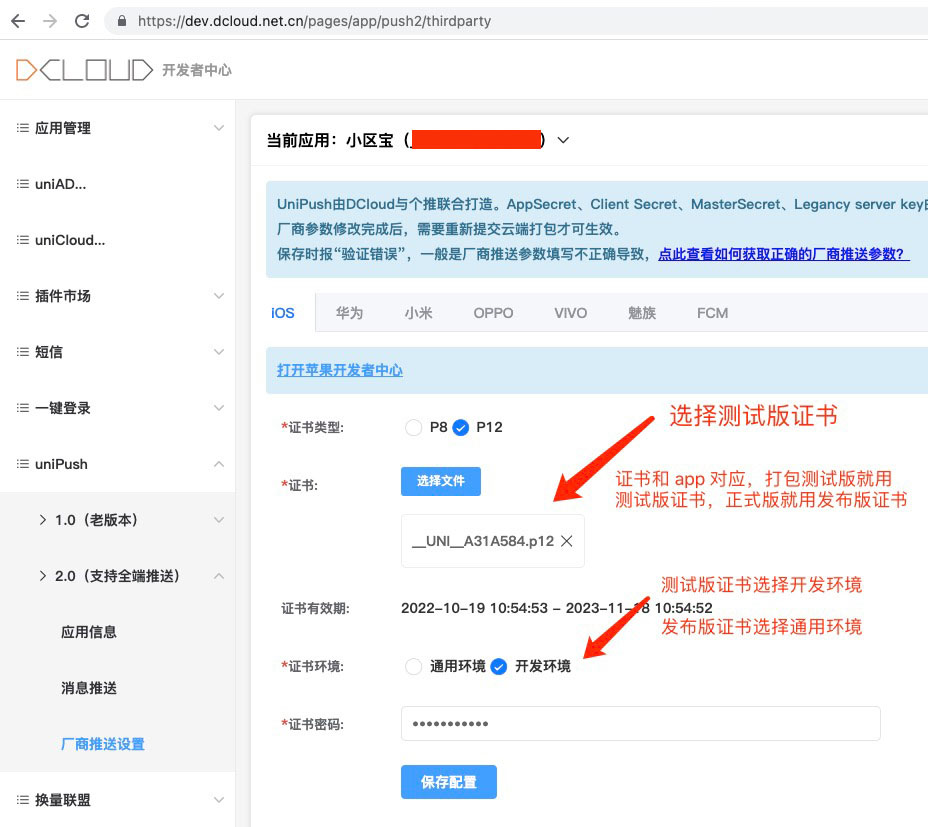
点击下边链接,进入到 dcloud 开发中心进行证书配置。一定要选择好对应的 app, 就是当前应用选择。
点击侧边栏,选择 应用信息,开始配置信息,iOS BundleId 配正确,关联服务空间选选好。
再点击侧边栏的 厂商推送设置,如上图所示,进行配置。
https://dev.dcloud.net.cn/pages/app/push2/thirdparty
dcloud 后台测试推送
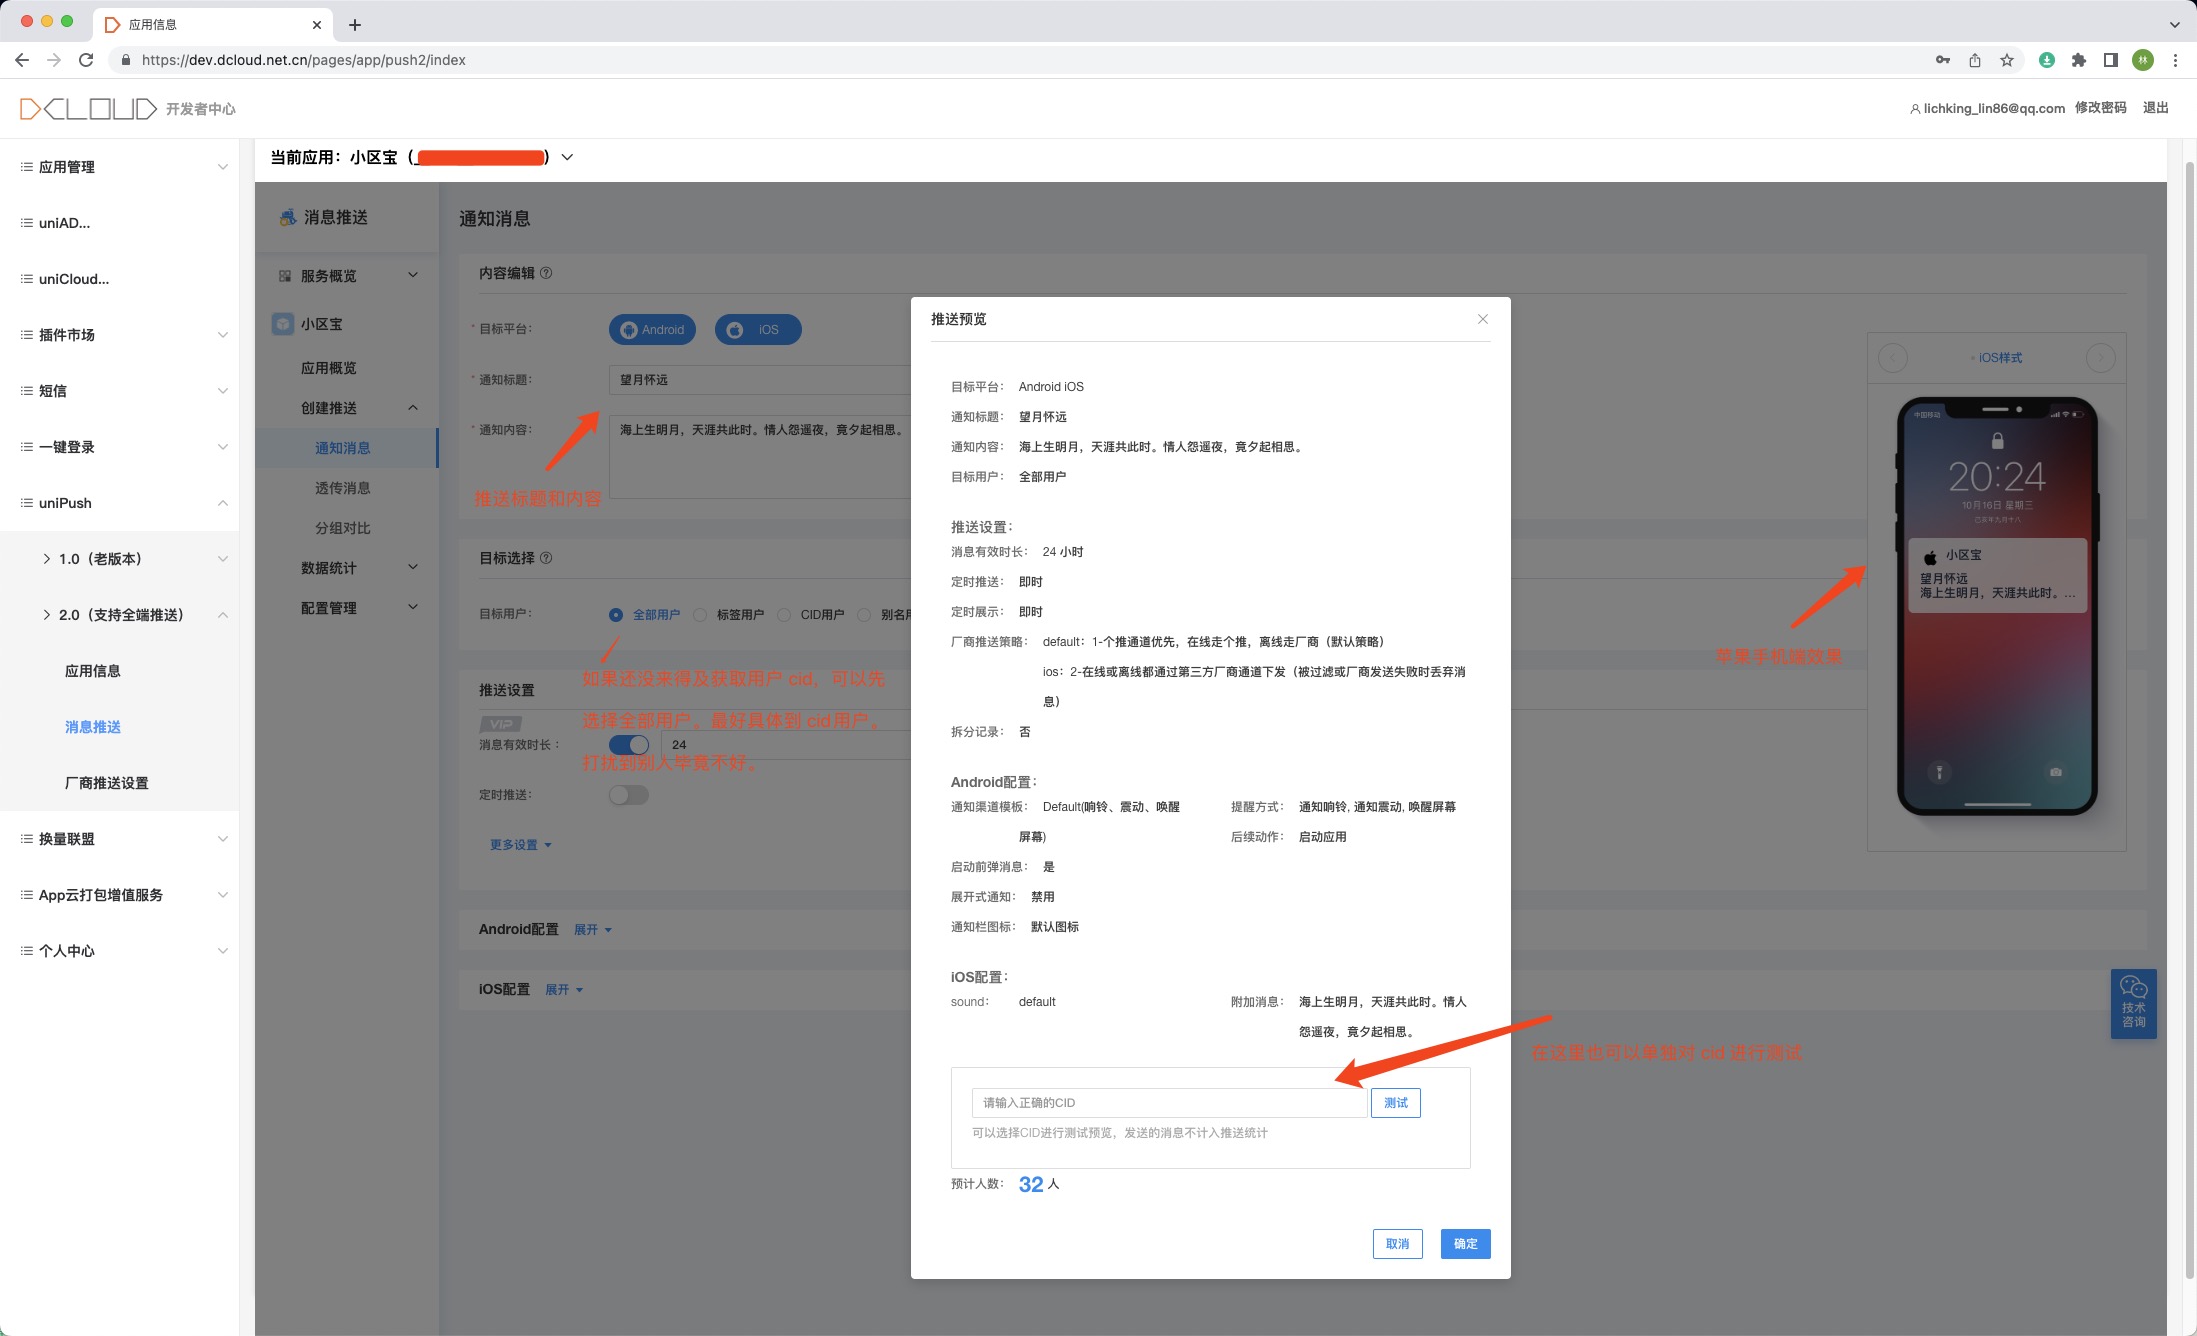
获取 cid
        uni.getPushClientId({
            success: (res) => {
                let push_clientid = res.cid
                console.log('客户端推送标识:',push_clientid)
            },
            fail(err) {
                console.log(err)
            }
        });
如果前边的动作都正确,你应该会收到推送的。
到这里一定要保证能收到通知。到此,仅仅是使用 dcloud 的后台测试,不能用于正式项目场景。正式项目场景往往需要通过后端接口调用推送。比如有人支付了一个报名了一个活动。可以通过后端把这个推送信息发送到活动发布者那里,告诉他有人参加了活动,请及时处理。
新建云函数
1.1 创建云开发环境,关联云服务空间
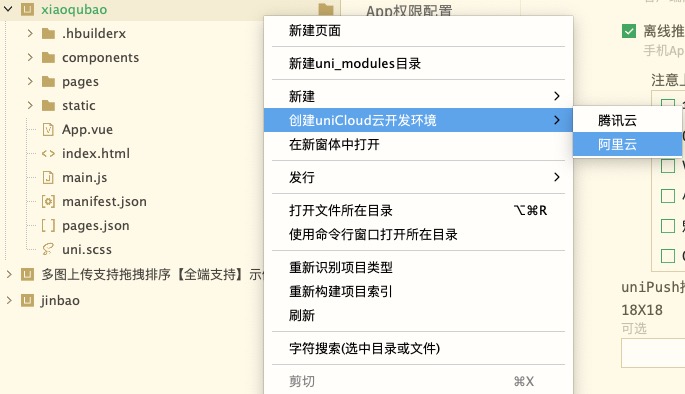
鼠标放在项目名称上,右键选择 创建uniCloud云开发环境,选择 阿里云。选择什么云,和你在 dcloud 后台创建关联的云一样就可以了。先默认创建一个云开发环境。
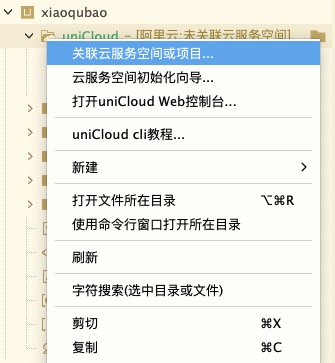
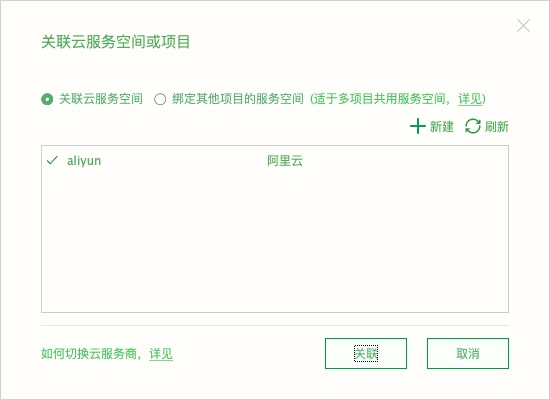
1.2 创建云函数
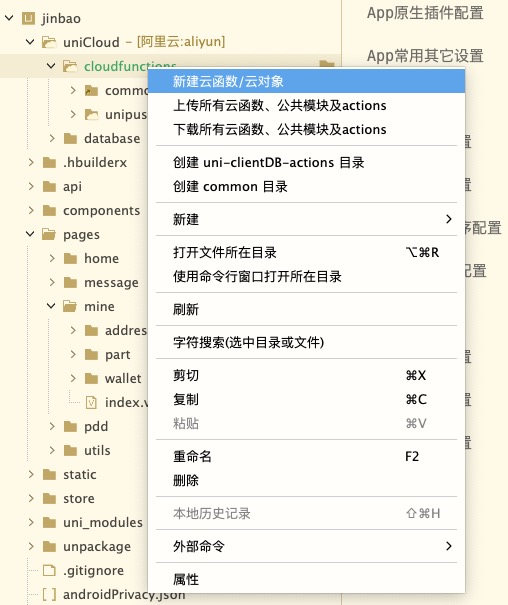
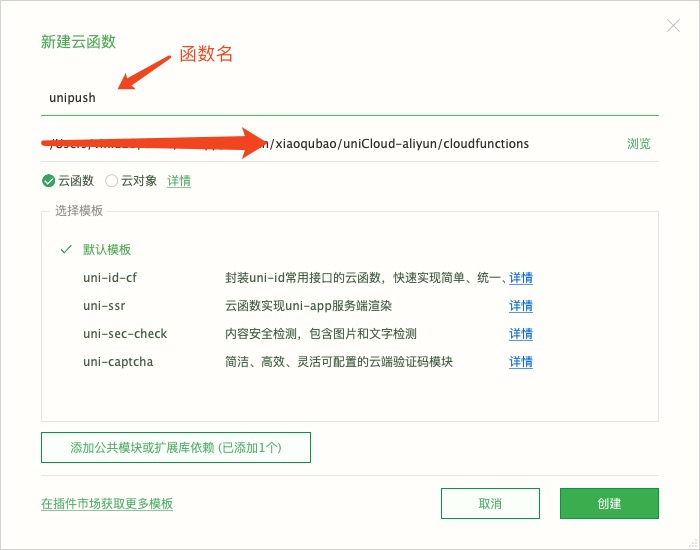
1.3 配置和编写云函数
package.json
{
  "name": "unipush",
  "version": "1.0.0",
  "main": "index.js",
  "description": "消息推送",
  "extensions": {
    "uni-cloud-push": {}
  },
  "author": "vini123"
}
index.js
'use strict';

exports.main = async (event, context) => {
    let body = event.body;
    if (event.isBase64Encoded) {
        body = Buffer.from(body);
    }

    if(!body) {
        return { message: 'no body'};
    }

    const param = JSON.parse(body);

    // 云函数是通用的,和项目没有直接的关系。通过传递 appId,可以为多个项目进行推送
    const uniPush = uniCloud.getPushManager({
        appId: param.appId
    });

    return await uniPush.sendMessage({
        "push_clientid": param.push_clientid,
        "title": param.title,
        "content": param.content,
        "payload": param.payload,
        "force_notification": true,
        "request_id": param.request_id,
        "badge": param.badge
    });
};
1.4 上传和运行云函数。因为该函数写了需要接受参数,不方便直接运行。如果想直接运行,将上边的参数直接写死。直接 send。鼠标右键上传并运行 就好。这里是动态的,仅仅上传部署就好了。
同名函数会相互覆盖。记得记得。所以这里 unipush 就要做一个通用的。(未关联云服务空间是不能上传的,先进行关联)
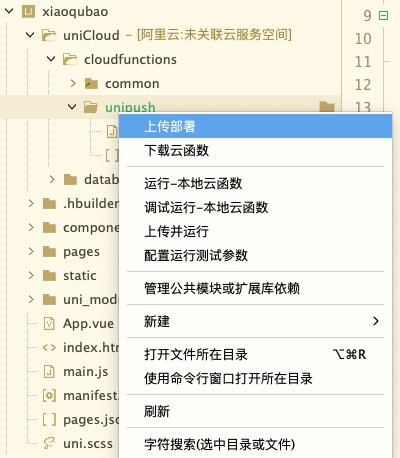
1.5 后台查看云函数
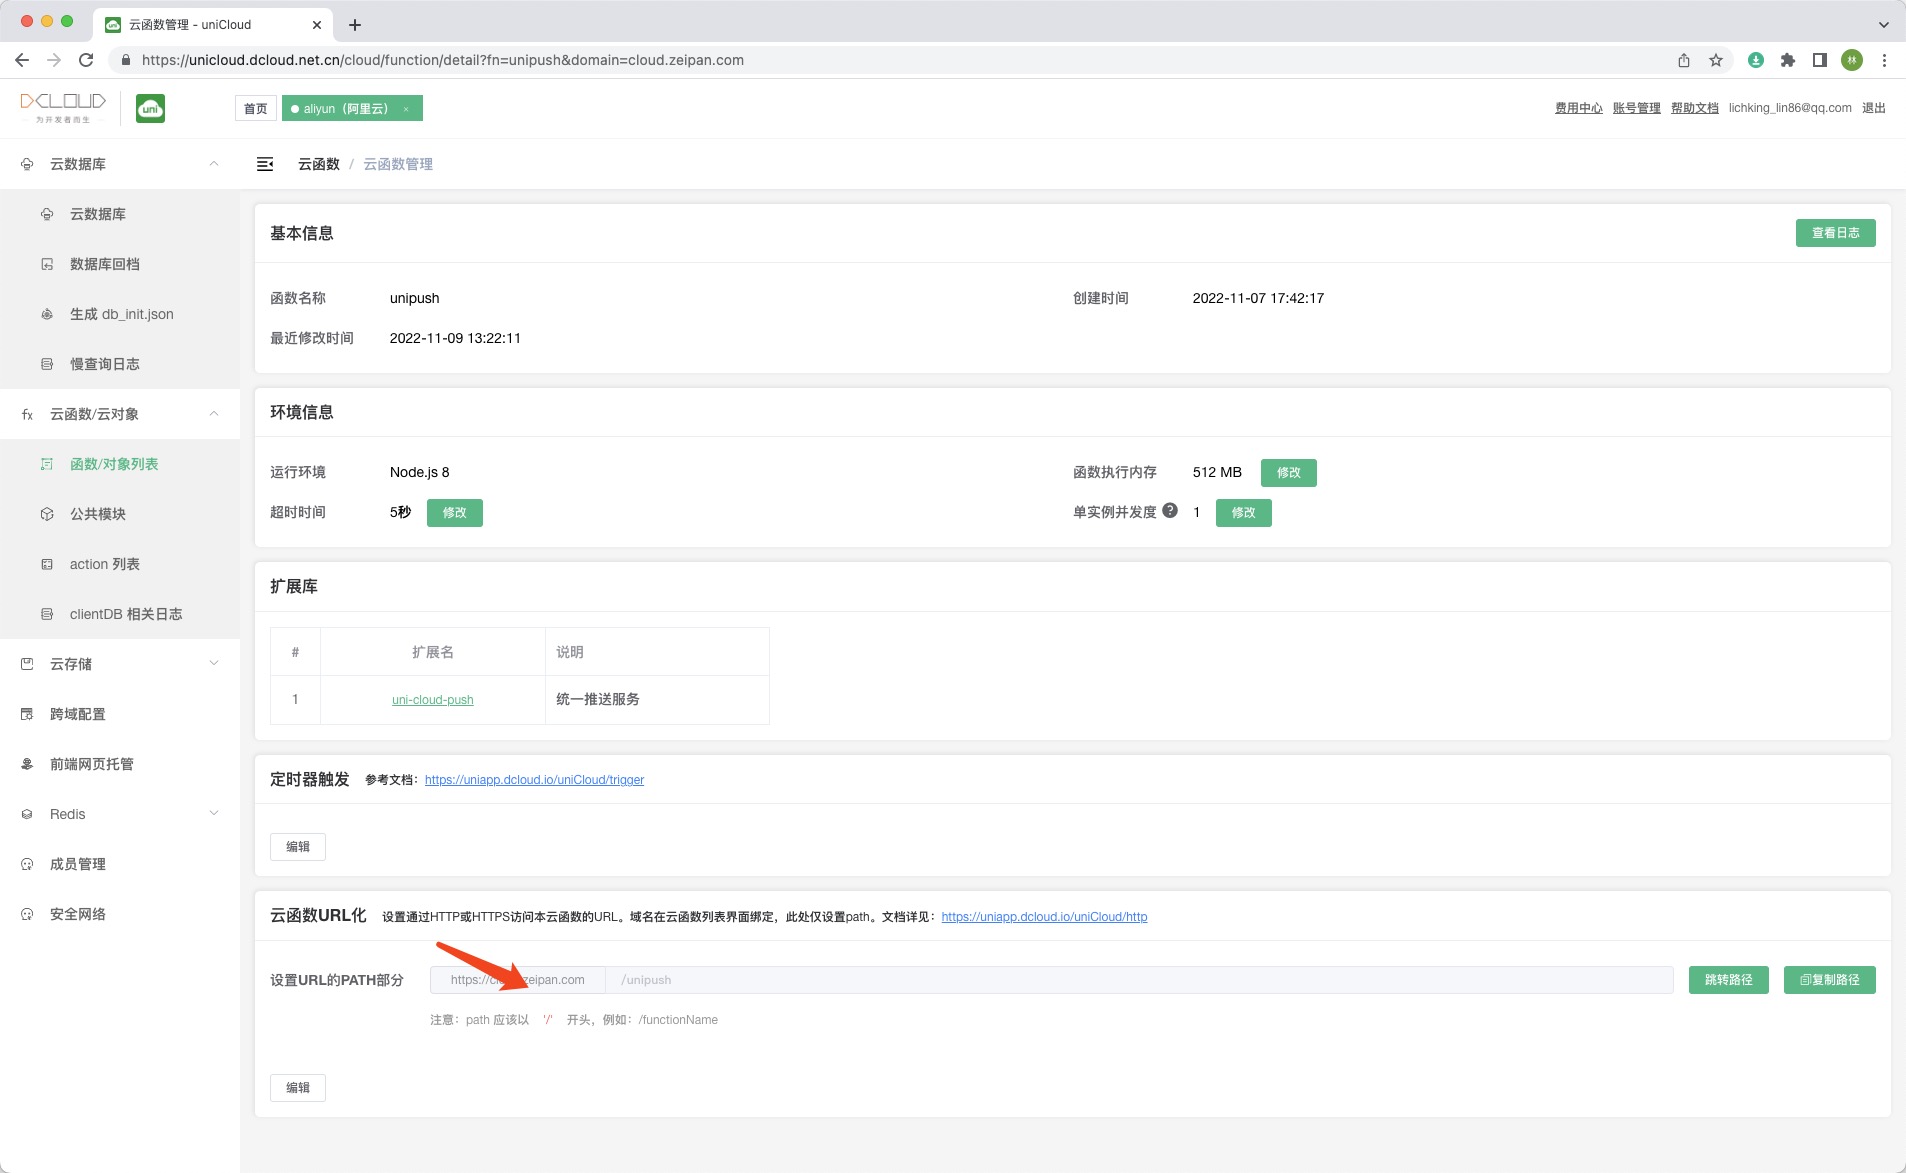
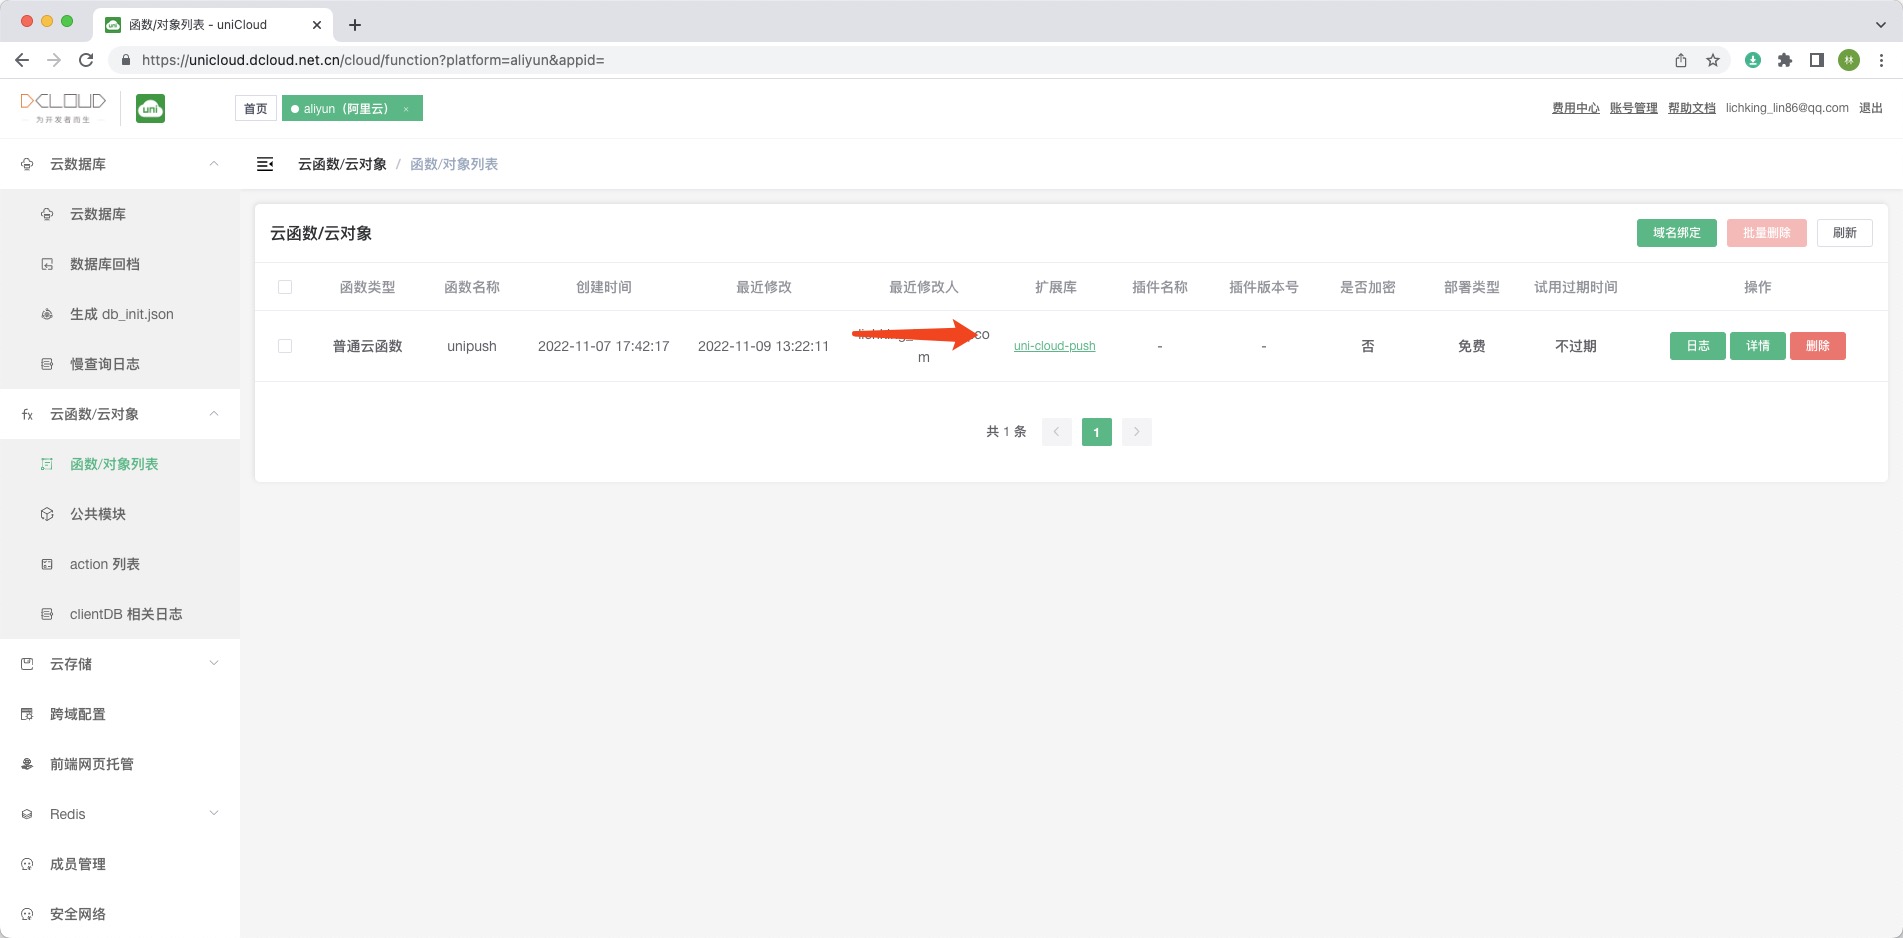
如果能看到上图这样的,表示你云函数已经好了。怕 dcloud 域名长不好记,可以绑定你自己备案过的域名。通过设置 CNAME 记录来映射。
1.6 函数 url 化说明
在云函数->云函数管理 页面,点击页面底下的 云函数URL化 的编辑按钮,设置访问 path。
通过https://${云函数Url化域名}/${path}直接访问函数,其中${path}是配置的函数触发路径或其子路径。
https://${云函数Url化域名}/ 部分,你创建云空间的时候就有了。只是你如果自定义成自己的域名后,会变成你的域名。这些在云函数详情页面都会完全显示。我们只需要定义 path 部分。path 最好和函数名一致,这样比较好理解。比如叫 unipush, 就知道这个 url 是做推送用的。完整的 url 如:https://xxx.com/unipush 简单吧,自定义的域名短呀短,好记呀好记。
1.7 使用 postman 调用该函数(就是以 get 方式访问该 url,参数记得要带上。访问方式要注意 get 和 post 会有所不同)
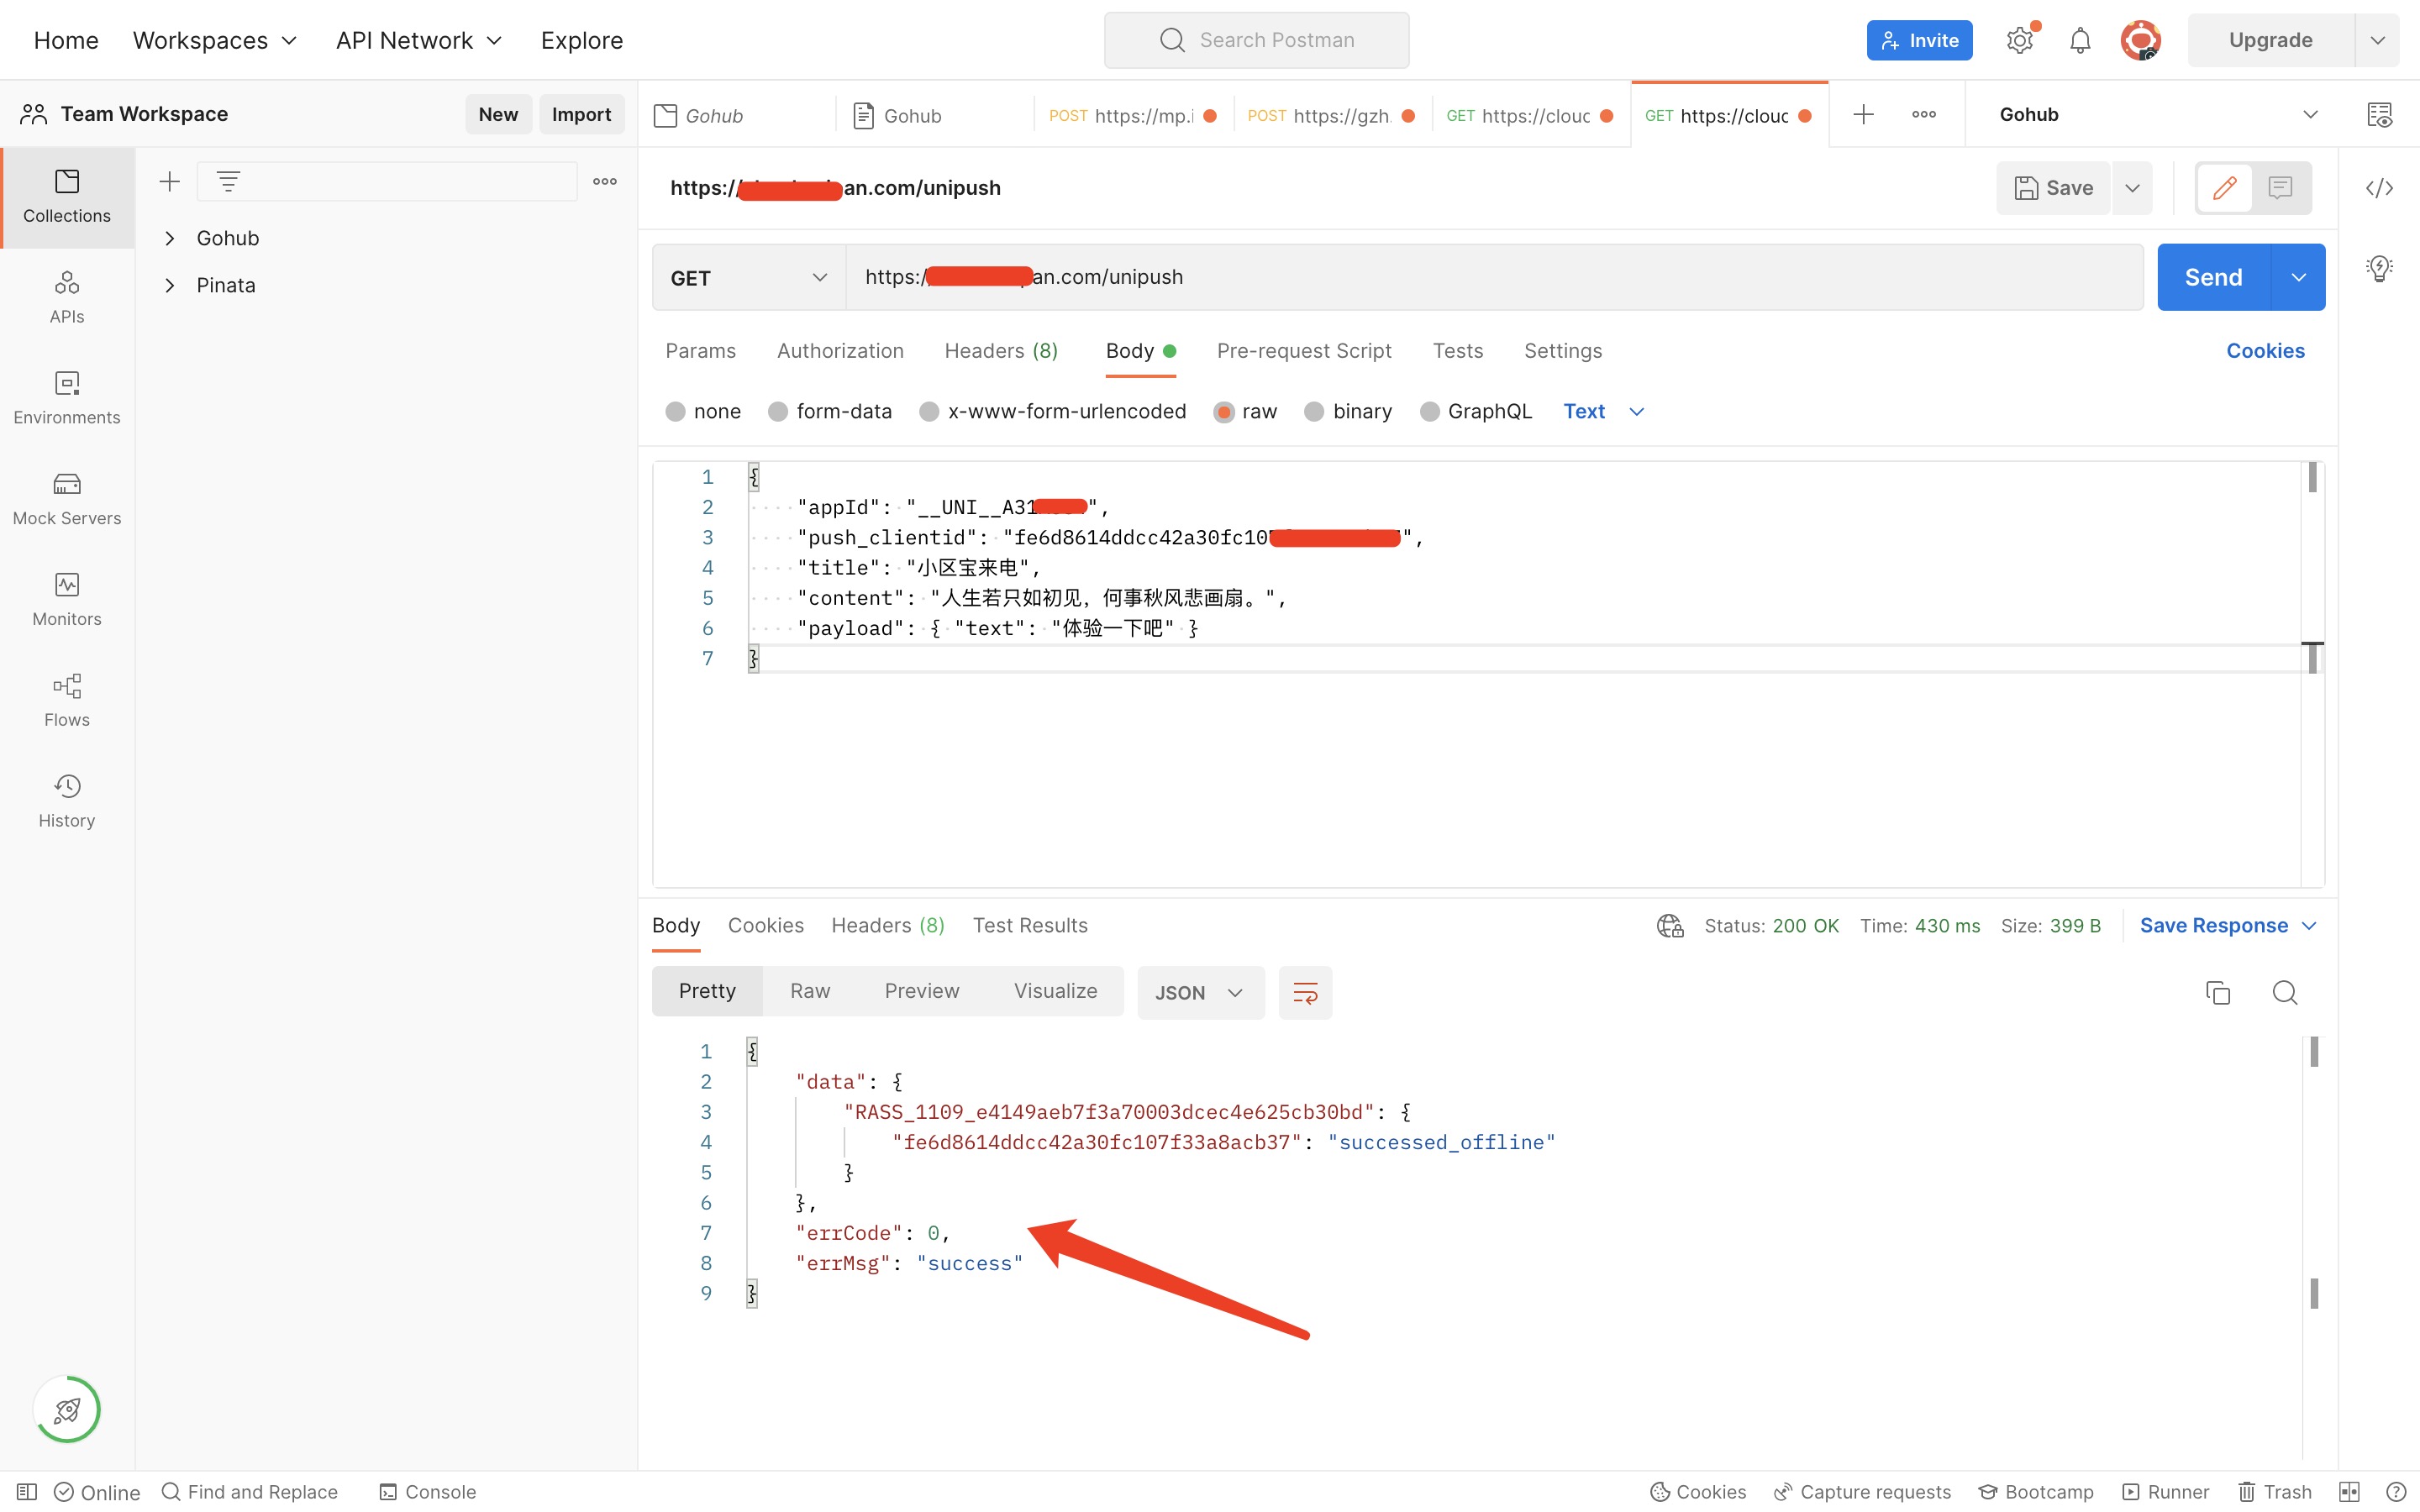
postman 配置如上图所示。这里没有任何授权,也就是任何人都可以调用。注意保护好隐私。

手机端接受到推送效果如上图所示。
1.8 上边算是测试完成了。你可以在自己的服务端如 php、java、go等服务端去请求 url 调用。
这里是 php 的实例:
        $data = [
            'appId' => '__UNI__Axxxxx,
            'push_clientid' => 'fe6d8614ddcc42a30fc10xxxxxxx',
            'title' => '小区宝来电',
            'content' => '人生若只如初见,何事秋风悲画扇。',
            'payload' => ['text' => '体验一下吧'],
        ];

        curl('https://xxxx.com/unipush', json_encode($data), true, true);

        /**
         * @param string $url 请求网址
         * @param bool $params 请求参数
         * @param bool $post 请求方式,是否是post
         * @param bool $https 请求http协议,是否是https
         * @return bool|mixed
         */
        function curl($url, $params = false, $post = false, $https = false)
        {
            $httpInfo = array();
            $ch = curl_init();
            curl_setopt($ch, CURLOPT_HTTP_VERSION, CURL_HTTP_VERSION_1_1);
            curl_setopt($ch, CURLOPT_USERAGENT, 'Mozilla/5.0 (Windows NT 10.0; WOW64) AppleWebKit/537.36 (KHTML, like Gecko) Chrome/41.0.2272.118 Safari/537.36');
            curl_setopt($ch, CURLOPT_CONNECTTIMEOUT, 30);
            curl_setopt($ch, CURLOPT_TIMEOUT, 30);
            curl_setopt($ch, CURLOPT_RETURNTRANSFER, true);

            if ($post === true) {
                curl_setopt($ch, CURLOPT_POST, true);
                curl_setopt($ch, CURLOPT_POSTFIELDS, $params);
                curl_setopt($ch, CURLOPT_URL, $url);
            } else {
                if ($params === false) {
                    curl_setopt($ch, CURLOPT_URL, $url);
                } else {
                    if (is_array($params)) {
                        $params = http_build_query($params);
                    }
                    curl_setopt($ch, CURLOPT_URL, $url . '?' . $params);
                }
            }

            if ($https === true) {
                curl_setopt($ch, CURLOPT_SSL_VERIFYPEER, false); // 对认证证书来源的检查
                curl_setopt($ch, CURLOPT_SSL_VERIFYHOST, false); // 从证书中检查SSL加密算法是否存在
            }
            $response = curl_exec($ch);
            if ($response === false) {
                Illuminate\Support\Facades\Log::error(sprintf('curl 错误。 url:%s, error:%s', $url, curl_error($ch)));
                return false;
            }
            $httpCode = curl_getinfo($ch, CURLINFO_HTTP_CODE);
            $httpInfo = array_merge($httpInfo, curl_getinfo($ch));
            curl_close($ch);
            return $response;
        }
不想用 sftp,就自己装个 ftp。
阿里云这片文章就够了
vsftpd(very secure FTP daemon)是Linux下的一款小巧轻快、安全易用的FTP服务器软件。本教程介绍如何在Linux实例上安装并配置vsftpd。
https://help.aliyun.com/document_detail/182263.html
背景信息
FTP(File Transfer Protocol)是一种文件传输协议,基于客户端/服务器架构,支持以下两种工作模式:
- 主动模式:客户端向FTP服务器发送端口信息,由服务器主动连接该端口。
- 被动模式:FTP服务器开启并发送端口信息给客户端,由客户端连接该端口,服务器被动接受连接。
FTP支持以下三种认证模式:
- 匿名用户模式:任何人无需密码验证就可以直接登录到FTP服务器。这种模式最不安全,一般只用来保存不重要的公开文件,不推荐在生产环境中使用。
- 本地用户模式:通过Linux系统本地账号进行验证的模式,相较于匿名用户模式更安全。
- 虚拟用户模式:FTP服务器的专有用户。虚拟用户只能访问Linux系统为其提供的FTP服务,而不能访问Linux系统的其它资源,进一步增强了FTP服务器的安全性。
这里主要介绍被动模式下,使用本地用户访问FTP服务器的配置方法。
操作一波
1.1 安装
yum install vsftpd
2.1 开启服务
systemctl start vsftpd
3.1 设置开机启动
- 先查看是否开机启动:
systemctl list-unit-files | grep vsftpd
- 我的系统显示这样:
systemctl list-unit-files | grep vsftpd
vsftpd.service                              disabled
vsftpd@.service                            indirect
vsftpd.target                               disabled
这里是未开通。
- 开启自启。
chkconfig vsftpd on
- 查看 ftp 服务监听的端口
netstat -antup | grep ftp
4.1 配置 vsftpd
为保证数据安全,本文主要介绍被动模式下,使用本地用户访问FTP服务器的配置方法。
# 创建用户 ftplin
adduser ftplin

# 给 ftplin 设置密码
passwd ftplin

# 创建一个供 ftp 使用的目录
mkdir /var/ftp/lin

# 创建一个测试文件
vim /var/ftp/lin/test.txt
# 填入 hello 保存退出

# 给 /var/ftp/lin 设置所有者
chown -R ftplin:ftplin /var/ftp/lin
再去修改 vsftpd.conf 配置文件:
vim /etc/vsftpd/vsftpd.conf
4.1 修改配置文件
vim /etc/vsftpd/vsftpd.conf
按照以下要求修改
注意 修改和添加配置文件内的信息时,请注意格式问题。例如,添加多余的空格会造成无法重启服务的结果。
#除下面提及的参数,其他参数保持默认值即可。

#修改下列参数的值:
#禁止匿名登录FTP服务器。
anonymous_enable=NO
#允许本地用户登录FTP服务器。
local_enable=YES
#监听IPv4 sockets。
listen=YES

#在行首添加#注释掉以下参数:
#关闭监听IPv6 sockets。
#listen_ipv6=YES

#在配置文件的末尾添加下列参数:
#设置本地用户登录后所在目录。
local_root=/var/ftp/test
#全部用户被限制在主目录。
chroot_local_user=YES
#启用例外用户名单。
chroot_list_enable=YES
#指定例外用户列表文件,列表中用户不被锁定在主目录。
chroot_list_file=/etc/vsftpd/chroot_list
#开启被动模式。
pasv_enable=YES
allow_writeable_chroot=YES
#本教程中为Linux实例的公网IP。
pasv_address=FTP服务器公网IP地址
#设置被动模式下,建立数据传输可使用的端口范围的最小值。
#建议您把端口范围设置在一段比较高的范围内,例如50000~50010,有助于提高访问FTP服务器的安全性。
pasv_min_port=port number
#设置被动模式下,建立数据传输可使用的端口范围的最大值。
pasv_max_port=port number
创建chroot_list文件,并在文件中写入例外用户名单。
# 输入例外用户名单。此名单中的用户不会被锁定在主目录,可以访问其他目录。及时没有例外用户,该文件也必须创建,内容为空。
# 个人建议该文件为空最好,不必去访问其他目录,世界一片安静多好呀。
vim /etc/vsftpd/chroot_list
重启服务
systemctl restart vsftpd.service
到此为止, ftp 的配置已经完了。但阿里云还得配置安全组。21 端口入方向必须打开以及上边配置的访问的最小到最大端口也要配置。
设置安全组
| 规则方向 | 授权策略 | 协议类型 | 端口范围 | 授权对象 |
|---|---|---|---|---|
| 入方向 | 允许 | TCP | 21/21 | 所有要访问FTP服务器的客户端公网IP地址,多个地址之间用逗号隔开。允许所有客户端访问时,授权对象为0.0.0.0/0。 |
| 入方向 | 允许 | TCP | pasv_min_port/pasv_max_port。例如:50000/50010 | 所有要访问FTP服务器的客户端公网IP地址,多个地址之间用逗号隔开。允许所有客户端访问时,授权对象为0.0.0.0/0。 |
可以测试了
使用 ftp 工具。比如 win 的 ftpx, mac 的 forklift 。输入公网 ip 地址,选择 ftp 连接方式(端口号不用管),填入用户名和密码。点击连接。是不是马上就好了,并进入到指定的目录了哈。
处理 ** API getFileSystemManager is not yet implemented** 问题
wx.chooseImage({
      success: res => {
         let base64 = wx.getFileSystemManager().readFileSync(res.tempFilePaths[0], 'base64');
      }
 })

 wx.canvasToTempFilePath({
                    success: res => {
                        let base64 = wx.getFileSystemManager().readFileSync(res, 'base64');
                    }
});
对应到 uniapp,将 wx 换成 uni 即可。如:
# 该方法在微信小程序中可行,混编的 h5 不行,可通过条件编译处理
uni.getFileSystemManager().readFileSync(r, 'base64');

# 处理如下
            // 将网络图片转换成 base64 各不相同
            // #ifdef APP-PLUS
            uni.request({
                url: this.extra.topic.thumbnail,
                method: 'GET',
                responseType: "arraybuffer",
                success: res => {
                    const arrayBuffer = new Uint8Array(res.data); //先将本地图片路径转换成array类型
                    const base64Img = uni.arrayBufferToBase64(arrayBuffer);  //再转换成base64类型
                }
            });
            // #endif

            // #ifdef MP
            uni.getImageInfo({
                src: this.extra.topic.thumbnail,
                success: res => {
                    if (res.errMsg == 'getImageInfo:ok') {
                        const base64Img = uni.getFileSystemManager().readFileSync(res.path, 'base64');
                    }
                },
                fail: error => {
                    this.extra.topic = null;
                }
            });
            // #endif
第三方公司也可以申请和加快申请。只是要给费用。其实,都这样子,软著写与不写,都没啥意义,都是欺骗。只是想 android 在国内上架,就必须有那玩意。哎,就弄吧。
https://www.ccopyright.com.cn/
使用一个 url 链接就可以打开一个 app,是个多方便的事情。不过,得先安装该 app 啊。不过,肯定是蛮好的。
相关链接
操作一波
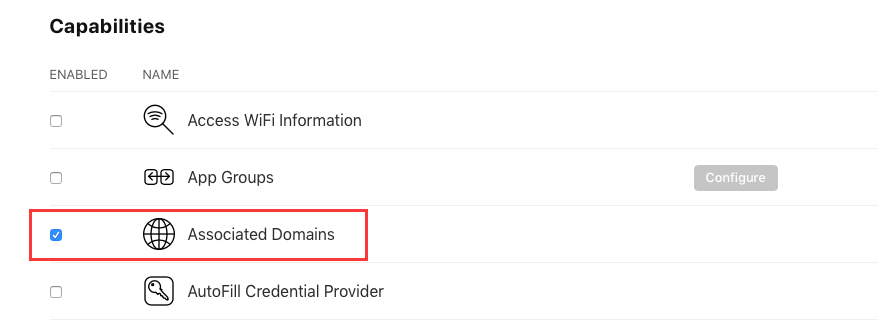
- 创建 app id 的时候,要将 Associated Domains 打钩。
- 服务器端准备 apple-app-site-association 文件。该文件就是文件名,不需要任何后缀,内容如下:
{
    "applinks": {
        "apps": [],
        "details": [
            {
                "appID": "VQYDABC49G.pro.xiangrong.xiaoqubao",
                "paths": [ "/ulink/*"]
            }
        ]
    }
}
apps 就是空的,appID 的 VQYDABC49G 去开发账号中 Certificates, Identifiers & Profiles 的 Identifiers 中查看,就是 App ID Prefix。后半的 pro.xiangrong.xiaoqubao 就是 Bundle ID。
paths 自己定义。用于处理可以跳转到App的链接,支持通配符*,?以及NOT进行匹配,匹配的优先级是从左至右依次降低。 apple-app-site-association 放在根目录,paths 加个路劲方便和其他路径区分开来。如果该域名也有其他业务的话。
上边的内容你要修改的好好的。然后放在域名映射的根目录的 .well-known 文件夹下。然后通过 xxxx/.well-known/apple-app-site-association 能够访问到就可以。
当然,如果使用 nginx,可以直接在 nginx 的 .conf 中配置 location 也可以。
- 上边都配置好了。然后,在 app 程序端配置打包就好。这里是 uniapp 的搞法。打开配置文件 mainfest.json ,找到 App 常用其他设置,然后在关联域这里添加新项即可。比如添加 applinks:zeipan.com, 通过源码视图就可以看的到的。如:
                "capabilities" : {
                    "entitlements" : {
                        "com.apple.developer.associated-domains" : [ "applinks:zeipan.com" ]
                    }
                },
- 打包。如果是 uniapp,先打包基座。删除手机上的已有 app(如果之前打包过)。然后运行,运行到 App Ios 基座。
-
测试。上边的部分都准备好了,打开备忘录,输入link 地址。 比如: https://zeipan.com/ulink/?title=test。 保存,点击链接。如果上边都配置对了,这个时候就可以打开刚才安装的 app。
-
接受参数。 通过 https://www.html5plus.org/doc/zh_cn/runtime.html#plus.runtime.arguments 获取参数。有了参数,你就可以做想做的事情,比如跳转到某个页面,传递某个参数等等。
这里以接受参数,然后跳转到某个页面为例:
let params = null;
if(plus.runtime.arguments != ""){
    try{
        params = JSON.parse(plus.runtime.arguments);
    }catch(e){
        let arr = plus.runtime.arguments.split('?');
        params = {};
        if (arr.length == 2) {
            arr = arr[1].split('&');
            for(let str of arr) {
                let p = str.split('=');
                if (p.length == 2) {
                    params[p[0]] = decodeURIComponent(p[1]);
                }
            }
        }
    }

    let tabbars = ['views/home/index', 'views/message/index', 'pages/mine/index'];
    if (params.page) {
        let isTab = false;
        for(let tabbar of tabbars) {
            if (params.page.indexOf(tabbar) >= 0) {
                isTab = true;
                break;
            }
        }

        if (isTab) {
            uni.switchTab({
                url: params.page
            });
        } else {
            uni.navigateTo({
                url: params.page
            });
        }
    }
}
注意对传递的 url 进行 encodeURIComponent 和 decodeURIComponent。
