11月
03
使用一个 url 链接就可以打开一个 app,是个多方便的事情。不过,得先安装该 app 啊。不过,肯定是蛮好的。
相关链接
apple 文档
uniapp 文档
操作一波
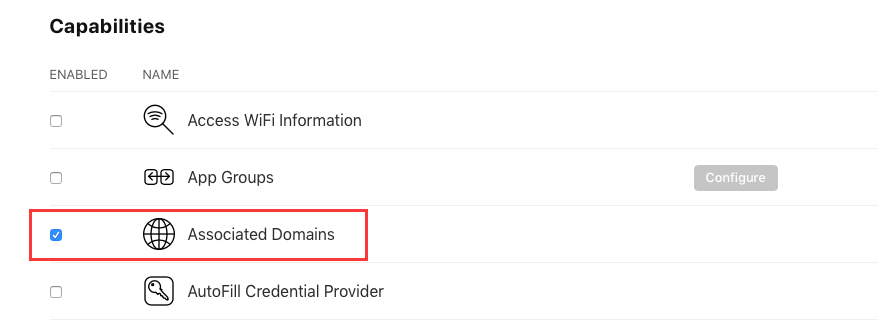
- 创建 app id 的时候,要将 Associated Domains 打钩。
- 服务器端准备 apple-app-site-association 文件。该文件就是文件名,不需要任何后缀,内容如下:
{
    "applinks": {
        "apps": [],
        "details": [
            {
                "appID": "VQYDABC49G.pro.xiangrong.xiaoqubao",
                "paths": [ "/ulink/*"]
            }
        ]
    }
}
apps 就是空的,appID 的 VQYDABC49G 去开发账号中 Certificates, Identifiers & Profiles 的 Identifiers 中查看,就是 App ID Prefix。后半的 pro.xiangrong.xiaoqubao 就是 Bundle ID。
paths 自己定义。用于处理可以跳转到App的链接,支持通配符*,?以及NOT进行匹配,匹配的优先级是从左至右依次降低。 apple-app-site-association 放在根目录,paths 加个路劲方便和其他路径区分开来。如果该域名也有其他业务的话。
上边的内容你要修改的好好的。然后放在域名映射的根目录的 .well-known 文件夹下。然后通过 xxxx/.well-known/apple-app-site-association 能够访问到就可以。
当然,如果使用 nginx,可以直接在 nginx 的 .conf 中配置 location 也可以。
- 上边都配置好了。然后,在 app 程序端配置打包就好。这里是 uniapp 的搞法。打开配置文件 mainfest.json ,找到 App 常用其他设置,然后在关联域这里添加新项即可。比如添加 applinks:zeipan.com, 通过源码视图就可以看的到的。如:
                "capabilities" : {
                    "entitlements" : {
                        "com.apple.developer.associated-domains" : [ "applinks:zeipan.com" ]
                    }
                },
- 打包。如果是 uniapp,先打包基座。删除手机上的已有 app(如果之前打包过)。然后运行,运行到 App Ios 基座。
-
测试。上边的部分都准备好了,打开备忘录,输入link 地址。 比如: https://zeipan.com/ulink/?title=test。 保存,点击链接。如果上边都配置对了,这个时候就可以打开刚才安装的 app。
-
接受参数。 通过 https://www.html5plus.org/doc/zh_cn/runtime.html#plus.runtime.arguments 获取参数。有了参数,你就可以做想做的事情,比如跳转到某个页面,传递某个参数等等。
这里以接受参数,然后跳转到某个页面为例:
let params = null;
if(plus.runtime.arguments != ""){
    try{
        params = JSON.parse(plus.runtime.arguments);
    }catch(e){
        let arr = plus.runtime.arguments.split('?');
        params = {};
        if (arr.length == 2) {
            arr = arr[1].split('&');
            for(let str of arr) {
                let p = str.split('=');
                if (p.length == 2) {
                    params[p[0]] = decodeURIComponent(p[1]);
                }
            }
        }
    }

    let tabbars = ['views/home/index', 'views/message/index', 'pages/mine/index'];
    if (params.page) {
        let isTab = false;
        for(let tabbar of tabbars) {
            if (params.page.indexOf(tabbar) >= 0) {
                isTab = true;
                break;
            }
        }

        if (isTab) {
            uni.switchTab({
                url: params.page
            });
        } else {
            uni.navigateTo({
                url: params.page
            });
        }
    }
}
注意对传递的 url 进行 encodeURIComponent 和 decodeURIComponent。
11月
02
11月
02
通过各种方式方法将 app 上传到 app sotre connect 中,准备提交新版本,进行发布时,发布构建版本不不见了。这个时候肯定会很着急的。咋办咋办呢。有一个反馈也行啊,没有任何反馈就是一抹黑。网上说使用了某个权限,没有在 plist 中进行说明。说明了就好。这个是一方面,也不全面。
不灯下黑
登录进去 app store connect,然后选择你的app,点击上方的 TestFlight,在这里可以看见你上传的 app 信息。如果是在处理中,等等就好(这是一个反馈,免得一抹黑),如果准备提交。你就可以去构建版本了。
11月
02
判断手机上是否安装了常用的 app 是一个很必要的功能。比如你 ios 端,想做微信登录功能,就得先判断手机是否安装了微信。因为如果你不判断,直接显示微信按钮,如果用户手机根本没装微信,app 上架就会不成功。
https://ask.dcloud.net.cn/article/35621
https://ask.dcloud.net.cn/article/39182
调用 api
let pinfo = {
    pname: 'com.tencent.mm',
    action: 'weixin://'
}

let hasWeixin = plus.runtime.isApplicationExist(pinfo);

console.log(hasWeixin)
通过 URLscheme 信息,通过 plus.runtime.isApplicationExist 来判断。
常用的 app URLscheme信息
| 平台 |
pname |
action |
| 微信 |
com.tencent.mm |
weixin:// |
| QQ |
com.tencent.mobileqq |
mqq:// |
| 微博 |
com.sina.weibo |
sinaweibo:// |
| 淘宝 |
com.taobao.taobao |
taobao:// |
| 支付宝 |
com.eg.android.AlipayGphone |
alipay:// |
| 京东 |
com.jingdong.app.mall |
openApp.jdMobile:// |
| 高德地图 |
com.autonavi.minimap |
iosamap:// |
| 百度地图 |
com.baidu.BaiduMap |
baidumap:// |
| 优酷 |
com.youku.phone |
youku:// |
| 拼多多 |
com.xunmeng.pinduoduo |
pinduoduo:// |
| 小区宝 |
pro.xiangrong.xiaoqubao |
xiaoqubao:// |
哈哈,当然我们小区宝也有
拼多多 URLscheme
额外
# app 系统
let osName = plus.os.name;
console.log(osName);
# 系统名字 Android,iOS
自己的 app 设置 URLscheme
IOS 配置方法
Android 配置方法
https://uniapp.dcloud.net.cn/tutorial/app-ios-schemes.html#
10月
24
app 中能直接打开小程序也是一个很好的体验。那么怎么搞呢。 uniapp 混编的是这样弄的。
参考资料
https://uniapp.dcloud.net.cn/api/other/open-miniprogram.html#navigatetominiprogram
https://www.html5plus.org/doc/zh_cn/share.html#plus.share.ShareService.launchMiniProgram
操作
先通过 getService 拿到 weixin,再调用 launchMiniProgram 方法。
// #ifdef APP-PLUS
plus.share.getServices((res) => {
    let weixin = res.find(i => i.id === 'weixin');
    if (weixin) {
        weixin.launchMiniProgram({
            id: 'gh_b8e08725bcda',
            path: 'pages/meet/index',
            type: 0
        }, (res) => {

        }, (err) => {

        });
    }
}, (err) => {
    console.log("获取分享服务列表失败: " + JSON.stringify(e));
});
// #endif
注意点:
- 先从 getServices 里找到 weixin。
- launchMiniProgram 第一个参数(options)的 id 是小程序的原始id,不是 appid。
10月
20
安装 jdk
打开 item2(反正比默认终端好用),输入下边的命令,回车看看
/usr/libexec/java_home -V
我的电脑会出现:
Matching Java Virtual Machines (2):
    18.0.1 (x86_64) "Oracle Corporation" - "Java SE 18.0.1" /Library/Java/JavaVirtualMachines/jdk-18.0.1.jdk/Contents/Home
    17.0.1 (x86_64) "Oracle Corporation" - "Java SE 17.0.1" /Library/Java/JavaVirtualMachines/jdk-17.0.1.jdk/Contents/Home
/Library/Java/JavaVirtualMachines/jdk-18.0.1.jdk/Contents/Home
如果没有这个,需要先安装 jdk。 可以去这里 https://www.oracle.com/java/technologies/downloads/ 下载安装
生证书
sudo keytool -genkey -alias xiaoqubao -keyalg RSA -keysize 2048 -validity 36500 -keystore xiaoqubao.keystore
-alias xiaoqubao xiaoqubao 是别名,因为我的 app,叫小区宝,就搞了这个名字
-keystore xiaoqubao.keystore xiaoqubao.keystore 是生成签名证书文件的名字
回车,输入电脑的密码,然后一系列操作输入证书的密码,姓名,企业名字,等这些。最后输入是,回车。证书就生好了。
看证书
keytool -list -v -keystore xiaoqubao.keystore
输入以上命令,回车。输入证书密码,就可以看见证书的信息了。如下所示:
密钥库类型: PKCS12
密钥库提供方: SUN

您的密钥库包含 1 个条目

别名: xiaoqubao
创建日期: 2022年10月20日
条目类型: PrivateKeyEntry
证书链长度: 1
证书[1]:
所有者: CN=zhoulin, OU=xiangrong, O=xiangrong, L=shanghai, ST=shanghai, C=china
发布者: CN=zhoulin, OU=xiangrong, O=xiangrong, L=shanghai, ST=shanghai, C=china
序列号: e4f7ee369f21453d
生效时间: Thu Oct 20 18:41:29 CST 2022, 失效时间: Sat Sep 26 18:41:29 CST 2122
证书指纹:
     SHA1: 13:00:A8:4A:11:96:1F:30:78:1A:72:32:0E:7E:AC:4F:C4:64:9C:AC
     SHA256: E3:EC:BA:4F:24:04:A6:28:B3:EB:BC:46:53:75:73:AC:7F:F3:7D:8C:01:DC:74:10:E2:50:A5:3C:6B:B5:D7:48
签名算法名称: SHA256withRSA
主体公共密钥算法: 2048 位 RSA 密钥
版本: 3

扩展:

#1: ObjectId: 2.5.29.14 Criticality=false
SubjectKeyIdentifier [
KeyIdentifier [
0000: 8A 89 19 CF BA E8 6D 36   46 74 15 D9 A1 FF CF C9  ......m6Ft......
0010: 4A 5C AA 30                                        J\.0
]
]
10月
19
APP 偏多,记录记录申请的证书时间
2022-10-19 类型 Apple Development xr
2022-10-19 类型 Apple Distribution !xr
Id 申请记录
2020-08-18 pro.xiangrong.wallet
2021-02-01 pro.xiangrong.yuepaibao
2022-10-18 pro.xiangrong.xiaoqubao
profiles
2022-10-19 xiaoqubao/yuepaibao
9月
30
使用 laravel 开发项目的时候, artisan 是个好东西。这个好东西是真的好。在做 command 的时候,您可以方便的输出想要的内容在终端上,比如警告,错误,选择等等。这是因为 command 它继承了Command 类,该类使用了 trait Illuminate\Console\Concerns\InteractsWithIO。而它最终实现了 Symfony\Component\Console\Output\OutputInterface 。 Symfony\Component\Console\Output\ConsoleOutput 是 cli output 的源头类。 只要我们做好 Symfony\Component\Console\Output\ConsoleOutput 的文章,不也可以输出吗。
ConsoleOutput is the default class for all CLI output. It uses STDOUT and STDERR.
来 123, 跟着步骤走起来
# 先生成一个 seeder
php artisan make:seeder TestSeeder

# 在该 seeder 的 run 函数中加入以下代码
    public function run()
    {
        $output = new \Symfony\Component\Console\Output\ConsoleOutput();
        $section = $output->section();
        $section->writeln('人生若只如初见,何事秋风悲画扇');
    }

# 那么开始测试一下
php artisan db:seed --class=TestSeeder
是不是就可以看见你想看见的东东了。当然你可以封装,搞出更多花样。也还有更多命令待使用。

