https://github.com/ohmyzsh/ohmyzsh/
常见命令一
# docker 信息
docker info
docker version

# 查看镜像
docker images

# 运行一个镜像
# --name 别名
# -p 端口映射( 宿主机端口:容器服务端口 )
# -d 以守护进程的方式运行(不加就会卡住占用窗口)
docker run --name my-nginx -d -p 80:80 nginx

# 查看活着的容器
docker ps

# 查看活所有容器
docker ps -a

# 停止容器
docker stop xxx

# 启动一个关闭的容器
docker start xxx

# 查看容器状态
docker stats

# 进入容器(以bash的形式进行交互模式)
docker exec -it xxx bash

# 退出容器(容器依然在运行)
exit

# 重启容器 (xxx 为容器 id 的前三个字符即可)
docker restart xxx

# 删除容器 (删除前需先停止)
docker rm xxx

# 删除镜像
docker rmi nginxtauri 时间相关的处理。一般,找 tauri 的 api,就是找 rust 的。tauri 获取当前时间,获取时间戳。
https://docs.rs/chrono/0.4.26/chrono/#date-and-time
https://www.cnblogs.com/yjmyzz/p/event-with-tauri.html
获取当前年月日时分秒
use chrono::{DateTime, Local};

fn now_datetime() -> String {
  let datetime: DateTime<Local> = Local::now();
  let timestamp_str = datetime.format("%Y-%m-%d %H:%M:%S.%f").to_string();
  timestamp_str
}
需要在 Cargo.toml 中,加入以下配置。
[dependencies]
…
chrono = "0.4"tauri dev 项目的时候,axios 是没有问题。当 build 后,安装使用,axios 就会出现问题。这个时候,需要给 axios 增加一个 adapter 就好。 当然 tauri 的 allowlist 的配置也是要好的。
https://github.com/persiliao/axios-tauri-api-adapter
操作
pnpm add axios-tauri-api-adapter

# 在封装 axios 的地方加入下边的配置
import axiosTauriApiAdapter from 'axios-tauri-api-adapter';

const defaultConfig: AxiosRequestConfig = {
  baseURL: VITE_APP_BASE_API,
  timeout: 20000,
  withCredentials: false,
  adapter: axiosTauriApiAdapter
}
然后修改 tauri.conf.json 文件。
  "tauri": {
    "allowlist": {
      "all": true,
      "http": {
        "all": true,
        "request": true,
        "scope": ["http://**", "https://**"]
      }
    }
  }
好了,再去打包就没问题了。
pnpm tauri build将代码给到客户端的时候,有时候不想让源码被对方看到。就得使用加密的方式。这里尝试
Laravel Source Encrypter
https://github.com/SiavashBamshadnia/Laravel-Source-Encrypter
安装配置扩展
- 先去下载
phpbolt扩展。对方提供了到 php8.2 的扩展,支持 win、linux、mac 的。
https://phpbolt.com/download-phpbolt/
打开上边的地址,输入您的 email 以及用户名,点击提交。他们会把文件下载链接发到邮箱里。下载出来就好。
- 安装 - 查看扩展的存放位置。 这里先尝试在 homestead 环境下安装。
# 查看 php 版本,了解当前的 php 版本信息
php -v

# 查看扩展的位置
php -i | grep extension_dir

# 这里是这样的
extension_dir => /usr/lib/php/20220829 => /usr/lib/php/20220829
sqlite3.extension_dir => no value => no value- 安装 - 将 phpbolt.so 文件复制到该目录下。
# 在本地,将扩展文件放到映射的 code 目录下。方便移动。
cd /usr/lib/php/20220829
sudo mv ~/code/bolt.so ./- 修改 php.ini 文件,重新启动。
php -i |grep php.ini
# 输出
# Loaded Configuration File => /etc/php/8.2/cli/php.ini

# vim 打开 php.ini 文件
sudo vim /etc/php/8.2/cli/php.ini
# 移动到末尾
GG
# i 进入编辑模式,加入下边的配置
extension=bolt.so

# 保存退出
:wq

# 重启 php-fpm
sudo /etc/init.d/php8.2-fpm restart

# 查看扩展
php -m | grep bolt
通过 php -m | grep bolt 的确是可以看见 bolt 扩展的存在。但是呢,如果通过 http 服务,访问获取 bolt,是没有看到 bolt 的信息的。这个时候,使用 bolt 的函数就会报错。如下。
Call to undefined function bolt_decrypt() in其实, bolt 的扩展还没完。我们继续配置。
cd /etc/php/8.2/fpm/conf.d

sudo vim 20-bolt.ini

# 添加一下内容,保存退出
extension=bolt.so

# 重启
sudo /etc/init.d/php8.2-fpm restart
再看看 phpinfo 信息,这个时候就有了
安装和使用 Laravel-Source-Encrypter
扩展装好了,那么就要用在项目中。这里我新建一个新的 laravel 项目来搞。当前 laravel 版本是 laravel 10, php 版本是 8.2 。
composer create-project laravel/laravel bolt.com --prefer-dist

cd bolt.com
项目创建好了之后,就按照 https://github.com/SiavashBamshadnia/Laravel-Source-Encrypter 来就可以了。
最后,将打包好的文件(默认 encrypted 下的)替换掉之前的文件。
这样就可以了。
感觉还是蛮方便好用的。
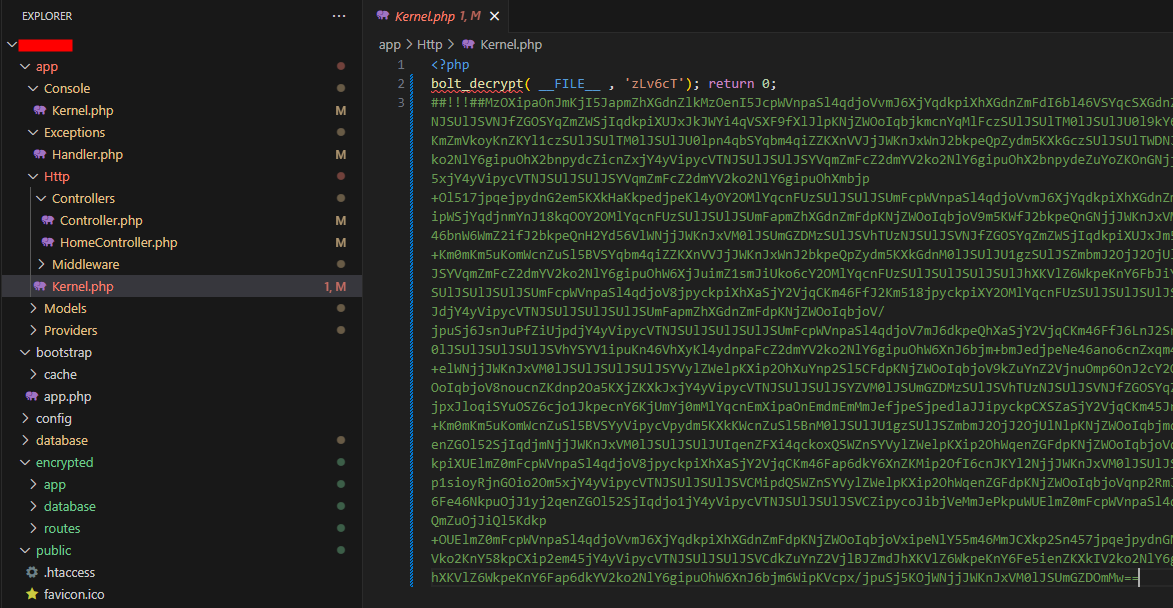
加密后的代码,如下边这样的。

将 web 项目打包成桌面应用程序是一种常见的方式。用到的工具有 electron 和 tauri 等。这里使用 tauri。
准备工作
- 安装配置 tarui 环境。 https://tauri.app/zh-cn/v1/guides/getting-started/prerequisites
- 准备一个 web 项目。
tauri 是可以从零开始创建项目,然后去完善项目的。但是,有的时候,项目已经完成了,这个时候,就需要在项目中加入 tauri。然后再构建打包了。
工作和学习中,多显示器同时工作的情况是常态。那么在多个显示器之间来回切换应用是个很有效率的操作。 win 系统,默认就有这样的快捷键。mac,默认没有,得自己设置一下。 ### 操作
https://zhuanlan.zhihu.com/p/657556266
https://support.apple.com/zh-cn/HT201236
按照上边这个文章讲的来就可以搞定了。记得填入的文字一定不能错。 我的设定是这样子的。
# 移动到视网膜显示器(macbook pro 我放在左边)
⇧ + ⌥ + ←
# 移动到外接显示器(外接显示器,我放在右边)
⇧ + ⌥ + →
# 全屏和退出全屏
⌃ + ⌘ + f
好,就这三个快捷键。
还是不够好啊。全屏状态下,快捷键失效是什么鬼。
最后
- 在多个显示器间移动应用程序,win 的体验比 mac 好太多了。
- 在单个显示器间切换桌面, mac 又比 win 好。
就这么明显的体验,官方咋就做不好呢。
用了 ts 的 vue3 项目,会经常遇到类型问题。组件问题也是类型问题的一种。这里简单总结一下写法。
组件类型声明
无论是第三方库,还是自定义组件,都可以通过这种方式来搞定。
这里分别以 element plus 中的组件和自定义组件为例。
# element plus 的 ElTable 组件
<template>
<el-table ref = "userTableRef">
    <el-table-column property="nickname" label="昵称" />
</el-table>
</template>

<script setup lang="ts">
import { ref } from 'vue'
import type { ElTable } from "element-plus";

const userTableRef = ref<InstanceType<typeof ElTable>>()
</script>
下边是自定义组件。
<template>
<MediaPlayer ref="mediaPlayer" />
</template>

<script setup lang="ts">
import { ref } from 'vue'
import MediaPlayer from '@/components/MediaPlayer/MediaPlayer.vue'

const mediaPlayer = ref<InstanceType<typeof MediaPlayer>>()
</script>
最后
定义好了类型后,代码提示就很友好了。
github 指定 ssh key。之所以会出现这个问题,是因为对于 github,只允许存在一份 ssh key。如果该 ssh key 绑定了 A 账号,B 账号则绑定不了。这个时候就需要再生成一份 ssh key,对新的 ssh key 进行绑定。但是,推送拉取代码的时候,默认是
~/.ssh/id_rsa。所以这个时候,特定的代码指定特定的 ssh key 就很有必要了。
解决问题
- 绑定 ssh key 时,出现 github Key is already in use 的问题。
- 多个 ssh key,特定项目指定特定的 ssh key 的问题。
先生成新的 ssh key
# 后边的参数 -f 指定生成 ssh key 对的名字
# 可以不加该参数,回车生成的时候,自己手动输入名字

ssh-keygen -t rsa -C email@email.com -f github

# 一直回车,干到生成为止,此时, `~/.ssh/` 下也许有好几份 ssh key 文件了
特定项目指定 ssh key
这个,在 config 中指定就可以。就像设置 user.name 和 user.email 一样。因为是特定项目使用特定的 ssh key。所以这个时候,不适合使用 --global 参数。
# ~/.ssh/github 这个对应生成的 ssh key 私钥文件
git config core.sshCommand "ssh -i ~/.ssh/github"

# 后边,再 git push 就会 ok 了
git remote add origin xxx
git push --set-upstream origin main
终点
到最后,就是这两个重要的命令。 生成 ssh key 对。进入项目目录,指定 ssh key。 ok 搞定。
# 生
ssh-keygen -t rsa -C email@email.com -f github

# 指
cd xxx
git config core.sshCommand "ssh -i ~/.ssh/github"在 ts 中,如果对一个接口对象的属性进行 delete 的话。该 delete 必须为可选属性。否则就会报
The operand of a 'delete' operator must be optional.错误。\
比如:
interface User {
    nickname: string
    gender: number
}

const user:User = {nickname: 'vini', gender: 1}

delete user['gender']

# 这个时候就会报错。只需将 User 接口的 gender 定义改为 下边这样即可

interface User {
    nickname: string
    gender?: number
}
在 strictNullChecks 中使用 delete 运算符时,操作数现在必须为 any、unknown、never 或为可选(因为它在类型中包含 undefined)。否则,使用 delete 运算符是错误的。
