下载一个 Creative Cloud Cleaner Tool 工具,就和方便清理掉 adobe 的各种缓存。比其他清理工具好用多了。一键搞定。然后就可以很方便的安装 adobe 全家桶了。缓存清理不干净,安装太伤人。
adobe 清理工具。
https://helpx.adobe.com/cn/creative-cloud/kb/cc-cleaner-tool-installation-problems.html
下载一个 Creative Cloud Cleaner Tool 工具,就和方便清理掉 adobe 的各种缓存。比其他清理工具好用多了。一键搞定。然后就可以很方便的安装 adobe 全家桶了。缓存清理不干净,安装太伤人。
adobe 清理工具。
https://helpx.adobe.com/cn/creative-cloud/kb/cc-cleaner-tool-installation-problems.html
在某些场景中,css 的遮罩真的很好用。小程序也可以用。如其名,遮罩就是遮住的地方才能罩得住,才能显示出来。adobe 的 flash 和 ps 也是这样提现的。
https://developer.mozilla.org/zh-CN/docs/Web/CSS/mask-image
如下图,用户的头像是个六边形区域。如果用传统 css 实现六边形的裁切,很难实现这样好的效果。这个不仅有 border,边边交接处还有圆角,看起来更圆润。这个时候,遮罩就能很好的实现。只要用图中所示的区域的 png 图片作为遮罩来对目标图片进行遮罩处理就可以很好的实现。border 可以通过嵌套和内层 margin 来实现。

css 实现渐变边框
<div class="box">无圆角的渐变边框</div>
.box {
  border: 4px solid;
  border-image-source: linear-gradient(to right, #8f41e9, #578aef);
  border-image-slice: 1;
}
这种方式最简洁简单。唯一缺点就是无圆角。
一般人能想到的是使用一个渐变色背景。然后里边套一层 div,设置 div 的背景色。同时设置外层和里层的圆角。这个有两个缺点。一个是多套了一层,另外一个就是圆角不一定能把握的住,不一定非常完美融合。
还有一种方式实现,分别设置 background-clip、background-origin、background-image 这三个属性,每个属性设置两组值,第一组用于设置border内的单色背景,第二组用于设置border上的渐变色。
.box {
  border: 4px solid transparent;
  border-radius: 16px;
  background-clip: padding-box, border-box;
  background-origin: padding-box, border-box;
  background-image: linear-gradient(to right, #222, #222), linear-gradient(90deg, #8F41E9, #578AEF);
}分析 app 接口数据,对 app 请求进行抓包是必要的一步。比如想做一个自动抢票系统,在对方没有提供 api 给予抢票时,就得需要自己去抓包分析请求。虽然这样不一定能成功,却是要走的一步。charles 是一个很不错的抓包工具,是一个付费工具。利用 charles 进行抓包需要走一下几步。
上边这些做好之后,手机端运行程序发起的 https 请求, mac 端的 charles 都能抓取到。可是在查看数据时,发现都是乱码。不是乱码更好了。如果是乱码,就处理处理。
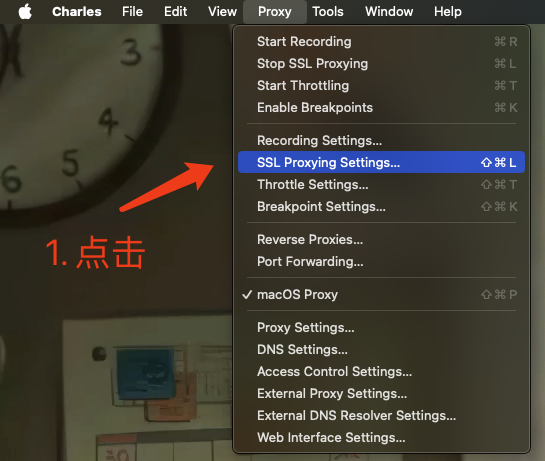
依次点击顶部菜单。 Proxy->SSL Proxying Settings.

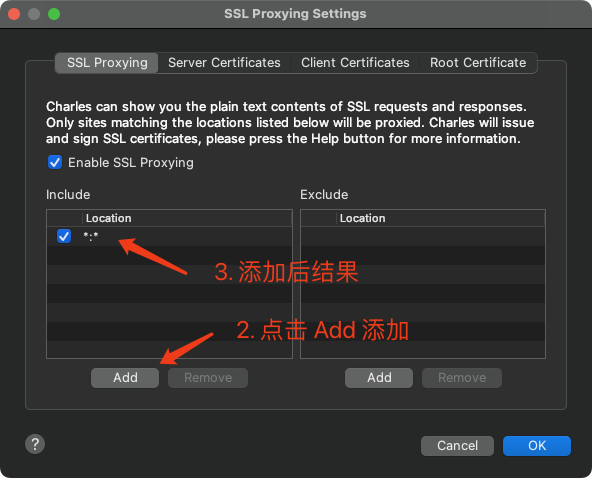
Enable SSL Proxying 打勾,并且添加 include 配置。这里可以添加 :。允许所有的域名和端口号。这样设置之后,乱码应该就没了。至少我是没了。

vite 构建的 ts 项目中,Could not find a declaration file for module 错误处理
vite 构建的 ts 项目中,引用某些库时,遇到 Could not find a declaration file for module 的错误提示。手动在 env.d.ts 中添加一下就可以。如:
/// <reference types="vite/client" />
declare module 'element-plus/dist/locale/zh-cn.mjs'
declare module 'element-plus/dist/locale/en.mjs'
declare module 'element-plus/dist/locale/ja.mjs'
declare module 'simple-peer/simplepeer.min.js'| 行为 | 命令 |
|---|---|
| 给自己发消息 | socket.emit('message', '这是一条给自己的消息'); |
| 给所有人发消息 | io.emit('message', '这是一条消息'); |
| 给除自己之外的人发消息 | socket.broadcast.emit('message', '这是一条消息,但不发送给自己'); |
| 给房间里的人发消息 | io.to('roomName').emit('message', '这是一条仅房间内用户可见的消息'); |
| 给房间里除了自己之外的人发消息 | socket.broadcast.to('roomName').emit('message', '这是一条仅房间内其他用户可见的消息'); |
| 加入房间 | socket.join('roomName') |
| 离开房间 | socket.leave('roomName') |
在 vite 环境下,安装使用 simple-peer,报错 global is not defined 处理。
解决方法: https://github.com/feross/simple-peer/issues/883
这样引入就可以了:
import SimplePeer from 'simple-peer/simplepeer.min.js'如果遇到 Could not find a declaration file for module 'simple-peer/simplepeer.min.js'. 错误。可以在 env.d.ts 中增加定义就可以。
env.d.ts
declare module 'simple-peer/simplepeer.min.js'有就编辑,没有就创建 .vimrc 文件
vim ~/.vimrc增加以下配置。
set encoding=utf-8
set fileencodings=utf-8,gbk,gb2312,gb18030,cp936,latin1
set termencoding=utf-8
使得生效
source ~/.vimrc原文: https://community.uwa4d.com/blog/detail?id=1638476203938906113
本文我想写一下,一款游戏上线前需要做哪些事情,以保证项目上线后的稳定性。若你们公司之前没有大DAU游戏上线和运维经验,现在准备上线一款新游戏,可以按照这个RoadMap去做或者检查一遍自己游戏的上线准备工作。
本文不会写具体的操作,只是提供一个RoadMap,具体如何做大家可以自行查找相关文档。
所有的工作,都会存在一个工作量和收益的权衡。一般来说,对于大部分游戏,不需要做到100w以上的同时在线,也不需要做到100%的可用性。具体工作做到哪一步,项目根据自己的情况权衡即可,我在文中会介绍需要重点关注的地方。
这些工作,至少需要提前6个月以上的时间准备,至少需要一个资深服务端和一个靠谱的执行服务端。